
If you want a make-ahead dessert that still feels special, chocolate-covered strawberries are hard to beat. They taste like a fancy gift shop treat, but the process is quick and doable with basic tools. In under an hour, you’ll turn fresh berries and good chocolate into something glossy, crisp, and celebratory.
This version keeps the steps simple and mess low, while sharing the small details that prevent streaky chocolate or soggy fruit. Expect a snappy shell and a cool, juicy center; that contrast is the whole point. You’ll see chocolate-covered strawberries everywhere around Valentine’s Day, but they also work for anniversaries, birthdays, or a low-effort finish to a steak-and-salad date night. Newer cooks and busy parents will appreciate the minimal prep and cleanup.
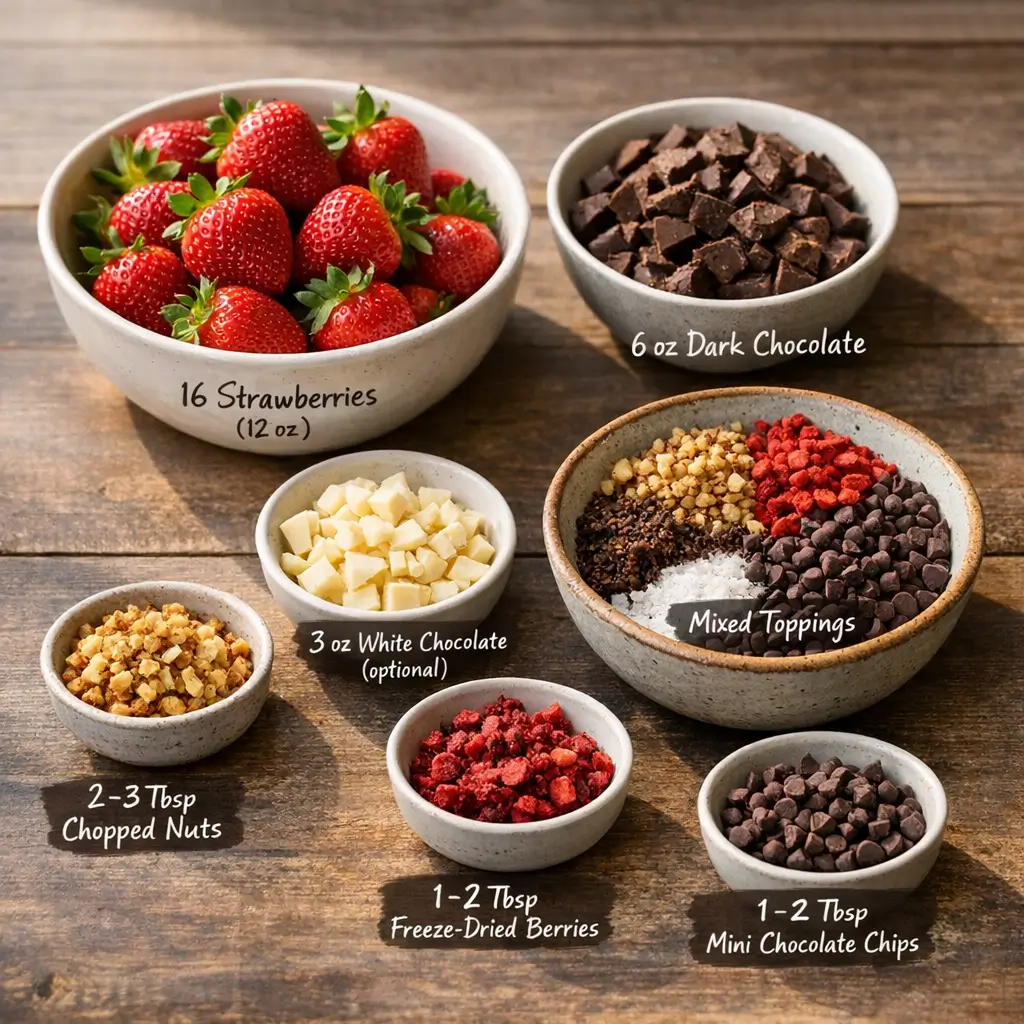
INGREDIENTS: Chocolate-Covered Strawberries
- 16 medium strawberries (about 12 oz / 340 g), stems on — room temperature and completely dry
- 6 oz (170 g) semisweet or dark chocolate, chopped — bar chocolate melts more smoothly than chips
- Use milk chocolate for a sweeter result.
- 3 oz (85 g) white chocolate, chopped (optional) — for drizzling or contrasting dips
- If white chocolate feels thick, stir in 1/2–1 tsp (2–5 mL) refined coconut oil or vegetable shortening to loosen.
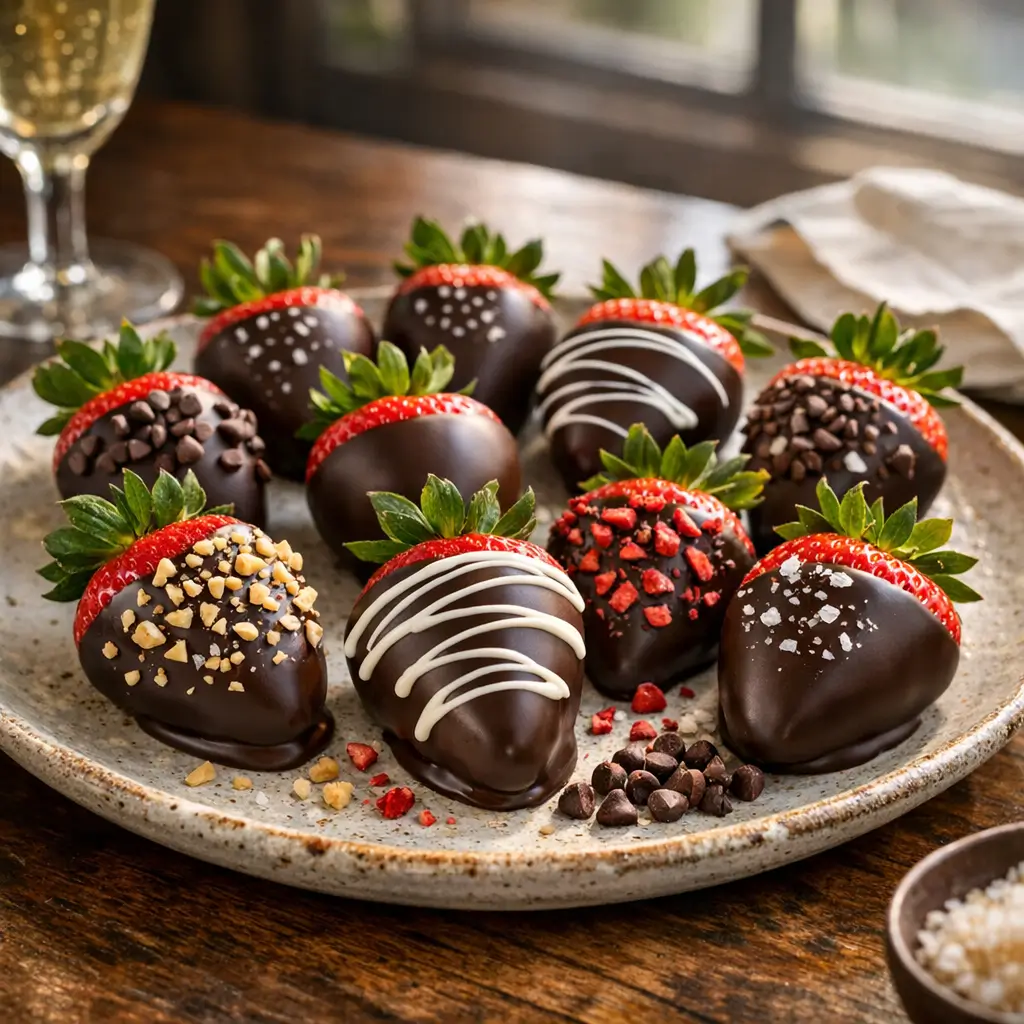
- Optional coatings (choose a couple): 2–3 Tbsp (20–30 g) finely chopped nuts, 1–2 Tbsp (5–10 g) crushed freeze-dried strawberries, 1–2 Tbsp (10–20 g) mini chocolate chips, or a pinch of flaky sea salt
Notes:
- The strawberries must be bone-dry; even a drop of water can seize chocolate.
- Keeping the green leaves attached gives you a built-in handle and nice presentation.
STEP-BY-STEP INSTRUCTIONS
- Prepare the berries.
- Rinse quickly under cool water, then lay out on a clean towel. Pat every side dry and air-dry 10–15 minutes. Any moisture invites chocolate seizing or sliding.
- Bring berries to room temperature so the coating sets more evenly and tastes less waxy.
- Line a tray.
- Cover a baking sheet with parchment or wax paper. This prevents sticking and helps the bottoms release cleanly.
- Melt the dark chocolate.
- Double-boiler method: Place the chopped chocolate in a dry, heatproof bowl set over a pot with 1–2 inches of barely simmering water. The bowl should not touch the water. Stir gently until smooth, then remove from heat.
- Microwave method: Heat the chocolate in a microwave-safe bowl at 50% power for 30 seconds. Stir well. Continue in 15–20 second bursts at 50% power, stirring between each, until just melted and smooth. Avoid full power to prevent scorching.
- Optional “seed” step for better snap and sheen: Reserve about one-quarter of the chopped chocolate. Melt the remaining three-quarters as above, then off heat stir in the reserved chocolate until fully melted and smooth.
- Melt the white chocolate (if using).
- Use the same method, in a separate dry bowl. If it seems thick, stir in 1/2–1 teaspoon refined coconut oil or vegetable shortening. White chocolate burns fast; warm it gently and stir often.
- Dip the strawberries.
- Hold a berry by the stem/leaves and dip into the dark chocolate, submerging almost to the leaves. Lift, then give a small twist and gentle shake so excess drips back into the bowl. Lightly swipe the bottom edge against the bowl rim to prevent a large “foot” of pooled chocolate.
- Set on the lined tray. Repeat, spacing berries so they do not touch.
- Add toppings or a drizzle.
- For coatings like nuts or freeze-dried strawberry crumbs, sprinkle them on right after dipping while the chocolate is still wet.
- For a contrasting drizzle, let the dark chocolate set slightly first. Then use a fork dipped in melted white chocolate, or spoon it into a small zip-top bag and snip a tiny corner for thin lines.
- Let the chocolate set.
- Room temperature: 25–35 minutes, depending on kitchen warmth.
- Speedy option: Chill the tray 10–15 minutes to firm the coating, then return to room temperature. Longer refrigeration can cause condensation (“sweating”) later.
- Serve or store.
- The best texture is within a few hours of dipping. If holding for later, see Serving and Storage for options and trade-offs.
Safeguards for beginners:
- Keep bowls and utensils bone-dry. One droplet of water can make chocolate grainy.
- Work with small bowls of chocolate and rewarm gently if it thickens. Overheating leads to dull, streaky coatings.
- Don’t rush drying the berries. Damp fruit is the number one cause of sliding or patchy shells.
WHAT TO EXPECT
- Texture: A firm but yielding shell. If you “seeded” the chocolate, expect more snap and gloss. Without it, the set may be softer with the chance of harmless white streaks (bloom) over time.
- Flavor: Semisweet chocolate gives balance against the berries’ tartness. Milk chocolate tastes creamier and sweeter. A white chocolate drizzle adds milky sweetness; a pinch of flaky salt sharpens flavors.
- Variability: Room temperature, chocolate brand, and strawberry size affect set time and coating thickness. Chips often melt thicker than chopped bars, so lines may look heavier if using chips.
WAYS TO CHANGE IT UP
-
Plant-based or dairy-free.
-
Use a dairy-free dark chocolate labeled vegan. Many brands offer 50–70% cacao bars that melt smoothly. For the drizzle, choose a plant-based white chocolate or skip the drizzle and finish with freeze-dried strawberry powder for contrast.
-
Trade-off: Some dairy-free bars set a little softer; keep portions small and enjoy the day they’re made.
-
Spicier, saltier, or more indulgent.
-
Stir a small pinch of ground chili, cayenne, or cinnamon into the melted dark chocolate. Or finish dipped berries with a tiny sprinkle of flaky sea salt.
-
Trade-off: Spices mute slightly as the chocolate cools, so taste and adjust while melted. Salt should be barely visible—too much will draw moisture.
-
Faster, cozier “fondue” night.
-
Skip the set-and-serve model and go for a warm marbled ganache dip at the table: pour hot cream over bowls of chopped dark and white chocolate, whisk each, then swirl together for dipping. It’s plush and immediate, but not portable and won’t “set” like classic shells.
-
Extra crunch.
-
Roll freshly dipped berries in toasted chopped almonds, pistachios, or cacao nibs. The coating clings best right after dipping.
-
Kid-friendly decorations.
-
Let kids drizzle with contrasting chocolate and add sprinkles. Keep decorations light so the shells don’t crack when you bite in.
SERVING AND STORAGE
- How to serve: Arrange on a platter with space between pieces so they don’t smudge. For a plated dessert, pair two or three berries with a scoop of vanilla ice cream or a dollop of whipped cream.
- What pairs well: Coffee, black tea, or a glass of bubbly all highlight the chocolate. For nonalcoholic sparkle, try chilled seltzer with a twist of citrus.
- Timing: Make the same day for the best snap and fruit texture. If your kitchen is cool and dry, you can hold them at room temperature for up to 6–8 hours.
- Short-term storage: For longer holds, refrigerate up to 24–48 hours. Line a container with paper towel, add a sheet of parchment, then arrange berries in a single layer. Cover loosely to avoid trapping moisture. Expect slight condensation after chilling; let them sit, uncovered, at room temperature 15–20 minutes before serving so surface moisture can evaporate.
- Freezing isn’t recommended: Frozen and thawed berries leak juice and soften the shell. If you must freeze, use it for smoothie prep—not for nice-looking treats later.
CULTURAL CONTEXT
Chocolate and romance have been linked in European and American culture for centuries, and exchanging sweets on February 14th became common as Valentine cards and gifts grew popular. For a concise overview of the holiday’s evolution—from medieval references to mass-produced cards—see the Library of Congress “Today in History” entry for February 14 (Library of Congress). For chocolate’s deeper backstory, including its Mesoamerican roots as a ceremonial drink long before it became a confection, the Smithsonian provides an accessible history (Smithsonian Magazine).
COMMON QUESTIONS AND TROUBLESHOOTING
-
My coating looks dull or has faint white streaks. What happened?
-
That’s likely fat bloom, often from overheating or from storing in a warm or humid spot. It’s harmless but not shiny. Melt gently, avoid steam, and if you want extra gloss, use the optional seeding method. Keep finished berries cool and dry.
-
The chocolate slid off some berries.
-
Residual moisture is usually the culprit. Dry berries thoroughly, including the crevices near the stem. Also check that the chocolate isn’t too hot; overheated chocolate turns thin and runs.
-
Can I use chocolate chips?
-
Yes, with caveats. Chips contain stabilizers that make them melt thicker. If that’s what you have, chop them a bit finer and consider thinning with 1/2 teaspoon neutral oil (for white chocolate, coconut oil or shortening works well). Bar chocolate melts and sets more cleanly.
-
How far ahead can I make these?
-
For the best texture, make the day you plan to serve. If needed, dip in the evening for the next day. Store refrigerated as described above, and expect some condensation when you bring them out.
-
My strawberries are huge/small—does timing change?
-
Larger berries hold more cold and take longer to set; give them a few extra minutes. With tiny berries, dip quickly and set them apart so they don’t topple or build large “feet” of chocolate.
-
Can I use frozen strawberries?
-
Not recommended for this style. Thawed berries release lots of moisture and won’t hold a clean chocolate shell. Save frozen fruit for smoothies or sauces.
-
Why did the bottoms puddle into big “feet” of chocolate?
-
Too much excess chocolate clung to the berry. After dipping, gently scrape the bottom against the bowl lip and give one small shake before setting on the parchment.
-
Is tempering required?
-
No. You’ll still get delicious results without full tempering. If you want more snap and shine with minimal fuss, the simple “seed” step (stirring in a handful of unmelted chopped chocolate after melting) helps.
CONCLUSION
Chocolate-covered strawberries reward a few careful minutes with an elegant finish to dinner—or a thoughtful DIY gift. If you try this version, leave a comment with how many you made, any toppings you loved, and what tweaks worked in your kitchen. Your notes help other home cooks plan with confidence.
Leave a Reply