
Classic mac and cheese is one of those sides that quietly steals the show at a summer cookout. It’s familiar, kid‑friendly, and feels right at home next to grilled burgers, ribs, or hot dogs. This version leans on a simple stovetop cheese sauce and a quick bake to give you a golden, crisp top and creamy center.
If you’re rushing to a backyard barbecue after work, start by boiling the pasta and shredding the cheese; those two steps make the rest feel easy. Hosting with a small kitchen? Mix the sauce in the same pot you used for the pasta to cut down on dishes.
The flavor skews toward sharp, savory cheddar with a mild creaminess rather than a heavy, gooey casserole. It’s rich enough to feel special but not so heavy that it competes with grilled mains. This mac and cheese suits newer cooks who want something reliable, as well as more experienced cooks who like a straightforward base they can adapt.
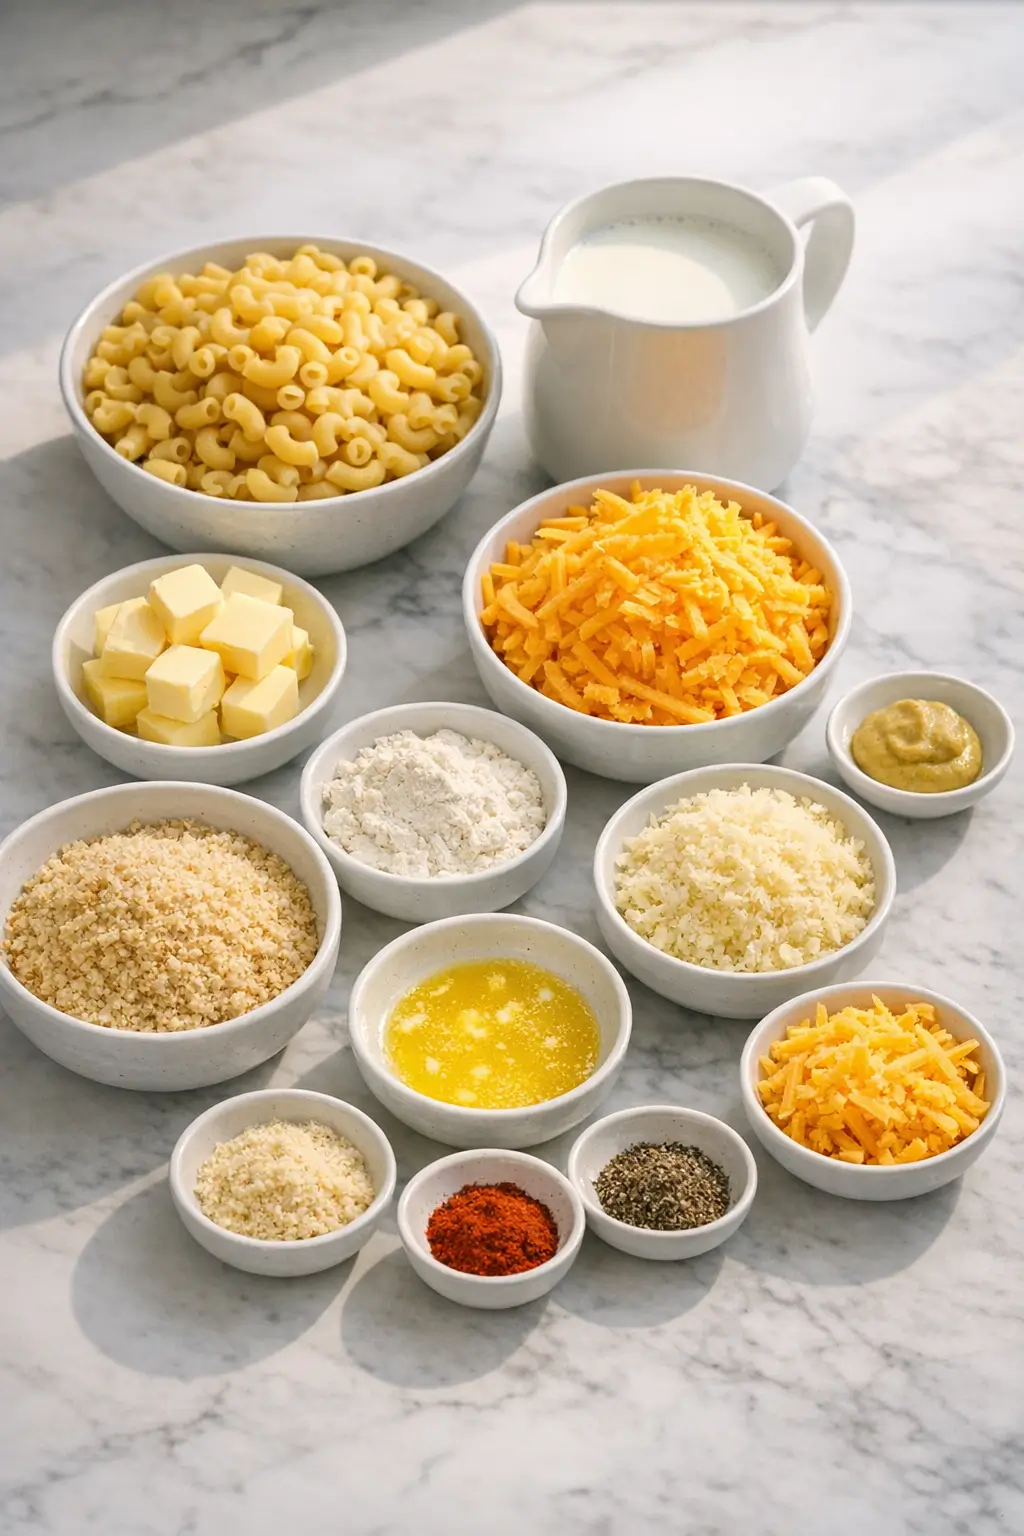
Ingredients
Serves 4 as a generous side, or 2 as a main
- 200 g (about 7 oz) dried elbow macaroni – or other short pasta like shells or cavatappi
- 30 g (2 tbsp) unsalted butter
- 20 g (2 tbsp) all-purpose flour – for thickening the sauce
- 480 ml (2 cups) whole milk – 2% milk also works, but whole gives better body
- 150 g (1 1/2 cups) sharp cheddar cheese, freshly grated – divided; use most in the sauce, reserve a small handful for topping
- 30 g (1/4 cup) grated Parmesan cheese – adds a salty, nutty edge
- 1/2 tsp fine sea salt, plus more for the pasta water
- 1/4 tsp freshly ground black pepper
- 1/2 tsp Dijon mustard – optional but brightens the cheese flavor (or 1/4 tsp dry mustard)
- 1/4 tsp sweet paprika – optional, for gentle warmth and color
For the crunchy topping:
- 25 g (1/2 cup) dry breadcrumbs – plain or panko
- 15 g (1 tbsp) melted unsalted butter
- Reserved small handful of grated cheddar (from above)
Kitchen note: Weighing the pasta if possible helps keep the sauce-to-pasta ratio right. Too much pasta leads to dry mac and cheese, especially once it bakes.
Step-by-Step Instructions for Classic Mac and Cheese
- Boil the pasta.
- Bring a large pot of well-salted water to a boil (it should taste pleasantly salty).
- Add the elbow macaroni and cook until just shy of al dente; usually 1–2 minutes less than the package suggests.
- Drain in a colander and let it sit while you make the sauce. Do not rinse.
- Prep your baking dish and oven.
- Heat the oven to 190°C / 375°F.
- Lightly butter a small baking dish, about 20 cm (8 inches) square or similar.
- This size keeps the layer of mac and cheese moderate so the center heats through without drying out the edges.
- Make the roux (butter and flour base).
- In the same pot you used for the pasta, melt 30 g (2 tbsp) butter over medium heat.
- Sprinkle in 20 g (2 tbsp) flour and whisk continuously for 1–2 minutes.
- You’re looking for a smooth, foamy paste that smells slightly nutty, not raw.
Kitchen note: If you see visible lumps of flour or smell raw flour after 2 minutes, keep whisking over medium heat. A well-cooked roux prevents grainy or pasty sauce later.
- Add the milk gradually.
- Still over medium heat, slowly pour in about 1/4 of the 480 ml (2 cups) milk, whisking as you go.
- Once the mixture looks smooth and thick, add another 1/4 of the milk.
- Continue until all the milk is in and the sauce is smooth.
- Keep simmering and whisking for 4–6 minutes, until the sauce gently bubbles and thickens enough to coat the back of a spoon.
- Season the sauce.
- Turn the heat to low.
- Whisk in 1/2 tsp salt, 1/4 tsp pepper, 1/2 tsp Dijon mustard, and 1/4 tsp paprika if using.
- Taste the sauce; it should already be pleasantly seasoned. Remember the cheese and pasta will dilute the salt slightly.
- Melt in the cheeses.
- With the heat still on low, add about 120 g (1 cup) of the grated cheddar and 30 g (1/4 cup) Parmesan, a small handful at a time.
- Whisk or stir after each addition until melted and smooth before adding more.
- When all the cheese has melted, you should have a thick, glossy cheese sauce that slowly runs off the spoon.
Kitchen note: If the sauce looks oily or starts to separate, take the pot off the heat and whisk in a tablespoon or two of cold milk. Gentle heat and steady whisking usually bring it back together.
- Combine pasta and cheese sauce.
- Add the drained macaroni to the cheese sauce.
- Use a spatula or wooden spoon to fold until every piece is coated and there’s still a bit of loose sauce in the pot.
- If the mixture looks very stiff, add 1–2 tbsp extra milk to loosen it. It will thicken more in the oven.
- Transfer to the baking dish.
- Scrape the mac and cheese into the prepared baking dish.
- Smooth the top lightly, but don’t pack it down; a bit of texture gives the topping nooks to crisp up.
- Make the breadcrumb topping.
- In a small bowl, combine 25 g (1/2 cup) breadcrumbs with 15 g (1 tbsp) melted butter.
- Stir until the crumbs look evenly moistened.
- Sprinkle the buttered crumbs evenly over the mac and cheese.
- Top with the reserved small handful of cheddar.
- Bake until golden and bubbling.
- Place the dish on the middle rack.
- Bake for 18–22 minutes, until the edges are bubbling and the top is a deep golden color.
- If the top is still pale at 18 minutes, give it a few more minutes, or briefly switch to the broiler for 1–2 minutes, watching closely.
Kitchen note: For summer gatherings, you can bake this earlier in the day until just set (slightly paler), then reheat covered at 160°C / 325°F for 10–15 minutes and uncover for the final 5 minutes to crisp the top again.
- Rest, then serve.
- Let the mac and cheese rest for at least 5–10 minutes before serving.
- This short rest allows the sauce to thicken slightly so the scoops hold together instead of running.
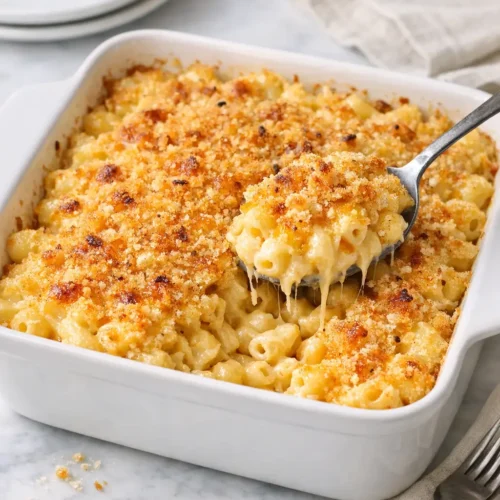
What to Expect
This classic mac and cheese bakes up with a lightly crisp, buttery breadcrumb crust and a creamy, spoonable interior. You should see defined pieces of pasta coated in sauce, not a stiff block.
The dominant flavor is sharp cheddar, backed by the slightly salty Parmesan and a subtle tang from the mustard. Paprika stays in the background, mostly adding color and a gentle warmth.
If you use whole milk and freshly grated cheese, the sauce will feel richer and smoother than if you use pre-shredded cheese and low-fat milk. Glass and ceramic baking dishes usually yield slightly softer edges, while metal pans can brown the bottom and sides more quickly.
Kitchen note: If the finished mac and cheese seems a touch dry around the edges, stir in a splash of hot milk or cream right after baking, then let it rest; this often revives the texture without making the center soupy.
Ways to Change It Up
- Vegetarian-friendly add-ins.
- The base recipe is already meat-free, but you can add more substance with vegetables.
- Fold in 1 cup of lightly roasted or grilled vegetables such as cherry tomatoes, zucchini, or corn kernels before baking.
- Just keep them fairly dry (not saucy) so they don’t water down the cheese sauce.
- Spicier version for heat lovers.
- Stir 1–2 tsp of finely chopped pickled jalapeños or a pinch of cayenne pepper into the cheese sauce.
- Smoked paprika or a bit of chipotle powder works well for outdoor cookouts because the smoky flavor echoes grilled meats.
- Keep in mind that small children and heat-sensitive guests may prefer a portion from a less-spicy corner of the dish.
- Milder and extra-creamy.
- Swap half of the sharp cheddar for mild cheddar or Monterey Jack to soften the flavor.
- You can also add 60 g (1/4 cup) of cream cheese to the sauce, letting it melt fully before adding the shredded cheeses.
- The trade-off is a slightly looser, richer sauce that may not slice as cleanly once cooled, but it’s very forgiving for reheating.
- Quicker stovetop-only option.
- For very hot days when you want to avoid turning on the oven, skip the baking step and serve straight from the pot.
- After combining the pasta and sauce, thin with a splash of hot milk if needed and serve immediately.
- You lose the crisp breadcrumb topping, but you gain speed and keep the kitchen cooler.
Serving and Storage
In a summer setting, this mac and cheese fits comfortably alongside grilled chicken, burgers, hot dogs, ribs, or vegetable skewers. It also pairs well with crunchy salads—think coleslaw, green salads with a sharp vinaigrette, or sliced tomatoes with a bit of salt and olive oil.
For potlucks or picnics, bake it in a travel-friendly dish and wrap it in a clean towel to keep warm on the way. Once you arrive, keep it out of direct sun and serve within 2 hours for food safety.
Leftovers keep well chilled in an airtight container for 3–4 days. To reheat, add a spoonful of milk per portion and warm gently on the stovetop over low heat, or cover and heat in the microwave in short bursts, stirring between each.
If you’d like to freeze it, cool the baked mac and cheese completely, then wrap the entire dish well or portion into freezer containers. Freeze for up to 2 months. Thaw overnight in the refrigerator before reheating covered at 160°C / 325°F until hot in the center.

Cultural Context
Macaroni and cheese in its current form—baked pasta in a creamy cheese sauce—has roots in European cooking, particularly dishes that used béchamel-based sauces enriched with cheese, like Mornay sauce. Over time, this combination of pasta and cheese traveled and evolved in North America, appearing in both home cooking and commercial boxed forms.
In the United States, mac and cheese now appears in many regional styles, from simple stovetop versions to baked casseroles served at holidays, barbecues, and community gatherings. For a concise overview of the sauce tradition that underpins this dish, see this entry on Mornay sauce from an encyclopedia of classic sauces: Mornay sauce and its béchamel base.
The idea of combining noodles with cheese also appears in other food traditions. For example, Ashkenazi Jewish cooking includes lokshen mit kaese, a noodle dish sometimes referred to as a kind of “Jewish mac and cheese”; you can read more about that dish and its history here: lokshen mit kaese.
Common Questions and Troubleshooting
Why did my sauce turn grainy or feel sandy?
Graininess often comes from either undercooked flour in the roux or cheese that overheated and separated. Make sure to cook the butter and flour together for at least 1–2 minutes before adding milk. Then keep the heat at medium or below when melting the cheese, and avoid using very low-quality pre-shredded cheese mixes that may contain a lot of anti-caking agents.
How can I keep mac and cheese creamy when serving it at a long cookout?
For longer events, slightly underbake the dish initially so the center stays looser. Keep it covered with foil and set on a warm-but-not-hot part of a grill or on a low-heat warming element, checking every 20–30 minutes. If it thickens too much, gently stir in a splash of hot milk or cream just before serving.
Can I use pre-shredded cheese instead of grating my own?
Pre-shredded cheese will technically work, but the starches added to prevent clumping can make the sauce a bit thicker and sometimes less smooth. If you use it, add the cheese gradually and be prepared to thin the sauce with an extra few tablespoons of milk.
What if I only have low-fat milk?
You can use 1% or 2% milk, but expect a slightly thinner, less rich sauce. To help compensate, you might add an extra 30 g (1/4 cup) of cheese or a tablespoon of butter. Keep a close eye on the thickness as it cooks; low-fat milk can take a little longer to reduce.
How do I avoid overcooking the pasta when I have to bake it too?
The key is to boil the pasta just until it’s nearly al dente, with a firm center. That way, it finishes cooking in the oven without turning mushy. Aim for 1–2 minutes less than the package time, and taste a piece rather than relying only on the clock.
Is it safe to leave mac and cheese out during a party?
In warm weather, try not to leave it at room temperature for more than 2 hours (or 1 hour if it’s very hot outside). After that, refrigerate any leftovers promptly. When in doubt, it’s better to chill and reheat than to risk foodborne illness.
Kitchen note: For large gatherings, consider baking two smaller dishes instead of one deep one. Shallow dishes reheat more evenly and are easier to keep at a safe, warm temperature without drying out.
Conclusion
Classic mac and cheese works well as a summer side because it’s familiar, flexible, and easy to transport. A simple cheese sauce, thoughtfully seasoned and baked with a crisp topping, gives you a dish that fits in alongside grilled mains without much extra effort.
If you make this version, I’d appreciate hearing how it fits into your cookout lineup—what you served it with, whether you added heat or vegetables, or how you adjusted it for your crowd. Share your notes, questions, and ratings so other home cooks can benefit from your experience too.
Classic Mac and Cheese Summer Side Dish
Equipment
- Large pot
- Colander
- Whisk
- Small baking dish (about 20 cm / 8-inch square)
- Small bowl
- Spatula or wooden spoon
Ingredients
Mac and cheese
- 200 g dried elbow macaroni or other short pasta like shells or cavatappi
- 30 g unsalted butter
- 20 g all-purpose flour for thickening the sauce
- 480 ml whole milk 2% milk also works
- 150 g sharp cheddar cheese freshly grated, divided; reserve a small handful for topping
- 30 g grated Parmesan cheese
- 1/2 tsp fine sea salt plus more for the pasta water
- 1/4 tsp freshly ground black pepper
- 1/2 tsp Dijon mustard optional (or 1/4 tsp dry mustard)
- 1/4 tsp sweet paprika optional
Crunchy topping
- 25 g dry breadcrumbs plain or panko
- 15 g unsalted butter melted
- reserved grated cheddar small handful (from above)
Instructions
- Boil the pasta: Bring a large pot of well-salted water to a boil. Add the elbow macaroni and cook until just shy of al dente (about 1–2 minutes less than package directions). Drain in a colander and let sit while you make the sauce; do not rinse.
- Prep your baking dish and oven: Heat the oven to 190°C / 375°F. Lightly butter a small baking dish, about 20 cm (8 inches) square or similar.
- Make the roux: In the same pot used for the pasta, melt the butter over medium heat. Sprinkle in the flour and whisk continuously for 1–2 minutes until smooth and foamy and the flour smells slightly nutty.
- Add the milk gradually: Slowly whisk in about 1/4 of the milk. When smooth and thickened, add another 1/4. Continue until all milk is added, then simmer and whisk 4–6 minutes until the sauce gently bubbles and thickens enough to coat the back of a spoon.
- Season the sauce: Reduce heat to low and whisk in salt, pepper, Dijon mustard (if using), and paprika (if using). Taste and adjust seasoning.
- Melt in the cheeses: On low heat, add most of the grated cheddar and the Parmesan a handful at a time, stirring until each addition melts smooth before adding more, until the sauce is thick and glossy.
- Combine pasta and cheese sauce: Add drained macaroni and fold until evenly coated. If the mixture looks stiff, add 1–2 tablespoons extra milk to loosen (it will thicken in the oven).
- Transfer to the baking dish: Scrape into the prepared dish and smooth the top lightly without packing it down.
- Make the breadcrumb topping: In a small bowl, mix breadcrumbs with melted butter until evenly moistened. Sprinkle over the mac and cheese and top with the reserved handful of cheddar.
- Bake until golden and bubbling: Bake on the middle rack for 18–22 minutes, until the edges bubble and the top is deep golden. If needed, bake a few minutes more or broil 1–2 minutes, watching closely.
- Rest, then serve: Let rest 5–10 minutes before serving so the sauce thickens slightly and portions hold together.
Leave a Reply