
You can make Irish Cheddar-Scallion Soda Farls from pantry basics in the time it takes to heat a skillet. This Northern Irish griddle bread cooks in quarters for crisp edges and a tender, steamy crumb. The sharp cheddar melts into salty pockets while scallions add freshness. If you need a bread fix on a busy weeknight, this is a fast, satisfying option that loves soup and salad alike.
Reader check-in: short on time? Measure flour, soda, and salt first, and preheat the pan while you grate the cheese. Cooking with kids nearby? Remind them this dough comes together fast—once liquid hits flour, you’re headed straight to the stove.
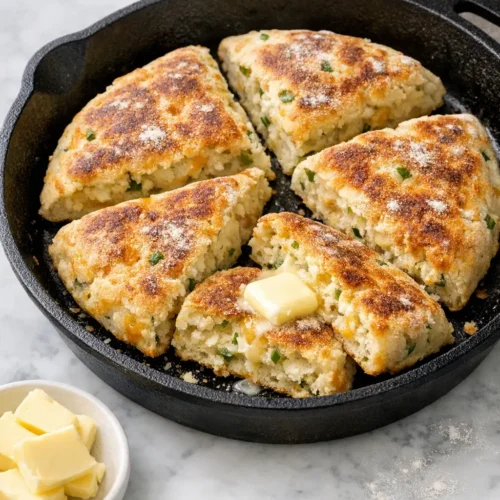
Expect a rustic look, a warm crumb, and best flavor right off the pan. Serve with butter and let the heat do the melting.
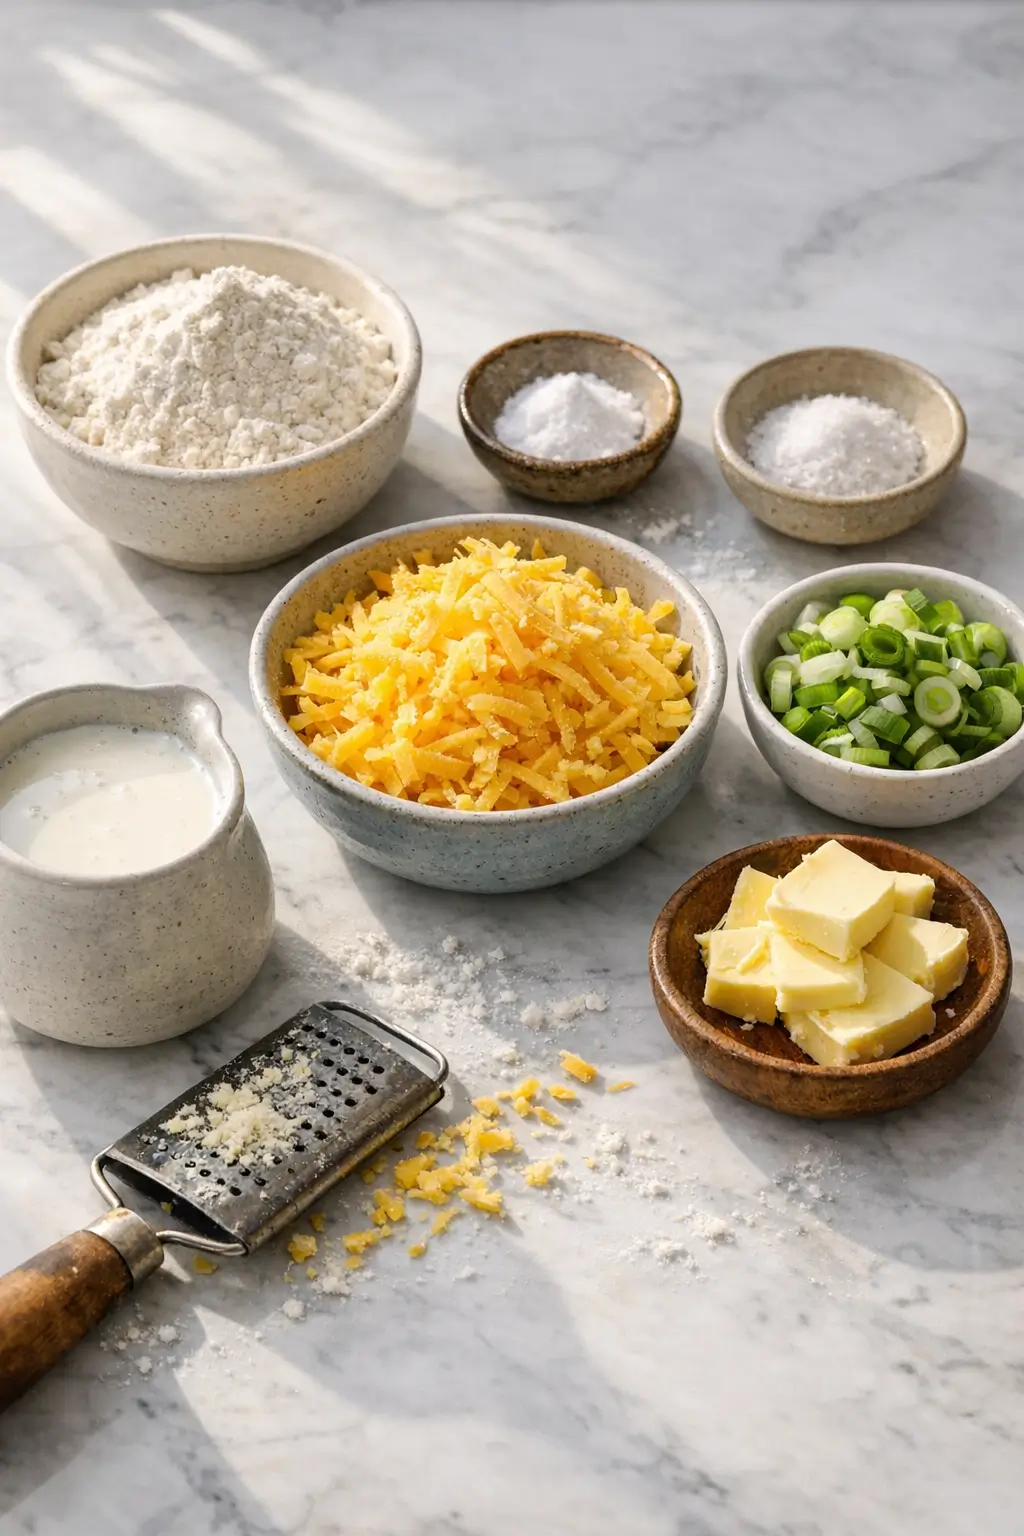
Ingredients
- 260 g (2 cups) all-purpose/plain flour, plus extra for dusting the counter and skillet — structure
- 1 tsp baking soda (bread soda) — lift from buttermilk’s acidity
- 1/2 tsp fine sea salt — seasons dough and balances cheddar
- 235 ml (1 cup) cold buttermilk, plus 1–2 tbsp if needed — moisture and tang; acidity activates soda
- 100 g (about 1 cup loosely packed / 3.5 oz) sharp cheddar, coarsely grated — savory pockets
- 2–3 scallions/spring onions, thinly sliced (about 1/2 cup) — fresh bite
- Soft unsalted butter, for serving
Substitutions:
- No buttermilk? Stir 1 tbsp lemon juice or white vinegar into 235 ml (1 cup) milk; rest 10 minutes. Or thin 2/3 cup plain yogurt with 1/3 cup water to reach 1 cup.
- Cheddar swap: any sharp aged cheese that grates well (Irish cheddar, Dubliner, or mature white cheddar). Avoid extra-wet cheeses.
- All-purpose flour can take 25–50% whole-wheat flour; add an extra 1–3 tbsp buttermilk if dough feels dry.
Kitchen note: Use baking soda (bicarbonate of soda), not baking powder. Too much soda or too little acid can create a bitter, soapy flavor—measure level teaspoons and mix-cook promptly.
Step-by-Step Instructions for Irish Cheddar-Scallion Soda Farls
-
Preheat the skillet. Set a heavy 10–12 inch cast-iron or heavy nonstick skillet over medium-low heat for 3–5 minutes. You want a steady, gentle heat—not a searing pan—so the farls cook through without scorching.
-
Combine the dry ingredients. In a medium bowl, whisk flour, baking soda, and salt until evenly distributed. Toss in the grated cheddar and sliced scallions to coat with flour (this helps prevent clumping and leaking pockets).
-
Make the dough. Pour in about 90% of the buttermilk. Use a butter knife or fork to stir just until a shaggy dough forms. If there are dry patches, add the remaining buttermilk a spoonful at a time. The dough should be soft and slightly tacky, not wet.
-
Bring it together briefly. Scrape the dough onto a lightly floured counter. With floured hands, fold and pat it together 3–5 times—no kneading. Form a thick disc about 20 cm (8 inches) wide and 1.5 cm (1/2–5/8 inch) thick.
-
Cut into farls. Dust the top lightly with flour and use a bench knife to cut the disc into a deep cross, creating 4 even quarters.
-
Prepare the skillet surface. Lightly dust the hot, dry skillet with about 1 tsp flour; swirl to coat. The thin flour film should faintly toast on contact.
-
Cook the first side. Lay the quarters in the skillet with a little space between them. Cook 6–8 minutes, adjusting heat so the undersides brown in fawn-to-golden patches while the edges look dry. If you see cheese droplets escaping and scorching, nudge the farl to a fresh spot.
-
Flip and finish. Turn each farl and cook another 6–8 minutes, again managing heat so they color without burning. They’re done when both sides are golden and the centers feel set; a gentle tap on the surface should sound light and hollow.
-
Crisp the edges (optional, but classic). Stand each farl on its rounded sides for 30–60 seconds total, rotating to “dry the sides” and add a little extra crunch.
-
Rest and serve. Take the skillet off the heat and let farls rest in the warm pan 3–5 minutes to finish steaming. Split and serve warm with plenty of butter.
Kitchen note: Soda-bread dough starts rising the moment liquid hits the soda. Mix swiftly, avoid overworking, and get the dough into the pan within 2–3 minutes for the best lift. Keep heat at medium-low; high heat browns the outside before the center sets.
What to Expect
- Texture: a tender, close but not dense crumb, with tiny steam tunnels and cheese pockets. The exterior shows floury, mottled browning and gently crisp edges from the skillet.
- Flavor: tangy from buttermilk, lightly savory-salty from cheddar, with fresh allium notes from scallions. A faint soda aroma is normal and fades as the farls cool slightly.
- Variability: cast iron holds heat and browns more deeply than nonstick; thicker discs need an extra minute or two per side. Whole-wheat flour drinks more liquid and tastes nuttier; a splash more buttermilk usually balances it.
Kitchen note: A slight floury scent and a soft crackle when you press the sides are good doneness cues. If the center still feels squishy after the time range, lower heat and give it another minute or two per side.
Ways to Change It Up
- Vegetarian and vegan: keep the method, but swap dairy. Use a meltable vegan cheddar and 235 ml (1 cup) plant milk soured with 1 tbsp lemon juice. Expect less browning and a slightly softer set; extend each side by 1–2 minutes on low heat.
- Spicier or punchier: add 1/4 tsp coarsely ground black pepper and 1/4 tsp dry mustard powder to the flour for a rounder cheddar flavor. For heat, fold in 1–2 tbsp finely diced pickled jalapeño with the scallions.
- Milder or herby: reduce scallions to 1 and add 1 tbsp chopped chives or parsley. Swap sharp cheddar for a milder mature white cheddar or young Gouda.
- Faster minis: instead of one disc, pat into an oval and cut into 8 smaller wedges. Cook 4–6 minutes per side. These reheat nicely in the toaster.
- Heartier brown farls: use 50% whole-wheat flour and add 1–3 tbsp extra buttermilk. Expect a nuttier flavor and a slightly tighter crumb.
- Bake instead of griddle (hands-off): shape as directed, then bake the 4 farls on a parchment-lined sheet at 220°C/425°F for 12–15 minutes, turning once for even color. The texture is a touch drier but convenient for batch prep.
Serving and Storage
Serve farls warm, split and buttered. They shine with eggs and bacon for breakfast or alongside soup and salad. Try them with Creamy Broccoli Cheddar Soup Done Right in 35 Minutes, French Onion Soup with Deep Flavor, Simple Steps, Tuscan White Bean Soup with Kale in 35 Minutes, Easy Creamy Chicken Noodle Soup, One-Pot Comfort, or a seafood night with Sailor’s Soup Made Easy: Weeknight Seafood Comfort. Building a bigger Irish-style brunch? Add Irish Boxty Potato Pancakes with Scallion Sour Cream.
Storage: best the day they’re cooked. Cooled farls keep 24 hours at room temperature wrapped in a clean tea towel inside an airtight bag. For day-two eating, toast or re-warm in a dry skillet over medium-low heat 2–3 minutes per side.
Freezing: cool completely, wrap tightly, and freeze up to 1 month. Reheat from frozen in a toaster or a covered skillet (lid on) over medium-low heat for 4–6 minutes, flipping once.
Kitchen note: Avoid the microwave for reheating—steam makes the crumb rubbery and the cheese oily. Skillet or toaster heat keeps edges crisp.

Cultural Context
Soda farls are part of Northern Ireland’s everyday griddle-bread tradition: a quick dough of flour, soda, and buttermilk, shaped into a round and cut into quarters (“farls”) for stovetop cooking. The quartered shape and griddle method connect to home hearths and the Ulster fry breakfast. For a concise overview with traditional measurements and a turf-fire demonstration, see the Ulster-Scots Agency’s overview of griddle breads: Butter and Soda Bread Farls. For background on the term “farl” and the simplicity of classic soda bread, the noncommercial Society for the Preservation of Irish Soda Bread documents its history and definitions.
Common Questions and Troubleshooting
- My dough is sticky. What should it feel like? Soft and slightly tacky is right. Dust your hands and the counter with flour and fold the dough together just 3–5 times. If it’s gooey, sprinkle 1–2 tsp flour and fold once more—don’t knead.
- The outside browned fast, but the center is underdone. Your heat is too high or the disc was too thick. Drop to medium-low, cook a few extra minutes per side, and stand the farls briefly on their edges. You can also finish on a wire rack in a 180°C/350°F oven for 5 minutes.
- I taste a bitter/soapy note. Why? That’s unreacted or excess baking soda, or undercooking. Measure a level teaspoon, use genuine buttermilk (or a well-soured milk/yogurt substitute), and cook until fully set with a light hollow sound when tapped.
- Can I use self-rising flour? It will work, but the flavor is different and the timing less predictable. If you must, omit the baking soda and salt, and start with 3/4 cup buttermilk—add more only if needed. Expect a slightly cakier texture.
- What if I don’t have cast iron? Any heavy, flat skillet works. Thin pans run hot; start a notch lower on heat and rotate the farls more often for even color.
- Is oven-baking traditional? Farls are known for skillet cooking, though some modern recipes adapt them for the oven. Baking is handy for batches; the skillet gives the signature mottled, floury browning and crisp edges.
- Can I add more cheese or different onions? Up to 125 g (4.5 oz) cheese works, but more increases oozing risk. Swap scallions with chives or finely sliced leeks (sauté and cool first). Reduce salt slightly if your cheese is very salty.
- Can I make the dough ahead? Mix the dry ingredients and prepare the add-ins in advance, but don’t add liquid until the skillet is hot. The soda reaction fades if the dough sits.
Conclusion
If you keep flour, baking soda, and buttermilk on hand, these farls deliver warm bread on demand with crisp edges and a cheesy, savory crumb. Share how yours turned out—thickness, pan type, any herb or heat tweaks—and leave a rating so other home cooks can benefit from your notes.
Irish Cheddar-Scallion Soda Farls, Skillet-Warm in 25
Equipment
- Heavy 10–12 inch skillet (cast iron or heavy nonstick)
- Medium mixing bowl
- Whisk
- Butter knife or fork
- Bench knife (for cutting farls)
- Measuring cups and spoons
Ingredients
- 260 g all-purpose/plain flour plus extra for dusting the counter and skillet
- 1 tsp baking soda (bread soda)
- 1/2 tsp fine sea salt
- 235 ml cold buttermilk plus 1–2 tbsp if needed
- 100 g sharp cheddar coarsely grated
- 2–3 scallions/spring onions thinly sliced (about 1/2 cup)
- soft unsalted butter for serving
Instructions
- Preheat the skillet. Set a heavy 10–12 inch cast-iron or heavy nonstick skillet over medium-low heat for 3–5 minutes. You want a steady, gentle heat—not a searing pan—so the farls cook through without scorching.
- Combine the dry ingredients. In a medium bowl, whisk flour, baking soda, and salt until evenly distributed. Toss in the grated cheddar and sliced scallions to coat with flour (this helps prevent clumping and leaking pockets).
- Make the dough. Pour in about 90% of the buttermilk. Use a butter knife or fork to stir just until a shaggy dough forms. If there are dry patches, add the remaining buttermilk a spoonful at a time. The dough should be soft and slightly tacky, not wet.
- Bring it together briefly. Scrape the dough onto a lightly floured counter. With floured hands, fold and pat it together 3–5 times—no kneading. Form a thick disc about 20 cm/8 inches wide and 1.5 cm/1/2–5/8 inch thick.
- Cut into farls. Dust the top lightly with flour and use a bench knife to cut the disc into a deep cross, creating 4 even quarters.
- Prepare the skillet surface. Lightly dust the hot, dry skillet with about 1 tsp flour; swirl to coat. The thin flour film should faintly toast on contact.
- Cook the first side. Lay the quarters in the skillet with a little space between them. Cook 6–8 minutes, adjusting heat so the undersides brown in fawn-to-golden patches while the edges look dry. If you see cheese droplets escaping and scorching, nudge the farl to a fresh spot.
- Flip and finish. Turn each farl and cook another 6–8 minutes, again managing heat so they color without burning. They’re done when both sides are golden and the centers feel set; a gentle tap on the surface should sound light and hollow.
- Crisp the edges (optional, but classic). Stand each farl on its rounded sides for 30–60 seconds total, rotating to “dry the sides” and add a little extra crunch.
- Rest and serve. Take the skillet off the heat and let farls rest in the warm pan 3–5 minutes to finish steaming. Split and serve warm with plenty of butter.
Leave a Reply