
Strawberry ice cream with real fruit, no churn needed is one of those desserts that genuinely works on a busy weeknight. You prep the fruit, whip some cream, and the freezer quietly does the rest. The flavor leans toward strawberries-and-cream rather than a very light sorbet, with soft pockets of fruit and a rich base.
If you are juggling kids or work, start by macerating the strawberries first so they can sit while you clear the kitchen or find a freezer-safe container. When you whip the cream, stay at the bowl for those few minutes so you do not overbeat it.
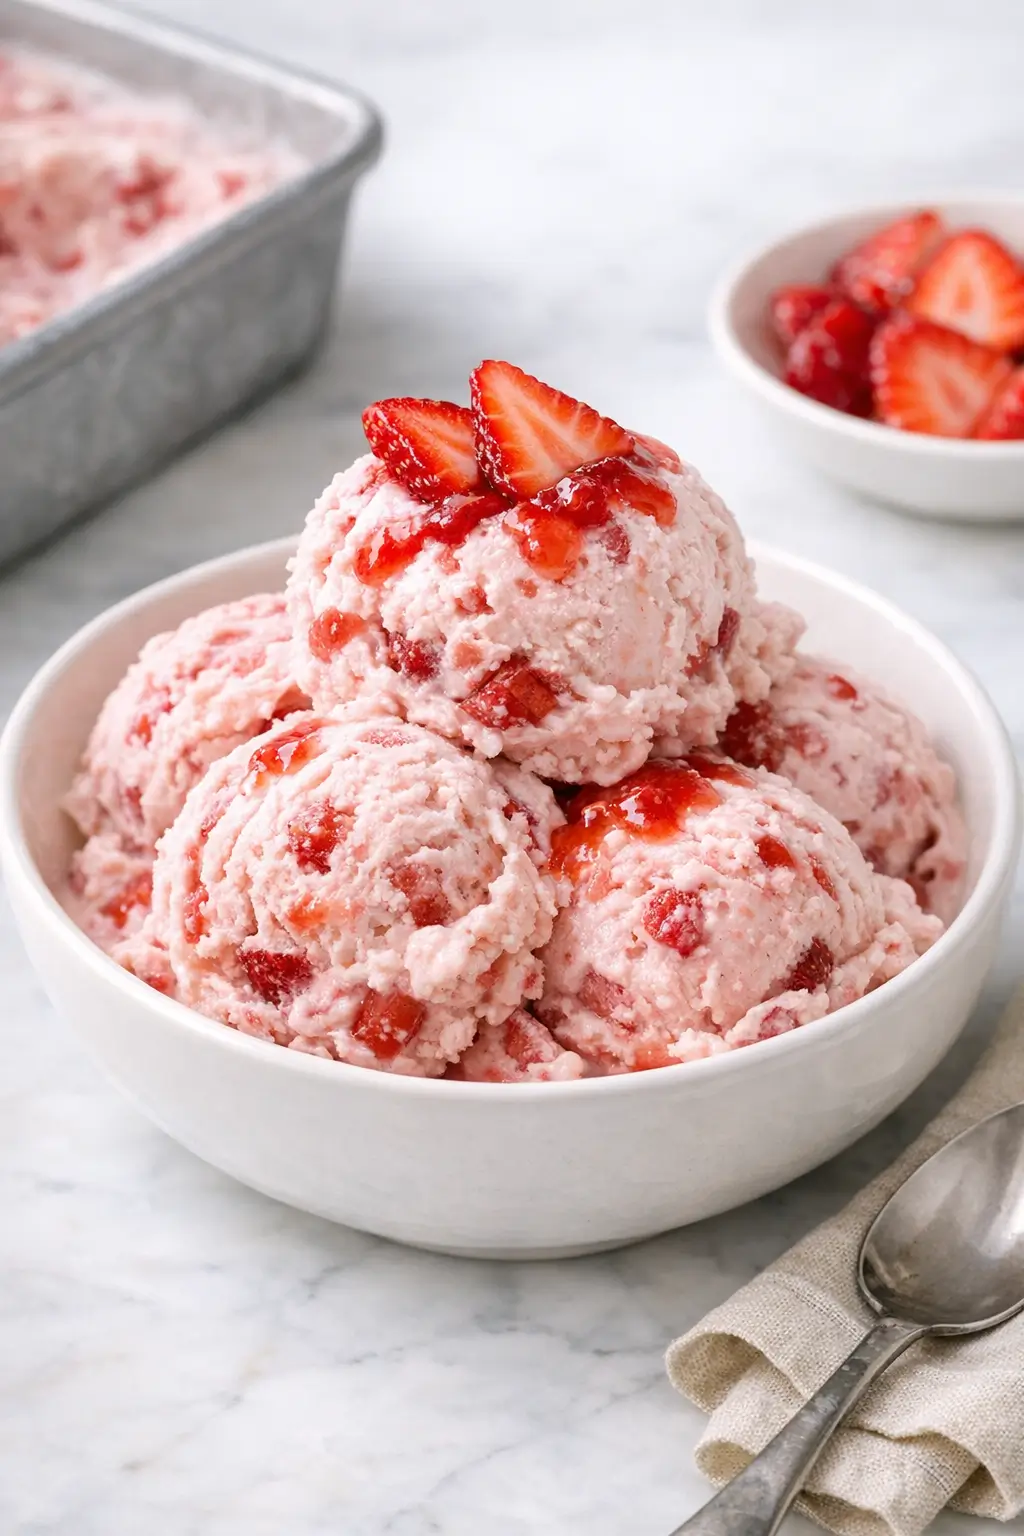
This style of ice cream shows up most often as a homemade summer dessert in North American kitchens. It suits newer cooks and confident bakers alike: the method is forgiving, but small details still affect texture. Expect a scoopable, creamy ice cream with real strawberry flavor and a few ice crystals around the edges, not a perfectly smooth commercial pint.
Ingredients
Makes about 1.2–1.4 L (roughly 1 ½ quarts), 6–8 servings
- 300 g (about 2 cups) fresh strawberries, hulled and diced small – for real fruit flavor and small pieces throughout
- 30 g (2 tablespoons) granulated sugar – helps draw juice from the berries and sweetens them
- 1 teaspoon fresh lemon juice – brightens the strawberry flavor and slightly balances the sweetness
- 1 can (397 g / 14 oz) sweetened condensed milk – provides sweetness and a smooth, scoopable texture
- 2 teaspoons pure vanilla extract – rounds out both the cream and fruit flavors
- 2 g (¼ teaspoon) fine sea salt – makes the strawberry and vanilla taste clearer
- 480 ml (2 cups) cold heavy cream / heavy whipping cream – forms the whipped base that traps air and keeps the texture light
Optional garnish: extra sliced strawberries or a little strawberry jam for serving.
Realistic substitutions:
- Frozen strawberries – Use 300 g frozen berries, thawed completely and drained well, then proceed with the maceration step. If they are unsweetened and a bit tart, you may prefer 3 tablespoons sugar instead of 2.
- Lemon juice – Can be replaced with lime juice or omitted if you do not have citrus; the flavor will be slightly sweeter and less bright.
- Heavy cream – Needs at least 35% fat to whip properly. Avoid half-and-half or regular milk here; they will not whip and the ice cream will freeze solid and icy.

Step-by-Step Instructions for Strawberry Ice Cream with Real Fruit No Churn Style
-
Prepare the strawberries.
Add the diced strawberries to a medium bowl. Sprinkle with the granulated sugar and lemon juice, then stir to coat. Let them sit for 15–20 minutes at room temperature, stirring once or twice, until a syrupy pool forms and the berries look glossy.
-
Decide on your fruit texture.
For a smoother base with fewer icy chunks, transfer about two-thirds of the macerated strawberries with some of their syrup to a blender or food processor. Pulse until mostly smooth with a few small pieces left. Leave the remaining fruit in the bowl for folding in later.
-
Mix the condensed milk base.
In a large mixing bowl, whisk together the sweetened condensed milk, vanilla, and salt until evenly combined. Scrape the sides of the bowl so no thick ribbons of condensed milk remain.
-
Incorporate the strawberry purée.
Pour the blended strawberry mixture into the condensed milk base and whisk gently until the color is evenly pink and there are no streaks. Taste a spoonful; it should be quite sweet and strongly flavored, since chilling mutes flavors.
-
Chill the strawberry base briefly (optional but helpful).
If your kitchen is warm, cover the bowl and refrigerate the strawberry-condensed milk mixture for 15–20 minutes while you set up to whip the cream. A cooler base makes it easier to keep the whipped cream stable when you fold it in.
-
Whip the heavy cream.
Pour the cold heavy cream into a separate large bowl. Using a hand mixer or stand mixer with the whisk attachment, beat on medium speed until the cream thickens and then forms medium-stiff peaks. When you lift the beaters, the peaks should stand up but the very tips should softly bend.
Kitchen note: If the cream starts to look grainy or clumpy instead of smooth and billowy, you have gone past stiff peaks toward butter. Stop as soon as the peaks mostly hold their shape; slightly under-whipped cream is better than over-whipped for folding.
-
Lighten the strawberry base.
Add about one-third of the whipped cream to the chilled strawberry-condensed milk mixture. Use a spatula to fold gently, lifting from the bottom and turning the bowl, just until the mixture looks mostly uniform. This first addition loosens the base.
-
Fold in the remaining cream.
Add the rest of the whipped cream in 2–3 additions, folding gently each time. Take your time and stop folding as soon as you no longer see streaks of white cream. The mixture should be thick, smooth, and airy.
-
Add the reserved strawberry pieces.
Gently fold in the remaining macerated strawberry pieces with their syrup. Aim to distribute them without over-mixing, so you keep little pockets of fruit.
Kitchen note: Too many large, juicy chunks can create icy bits once frozen. If your strawberries are very watery, drain off a spoonful or two of the liquid and save it for drizzling over scoops instead of folding everything in.
-
Transfer to a freezer-safe container.
Scrape the mixture into a loaf pan, metal baking dish, or freezer-safe container that holds at least 1.5 L (1.5 quarts). Smooth the top with a spatula. For fewer ice crystals, press a piece of parchment or plastic wrap directly against the surface before covering the container with a lid or foil.
-
Freeze until firm.
Place the container on a flat shelf in your freezer. Freeze for at least 6–8 hours, or overnight, until solid around the edges and firm in the center. Freezers vary; deeper freezers may need the full overnight rest for a clean scoop.
Kitchen note: If your freezer runs very cold, the ice cream may be hard straight from the freezer. Let the container rest on the counter for 5–10 minutes before scooping so it softens slightly and the texture feels creamier on the tongue.
-
Serve.
Scoop into bowls or cones. Garnish with extra sliced strawberries or a ribbon of strawberry jam if you like. Return any leftover ice cream to the freezer as soon as possible to keep the texture from degrading.
What to Expect
This no churn strawberry ice cream sets firm but not rock-solid, with a creamy, dense spoon feel similar to premium ice cream.
You will see a pale pink base with tiny flecks of berry and occasional soft pieces of strawberry, especially if you kept some chunks larger. Because real fruit carries water, expect a few small ice crystals, particularly near the surface or around big fruit pieces.
The flavor leans sweet and milky from the condensed milk, balanced by the mellow tartness of the strawberries and a hint of lemon.
If your strawberries are very ripe and fragrant, the flavor will be more intense and jammy. Less ripe fruit will give a lighter, fresher note and might benefit from an extra teaspoon of lemon juice when you macerate.
Different brands of cream and condensed milk can change richness. Higher-fat cream or very thick condensed milk will give a more luxurious texture, while lower-fat or thinner products may freeze slightly icier.
Ways to Change It Up
-
Simple vegan-style version.
Swap the condensed milk for one 11–14 oz can of sweetened condensed coconut milk and use cold full-fat coconut cream (scooped from the top of chilled cans of coconut milk) instead of dairy cream. Whip the coconut cream until thick and fold it in just as you would whipped cream. The ice cream will taste lightly coconutty along with the strawberries and may freeze a bit firmer, but it stays scoopable if you let it sit out for 10–15 minutes before serving.
-
Milder and lighter.
If you prefer something less sweet and rich, use ¾ of the can of condensed milk instead of the full can and increase the strawberries by another 50–75 g (½ cup diced). The base will be less sugary and a bit more refreshing, but because there is relatively more fruit water, you will likely see more ice crystals, especially after a couple of days in the freezer.
-
Stronger strawberry swirl.
For more defined pockets of fruit, cook half of the strawberries with 1–2 extra teaspoons of sugar over low heat for 5–7 minutes, just until they release juice and thicken slightly, then cool fully. Swirl this thicker strawberry mixture through the folded ice cream base instead of blending it all into the condensed milk. This gives ribbon-like streaks and a slightly more intense fruit layer.
-
Faster soft-serve style.
For almost-instant dessert, chill the base briefly, then freeze the filled container for about 3–4 hours, stirring gently once halfway through. The texture will be more like soft-serve or a thick milkshake than firm ice cream, but it is ready much sooner and can be eaten straight from the freezer with a spoon.
Kitchen note: Shorter freezing means less time for the center to set. If you find the edges too firm and the center too soft, scoop from the outside and gently fold the firmer outer ring into the softer middle before serving.
Serving and Storage
This strawberry ice cream works well on its own in bowls, on sugar cones, or as part of simple sundaes with extra strawberries and a drizzle of chocolate or strawberry sauce.
It also pairs naturally with shortcakes, pound cake slices, or simple butter cookies. The creamy texture contrasts nicely with crisp toppings like nuts or wafer cookies as well.
For storage, keep the container well covered and pressed with parchment or plastic against the surface to limit ice crystals. The ice cream is at its best in the first 3–4 days, when the texture stays smooth and the strawberry flavor is brightest.
You can store it for up to 2 weeks, but over time, you will notice more ice crystals and slightly duller fruit notes, especially if the freezer door is opened often.
To serve leftover ice cream, let it sit at room temperature for 5–10 minutes before scooping so it softens evenly rather than melting just around the edges.
Cultural Context
Ice cream has moved from a rare luxury to an everyday dessert over centuries. Early forms of chilled sweets and flavored ices appeared in parts of Asia and the Middle East long before mechanical refrigeration existed, with more recognizable dairy-based ice creams becoming popular in Europe and later North America in the 17th to 19th centuries.
Industrial refrigeration in the 19th and early 20th centuries made ice cream accessible to a much wider public, especially through soda fountains and street vendors. Modern home freezers and simplified methods like no-churn bases now allow cooks to recreate frozen desserts without specialized equipment. For a concise overview of how ice cream evolved into a common treat, the International Dairy Foods Association offers a clear timeline: The History of Ice Cream.
Strawberries also have a long cultural connection to cream-based desserts. Garden strawberries, as they are known today, developed from hybridization in Europe in the 18th century and quickly became popular in confections, preserves, and frozen sweets. For a broader look at ice cream’s development in modern times, including its spread as a commercial product, see this overview from Ice Cream Nation: Ice cream history – modern times and industrial ice cream.
Common Questions and Troubleshooting
Why is my no-churn strawberry ice cream icy instead of creamy?
Fruit naturally contains water, so large chunks of strawberry can freeze into hard bits. To reduce iciness next time, blend most of the berries, cook part of them into a slightly thicker sauce before cooling, or simply chop more finely before folding in. Also, make sure you used full-fat heavy cream and a full can of condensed milk, which both help control ice crystal size.
Can I reduce the sweetness without ruining the texture?
You can cut the condensed milk down to about ¾ of the can without major issues, especially if you keep the cream amount the same. The texture will be a little firmer and less rich but still scoopable as long as the cream is well whipped. Avoid going much lower than that unless you increase the fat elsewhere, or the ice cream may freeze quite hard.
My whipped cream deflated when I folded it in. Did I do something wrong?
Some softening is normal once you mix airy whipped cream into a heavier base. If the mixture became thin and runny, you may have under-whipped the cream (it should hold soft-to-medium peaks) or stirred too vigorously instead of folding gently. The ice cream will still freeze, but it will be denser and slightly less fluffy. Next time, whip the cream just to medium-stiff peaks and use slower, scooping motions with a spatula.
How long can I keep this ice cream in the freezer?
For best texture and flavor, aim to eat it within 3–4 days, although it is safe to keep for up to 2 weeks if stored well covered. After that, more ice crystals will form and the condensed milk flavor can become more pronounced. If the surface develops a thick layer of frost, simply scrape off the top thin layer before serving.
Can I use other fruits instead of strawberries?
Yes, this method works well with raspberries, blueberries, blackberries, or a mixed-berry blend. Berries with more seeds and less natural sweetness may need an extra teaspoon or two of sugar in the maceration step, and you might want to strain out some seeds if texture bothers you. For very juicy fruits like peaches or cherries, keep the added fruit quantity similar and avoid adding too much extra juice to keep the base from getting watery.
Kitchen note: If you switch fruits, taste the fruit-condensed milk mixture before adding the whipped cream. It should be slightly sweeter and more intense than you want the finished ice cream, since freezing will mute both sweetness and aroma.
Conclusion
This no churn strawberry ice cream with real fruit gives you a practical way to turn a small bowl of berries and pantry staples into a freezer dessert without special equipment.
Once you are comfortable with the base method, it is easy to adjust the sweetness, change the fruit, or experiment with light swirls and mix-ins. If you try it, consider leaving a comment or rating to say how it went in your kitchen and what brand of cream or condensed milk you used.
Feel free to note any tweaks you made—more lemon, different berries, a chunkier swirl—so other home cooks can learn from your version as well.

Strawberry Ice Cream with Real Fruit, No Churn Needed
Equipment
- Medium Bowl
- Large mixing bowl
- Whisk
- Hand mixer or stand mixer with whisk attachment
- Rubber spatula
- Blender or food processor (optional)
- Freezer-safe container (at least 1.5 L / 1.5 quarts)
Ingredients
- 300 g fresh strawberries hulled and diced small (about 2 cups)
- 30 g granulated sugar
- 1 tsp fresh lemon juice
- 1 can sweetened condensed milk 397 g / 14 oz
- 2 tsp pure vanilla extract
- 1/4 tsp fine sea salt 2 g
- 480 ml cold heavy cream / heavy whipping cream 2 cups
- extra sliced strawberries or strawberry jam optional, for serving
Instructions
- Prepare the strawberries. Add the diced strawberries to a medium bowl. Sprinkle with the granulated sugar and lemon juice, then stir to coat. Let them sit for 15–20 minutes at room temperature, stirring once or twice, until a syrupy pool forms and the berries look glossy.
- Decide on your fruit texture. For a smoother base with fewer icy chunks, transfer about two-thirds of the macerated strawberries with some of their syrup to a blender or food processor. Pulse until mostly smooth with a few small pieces left. Leave the remaining fruit in the bowl for folding in later.
- Mix the condensed milk base. In a large mixing bowl, whisk together the sweetened condensed milk, vanilla, and salt until evenly combined. Scrape the sides of the bowl so no thick ribbons of condensed milk remain.
- Incorporate the strawberry purée. Pour the blended strawberry mixture into the condensed milk base and whisk gently until the color is evenly pink and there are no streaks. Taste a spoonful; it should be quite sweet and strongly flavored, since chilling mutes flavors.
- Chill the strawberry base briefly (optional but helpful). If your kitchen is warm, cover the bowl and refrigerate the strawberry-condensed milk mixture for 15–20 minutes while you set up to whip the cream.
- Whip the heavy cream. Pour the cold heavy cream into a separate large bowl. Using a hand mixer or stand mixer with the whisk attachment, beat on medium speed until the cream thickens and then forms medium-stiff peaks (peaks stand up but the very tips softly bend). Stop before it turns grainy/clumpy.
- Lighten the strawberry base. Add about one-third of the whipped cream to the chilled strawberry-condensed milk mixture. Use a spatula to fold gently just until mostly uniform to loosen the base.
- Fold in the remaining cream. Add the rest of the whipped cream in 2–3 additions, folding gently each time. Stop as soon as you no longer see streaks of white cream; the mixture should be thick, smooth, and airy.
- Add the reserved strawberry pieces. Gently fold in the remaining macerated strawberry pieces with their syrup. If the berries are very watery, drain off a spoonful or two of liquid and save it for drizzling instead of folding it all in.
- Transfer to a freezer-safe container. Scrape the mixture into a loaf pan, metal baking dish, or container that holds at least 1.5 L (1.5 quarts). Smooth the top. For fewer ice crystals, press parchment or plastic wrap directly against the surface, then cover with a lid or foil.
- Freeze until firm. Freeze on a flat shelf for at least 6–8 hours, or overnight, until solid around the edges and firm in the center. If very hard straight from the freezer, let sit at room temperature 5–10 minutes before scooping.
- Serve. Scoop into bowls or cones. Garnish with extra sliced strawberries or a ribbon of strawberry jam if desired. Return leftovers to the freezer promptly.
Leave a Reply