
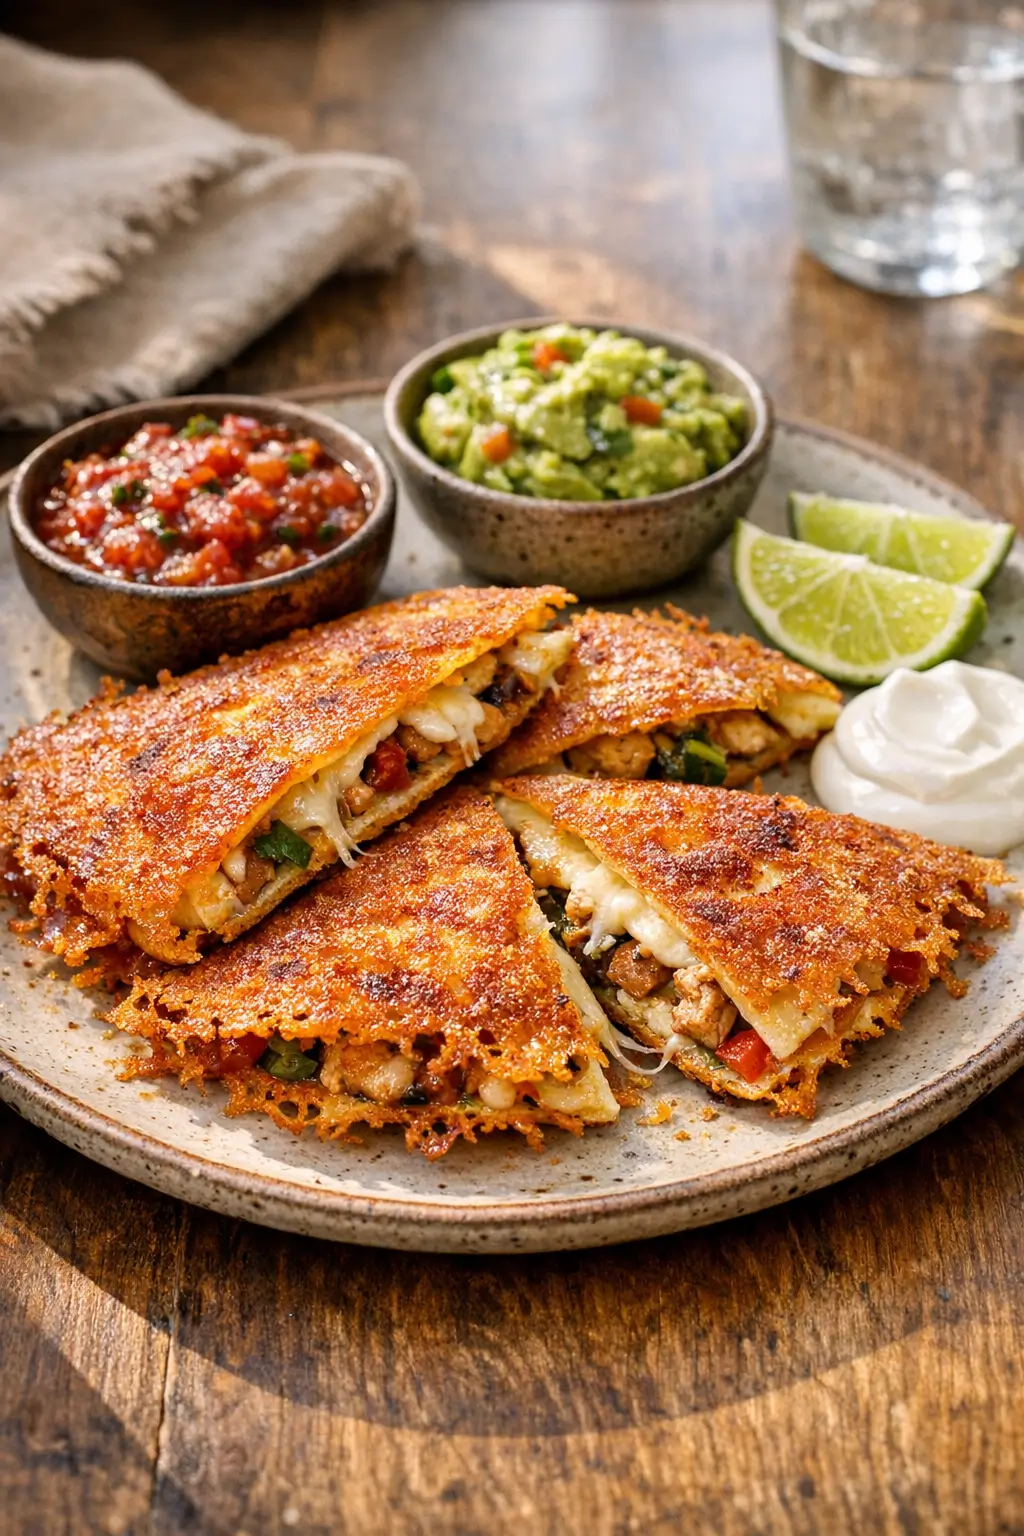
If you love the crispy bits that escape from a grilled cheese, this Upside-Down Quesadilla gives you that same magic on purpose. The cheese hits the pan first, melts into a lacy crust, then bonds to the tortilla for shatter-crisp edges and a gooey center.
You’ll get weeknight speed with full snack-board satisfaction. The technique is common on hot griddles at some Mexico City stands and went viral for good reason: it’s easy, dramatic, and delicious. Make it for lunch, an after‑school bite, or a game-night platter.
This method suits all skill levels. If you keep an eye on heat and use the right pan, it’s straightforward. Expect nutty, toasty cheese outside; stretchy, melty cheese inside; and whatever quick fillings you like.
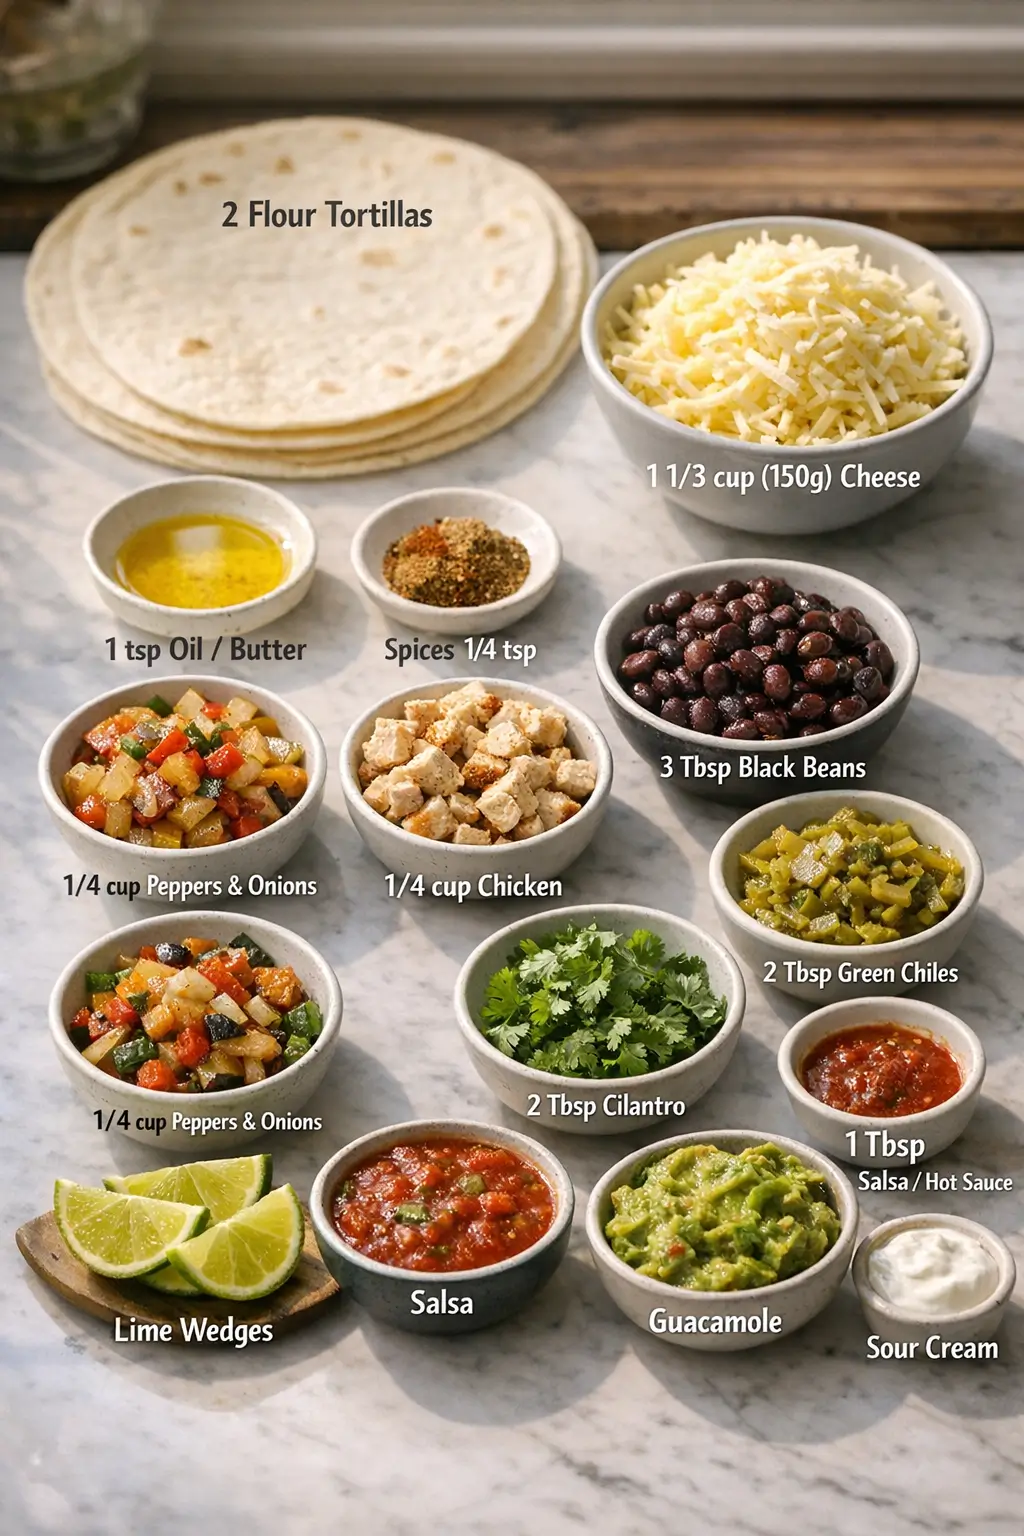
INGREDIENTS
- 2 (20 cm/8-inch) flour tortillas
- Soft taco size flips easily. Corn tortillas work but are more delicate; choose 15 cm/6-inch and reduce filling.
- 1 1/3 cups (150 g) shredded melting cheese, divided (Monterey Jack, Oaxaca, Chihuahua, or low‑moisture mozzarella)
- You’ll use about 1/3 cup (40 g) for the crispy “cheese skirt” and 1/3 cup (40 g) inside each quesadilla. Pre-shredded works, but hand‑grated melts and browns more evenly.
- 2 teaspoons (10 ml) neutral oil or unsalted butter, divided
- A thin film prevents sticking and helps even browning. Ghee or light olive oil are fine.
- Optional fast fillings (choose 2–3, about 1/2 cup (75 g) total):
- 1/4 cup (40 g) sautéed peppers and onions, patted dry
- 1/4 cup (40 g) cooked chicken, steak, or rotisserie leftovers, chopped
- 3 tablespoons (35 g) black beans or refried beans, drained
- 2 tablespoons (20 g) canned green chiles or pickled jalapeños, drained
- 2 tablespoons (10 g) chopped cilantro
- 1 tablespoon (15 ml) salsa macha, chili crisp, or hot sauce
- Seasoning (optional): 1/4 teaspoon ground cumin or chili powder
- To serve: lime wedges, salsa, guacamole, and/or sour cream
STEP-BY-STEP INSTRUCTIONS — Upside-Down Quesadilla
- Prep the fillings so they’re ready to go.
- Warm cooked meats in the microwave or a small pan. Sauté vegetables ahead if you like. Blot everything dry; moisture softens the crust.
- Heat the pan over medium.
- A well‑seasoned cast‑iron or a true nonstick skillet works best. Add 1 teaspoon (5 ml) oil. You want a thin sheen, not a puddle.
- Sensory cue: flick a drop of water—if it skitters, the pan’s hot enough.
- Make the cheese base.
- Sprinkle 1/3 cup (40 g) shredded cheese directly into the center of the pan in a neat 18 cm/7-inch circle. Aim for an even layer with a few wispy edges.
- It will melt, bubble, and look glossy in 30–60 seconds. Do not move it yet.
- Cap with the tortilla.
- Lay one tortilla right on top of the melting cheese. Press gently with a spatula to adhere.
- Cook until the cheese edges look lacy and browned and you smell toasted, nutty notes—usually 60–90 seconds, but pans vary.
- Flip so the cheese faces up.
- Slide a wide spatula under the tortilla, angling to catch the cheese skirt. If it resists, give it 15–20 more seconds; well‑browned cheese releases cleanly.
- Flip in one confident move. If you’re nervous, slide onto a plate, invert a second plate, then return to the pan cheese‑side up.
- Fill and fold.
- Sprinkle 1/3 cup (40 g) more cheese on half the tortilla. Add 1/4–1/2 cup (35–75 g) combined fillings, keeping a thin, even layer to the edge.
- Season lightly if using. Fold the empty half over the filling to make a half‑moon.
- Finish the crisp and melt.
- Cook 30–60 seconds per side, pressing lightly with a spatula, until both sides are spotty‑gold and the interior cheese is melted. If the tortilla browns too fast before the center melts, lower the heat.
- Rest, slice, and repeat.
- Transfer to a board and rest 1 minute—this sets the cheese so it doesn’t ooze out when cut. Slice into 3–4 wedges. Repeat for the second tortilla with the remaining oil, cheese, and fillings.
Beginner safeguard: the only fast step is the flip. If the cheese isn’t sufficiently browned and crisped, it will tear. Wait for the lacy, deep‑gold cue and light sizzling sound.
Timing note: cast iron runs hotter and may brown in under a minute; nonstick is often steadier but a touch slower. Stoves vary—use color and aroma over the clock.
WHAT TO EXPECT
-
Texture: a lacy, golden cheese crust that’s crisp at the edges and gently chewy under the tortilla. Inside, the cheese pulls in strands; some corners may be flatter if you used a drier filling.
-
Flavor: nutty, toasty notes from the seared cheese outside; creamy, milky cheese inside. Fillings add heat, sweetness, or freshness depending on your picks. Even a plain cheese version tastes satisfying.
-
Variability:
-
Cheese type matters. Monterey Jack and Oaxaca give the best stretch. Cheddar browns quickly but can get oily; use a lighter hand or blend with Jack. Pre‑shredded cheeses may brown less evenly because of anti‑caking starches.
-
Pan choice matters. Nonstick releases easily with a thinner, lighter crust. Cast iron gives deeper browning but demands attention to heat.
-
Tortillas differ. High‑fat or extra‑flour tortillas brown faster; some store brands are thicker and take longer to crisp.
WAYS TO CHANGE IT UP
-
Vegetarian or vegan adapted
-
Swap in sautéed mushrooms, spinach, and black beans for a hearty plant‑based filling. For vegan, use a melt‑friendly shredded vegan cheese and add a drizzle of oil to encourage browning. Lower the heat slightly and cover for 20–30 seconds after folding to help vegan cheese melt.
-
Trade‑off: vegan shreds can brown less evenly and may need an extra minute.
-
Spicier or milder
-
For heat, tuck in pickled jalapeños, a smear of chipotle in adobo, or a spoon of salsa macha. For a mild version, stick to Monterey Jack with sautéed onions and sweet peppers. A squeeze of lime over the wedges brightens either path.
-
Trade‑off: wetter salsas inside can soften the crust—use sparingly or serve on the side.
-
Faster or simplified
-
Make it “cheese‑skirt only”: skip the inside fillings and use just the outer cheese crust and tortilla, fold, and finish. It’s minimal prep and still incredibly satisfying.
-
Or batch on a griddle: work two pans or a large flat‑top to cook two at once. Keep finished quesadillas on a wire rack in a 95°C/200°F oven for up to 15 minutes.
-
Trade‑off: holding in the oven keeps them hot but slightly softens the crust; a quick re‑sear restores crispness.
SERVING AND STORAGE
Serve hot, cut into wedges with salsa, guacamole, and lime. A crunchy chopped salad, quick pickled onions, or corn and black bean salad rounds it into dinner. Tomato soup is an unexpectedly great pairing if you’re craving comfort.
For a party platter, cook, rest, and slice, then set out on a wire rack instead of a plate so the underside doesn’t steam.
Storage: leftovers keep up to 3 days in an airtight container in the fridge. The crust softens but re‑crispens well.
Reheat: warm in a dry skillet over medium heat 2–3 minutes per side, or in a 200°C/400°F oven for 8–10 minutes on a rack. Avoid the microwave for the best texture.
CULTURAL CONTEXT
Quesadillas are a flexible, widely enjoyed Mexican dish built on tortillas and melted cheese, sometimes with added fillings. Tortillas themselves carry deep cultural weight linked to maize and nixtamalization, practices recognized by UNESCO on its Intangible Cultural Heritage list. If you want to learn more about the broader foodways that tortillas belong to, see UNESCO’s explainer on traditional Mexican cuisine: Traditional Mexican cuisine — Intangible Cultural Heritage.
For a short history of tortilla making in everyday life and how it became common in U.S. supermarkets, the National Museum of American History offers an accessible overview with artifacts and photos: The Mexican Food Revolution and a focused piece on tortillas in grocery culture: Tortillas at the Supermarket.
COMMON QUESTIONS AND TROUBLESHOOTING
-
The cheese welded to my pan—what happened?
-
The pan likely wasn’t hot enough, or the cheese wasn’t browned enough to release. Use a thin film of oil, wait for deep golden, lacy edges, then slide a wide spatula under one quadrant first. Nonstick or well‑seasoned cast iron helps immensely.
-
My cheese burned before the inside melted.
-
Heat was too high or your cheese was very low moisture. Lower the burner a notch and use a blend with Monterey Jack or Oaxaca for stretch. After folding, briefly cover the pan to trap heat if needed.
-
Can I use corn tortillas?
-
Yes, but they are smaller and more fragile. Warm them first so they’re pliable. Use less filling, fold gently, and expect a slightly firmer bite.
-
Any tips for vegan cheese?
-
Choose melt‑friendly shreds, add a drizzle of oil to encourage browning, and use moderate heat. Cover for 20–30 seconds after folding to help it liquefy.
-
The flip scares me—alternatives?
-
Use the plate‑flip: slide the tortilla and cheese onto a plate, invert a second plate on top, flip the stack, then slide back into the pan. Or work with two spatulas—one under, one steadying the top.
-
Why hand‑grated cheese?
-
It melts and browns more evenly because it lacks added starches. If using pre‑shredded, spread it in a thinner layer and don’t crowd the pan.
-
How much filling is too much?
-
As a rule, keep it to 1/4–1/2 cup (35–75 g) per tortilla. Overstuffing pries the fold open and prevents even melting.
-
Can I scale this up for a family?
-
Yes. Work assembly‑line style on a large griddle or two pans. Keep finished quesadillas on a wire rack in a 95°C/200°F oven up to 15 minutes. Re‑sear 30 seconds per side before serving for peak crunch.
CONCLUSION
If you try this method, leave a comment with how it went and what fillings you used. Share any tweaks—different cheeses, vegan swaps, or griddle tricks—and rate the recipe so other home cooks know what worked for you at home.
Leave a Reply