
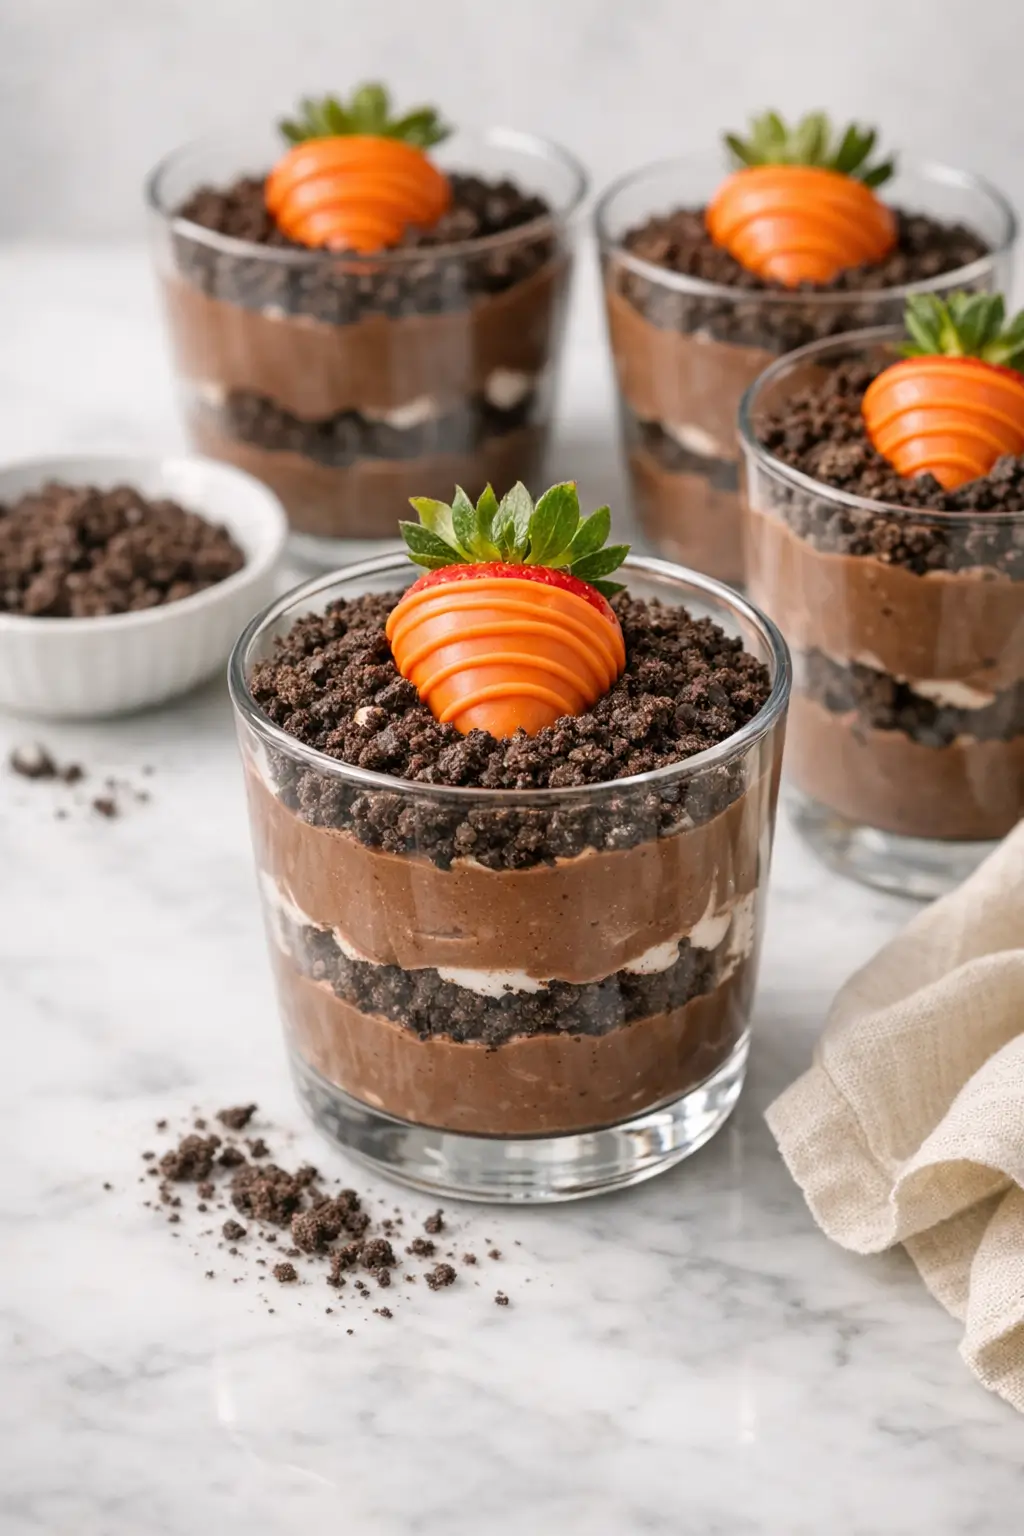
Carrot patch dessert cups with Oreo dirt turn a handful of pantry ingredients into a playful spring dessert that looks like tiny garden pots. You get cool, creamy chocolate pudding under a layer of crushed cookies that mimic soil, finished with simple candy “carrots” so each cup feels like its own miniature patch. The flavor is classic dirt dessert—chocolatey, sweet, and a little crunchy—just dressed up for Easter or any spring gathering.
If you’re throwing this together on a busy weeknight before a school event, start by whisking the pudding so it can thicken while you crush the Oreos and shape the carrots. Working with kids or in a small kitchen, set up a little assembly line: one bowl for pudding, one for crumbs, one tray for finished cups so the mess stays contained.
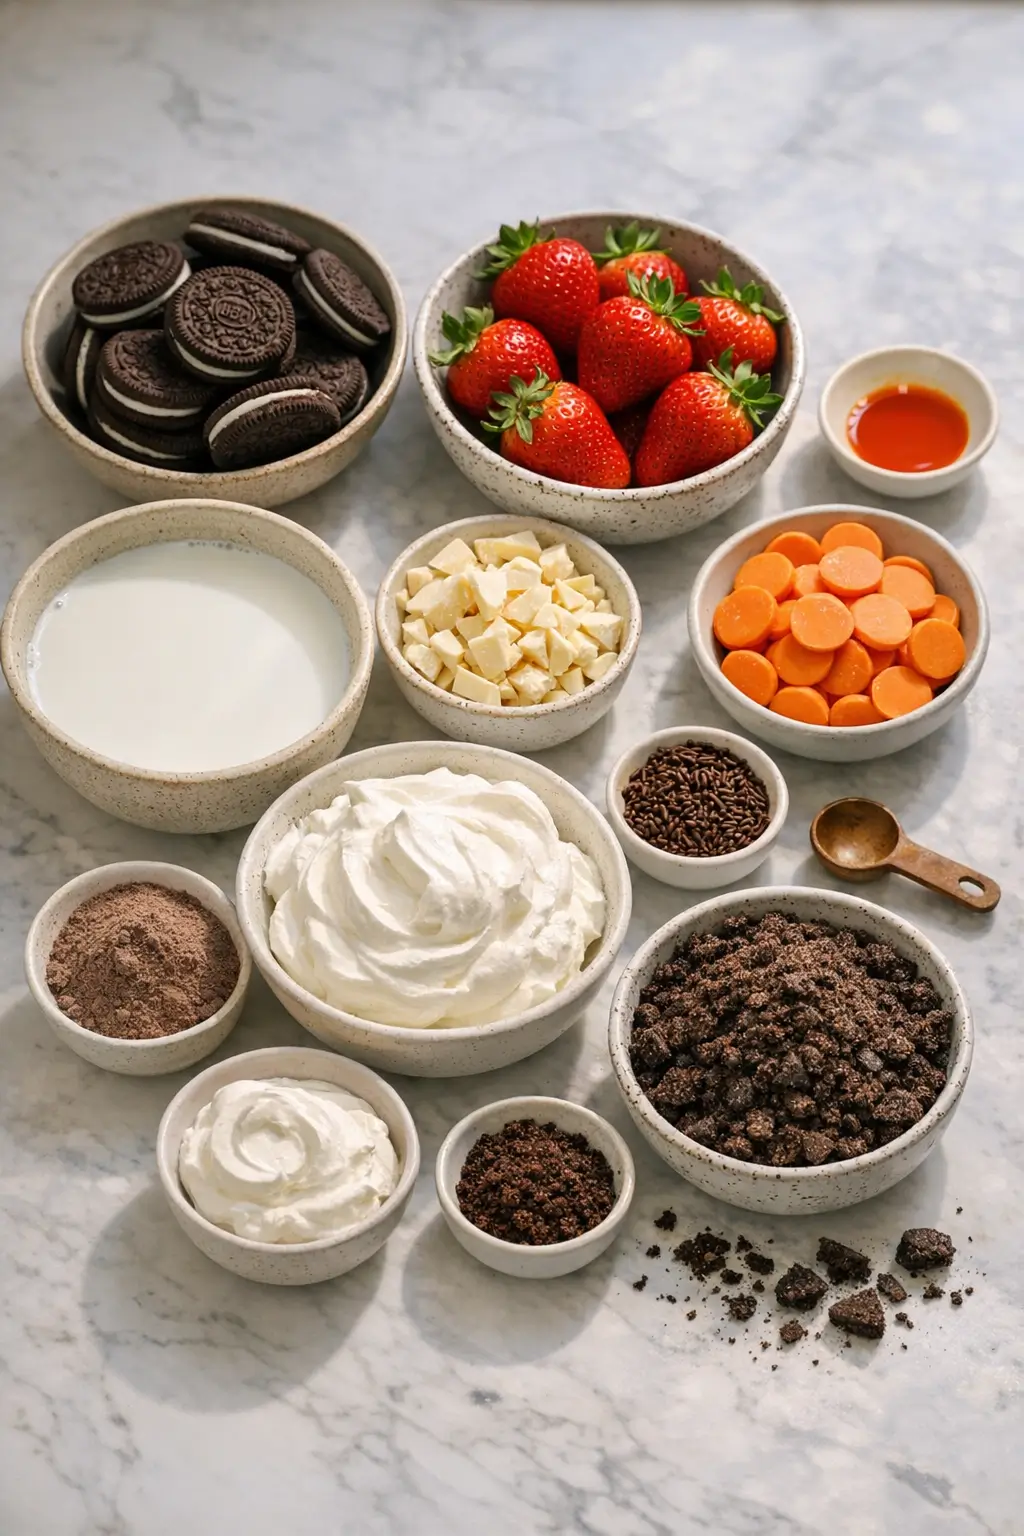
Ingredients
Makes 4–6 small cups (about 120–180 ml / 4–6 oz each)
- 24 Oreo cookies (about 250 g) – for the “dirt” layer
- 2 cups (480 ml) cold whole or 2% milk – to mix with the pudding
- 1 package (3.9 oz / 110 g) instant chocolate pudding mix – standard size box
- 1 cup (240 ml) whipped topping such as Cool Whip, thawed – lightens the pudding
- 6 ounces (170 g) white baking chocolate or orange candy melts – for coating the strawberries
- 6 medium strawberries with green tops intact – these become the “carrots”
- Orange food coloring, gel or liquid – if using white chocolate instead of orange candy melts
- Optional garnish: a few extra Oreo crumbs or chocolate sprinkles around the “carrot” for texture
Substitutions:
- Gluten-free: use gluten-free chocolate sandwich cookies instead of Oreos.
- Dairy-free: use dairy-free instant pudding and plant-based milk and whipped topping, plus dairy-free sandwich cookies. Texture will be slightly looser with some dairy-free milks.
- Homemade whipped cream: swap the whipped topping for 1 cup (240 ml) lightly sweetened whipped cream; the cups will be softer and best eaten the same day.
Step-by-Step Instructions for Carrot Patch Dessert Cup with Oreo Dirt
Crush the Oreo “dirt.”
Place the Oreo cookies in a sturdy zip-top bag and press out most of the air. Seal well, then crush with a rolling pin until you have fine to medium crumbs. Aim for a mix of powdery crumbs and small chunks so the “soil” looks more natural. Set aside.Mix the chocolate pudding.
In a medium mixing bowl, pour in the cold milk. Sprinkle the chocolate pudding mix over the top and whisk for 1–2 minutes, until smooth and starting to thicken. Let it sit for about 5 minutes to fully set.
Kitchen note: Instant pudding sets faster with very cold milk. If your kitchen is warm, keep the milk in the fridge right up until mixing so the pudding doesn’t stay runny.
Lighten the pudding with whipped topping.
Once the pudding has thickened, add the whipped topping. Use a spatula to gently fold it in, scraping around the sides and across the bottom of the bowl. Stop as soon as the mixture is uniform and lighter in color; over-mixing can deflate the air and make it dense.Chill the base briefly (optional but helpful).
If you have the time, cover the bowl and refrigerate the pudding mixture for 15–20 minutes. This helps it firm slightly so layers hold better in the cups, especially if you’re using tall or narrow containers.Prepare the strawberry “carrots.”
Line a small tray or plate with parchment paper. Wash and dry the strawberries very thoroughly; any moisture on the berries will make the chocolate seize or slide off.Melt the coating.
Place the white baking chocolate or candy melts in a microwave-safe bowl. Microwave in 20-second bursts, stirring between each, until just melted and smooth. If you’re using white chocolate, tint it orange with food coloring, starting with a small amount and stirring until the color is even and carrot-like.
Kitchen note: White chocolate scorches easily. Stop heating while a few small bits remain and stir until they melt from residual heat instead of microwaving again.
Dip the strawberries.
Holding each strawberry by the green top, dip it into the melted orange coating, turning to cover most of the berry. Let excess drip back into the bowl, then lay the coated berry on the parchment-lined tray. Repeat with all strawberries.Add carrot “ridges.”
Use a fork or a small spoon to drizzle thin lines of the remaining orange coating across each strawberry to mimic carrot ridges. Chill the tray in the refrigerator for about 10–15 minutes, until the coating is fully set and no longer tacky.Layer the pudding and Oreo dirt.
Spoon about 1–2 tablespoons of Oreo crumbs into the bottom of each clear cup. Add a few spoonfuls of the pudding mixture (about 1/4 cup / 60 ml), then sprinkle another thin layer of crumbs on top. Repeat once more if your cups are tall, finishing with a generous, even layer of Oreo “dirt” on top.Adjust for cup size.
For very small cups (around 4 oz / 120 ml), one layer of pudding and one of crumbs is enough. Larger cups (6 oz / 180 ml) can support two pudding layers. The top Oreo layer should fully cover the pudding so the “carrot patch” illusion works.Plant the strawberry carrots.
Just before serving, gently press one coated strawberry into the center of each cup, twisting slightly so it stands upright in the crumbs. The Oreo layer should come up to or just below where the coating starts, making it look like a carrot planted in soil.Chill until ready to serve.
Refrigerate the assembled cups for at least 30 minutes so the flavors meld and the pudding firms. The cups can hold for several hours in the fridge; for the best texture on the strawberries, add them within 2–3 hours of serving.
Kitchen note: If you need to make these ahead, keep the pudding cups and coated strawberries separate in the fridge. Assemble and “plant” the carrots right before serving so the cookie crumbs stay crisp and the coating on the berries doesn’t take on moisture.
What to Expect
The base of these carrot patch dessert cups with Oreo dirt is smooth and creamy from the pudding and whipped topping, with just enough structure to hold layers in the cup. It’s not as dense as a mousse made with eggs or heavy cream, but it still feels rich.
The Oreo “dirt” brings a gentle crunch that softens over time in the fridge. If you serve the cups within a few hours, you’ll get more contrast between crisp crumbs and soft pudding; overnight, the crumbs absorb moisture and turn cakier.
Flavor-wise, expect familiar chocolate pudding sweetness supported by the deeper cocoa taste of the Oreos. The strawberry “carrots” add a fresh, fruity bite next to the candy coating and chocolate base, which keeps the dessert from feeling one-note.
Different brands of instant pudding and whipped topping can change the thickness. Some puddings set firmer, and some toppings are lighter; if your mixture feels very loose, chilling a bit longer before layering will help it hold shape.
Kitchen note: Clear, straight-sided cups show the layers best, but if you use short, wide ramekins, you may only see a top crust of “dirt.” The dessert still works; just lean into the patch idea with a thicker Oreo layer.
Ways to Change It Up
Simple vegetarian or vegan version.
To make a dairy-free option, choose a plant-based instant pudding (or a vegan pudding mix), use almond, oat, or soy milk, and swap in a non-dairy whipped topping. Check your sandwich cookies and candy melts for hidden dairy. The texture may be slightly softer, but the Oreo dirt effect and overall look remain the same.Milder, less-sweet cups.
If you prefer less sweetness, use dark chocolate pudding mix (if available) and a reduced-sugar whipped topping. You can also scrape the filling out of a few Oreos before crushing to reduce richness. The finished dessert will taste more cocoa-forward and less like kids’ snack packs.Extra-chocolate or candy-loaded version.
For a more indulgent take, stir a handful of mini chocolate chips or chopped milk chocolate into the pudding mixture before layering. You can also tuck a few chocolate eggs or small candies into the Oreo layer so kids discover “hidden treasures” in the patch.Faster assembly for a crowd.
Instead of individual cups, layer the pudding mixture and Oreo crumbs in a 20 x 20 cm (8 x 8 inch) glass baking dish. End with a thick dirt layer and plant the strawberry carrots in rows across the top. It’s quicker to build and easier to transport to potlucks or school events.Kid-decorated garden.
Skip the chocolate-dipped strawberries and let kids top the Oreo dirt with gummy carrots, candy bunnies, or jelly beans. This cuts out the coating step and keeps the recipe very close to classic dirt cups with a spring twist.
Serving and Storage
Carrot patch dessert cups with Oreo dirt are most often served as a spring or Easter dessert, but they work anytime you want a garden or bunny theme. The individual portions make them easy to pass around at kids’ parties or casual potlucks.
Serve the cups well chilled. The pudding base tastes best cold, and the Oreo crumbs hold their texture better straight from the refrigerator. A small spoon works better than a fork so you can scoop down through the layers.
For pairing, these cups go nicely after lighter mains like simple roast chicken, salads, or grilled vegetables, since the dessert leans pretty sweet. Because they’re rich, small portions are usually enough.
In terms of storage, keep the pudding–Oreo layers covered in the refrigerator for up to 2 days. Over time, the cookies will soften and turn more cake-like, but the dessert is still pleasant.
The chocolate-covered strawberry carrots are best added within a few hours of serving. Stored separately on a parchment-lined tray and lightly covered, they’ll keep in the fridge for about 24 hours, though the berries slowly release moisture.
Leftover fully assembled cups should be eaten within 24 hours for the best look and texture. The strawberries may weep a bit into the crumbs, which doesn’t hurt the flavor but makes the “dirt” look less crisp.
Cultural Context
Dirt-style desserts like these carrot patch cups are part of a broader American trend of playful, no-bake sweets that became especially popular in the late 20th century. Classic “dirt cake” combines instant pudding, whipped topping, and crushed chocolate sandwich cookies to resemble soil, often with gummy worms or other candies added for fun, a style sometimes called “dirt and worms.”
Food historians link these recipes to the rise of convenience products like instant pudding and shelf-stable whipped toppings in U.S. home kitchens. References to dirt cake and similar treats appear in discussions of American dessert culture and children’s food, such as the overview of dirt cake as an American dessert made from pudding and cookies on the dirt cake entry and analyses of how dirt cups evolved alongside branded products in pieces like this history of the dirt cup dessert. Carrot patch versions simply adapt that template with seasonal decorations for spring and Easter.
Common Questions and Troubleshooting
Why is my pudding mixture too runny to layer?
Usually the milk wasn’t cold enough, or the pudding didn’t get enough time to set before folding in the whipped topping. Let the mixture sit in the fridge for another 15–20 minutes, then check again. If it’s still loose, whisk in an extra spoonful of dry pudding mix if you have it.
My Oreo dirt turned soggy. How can I keep it crunchy?
For the best texture, assemble the cups no more than a few hours before serving, and keep them chilled. If you need more lead time, you can add only the bottom and middle Oreo layers in advance, then sprinkle the final “dirt” layer and add the carrots right before serving so at least the top stays crunchy.
The chocolate coating slid off my strawberries—what happened?
Strawberries that are even slightly wet will repel the melted chocolate. Pat the berries completely dry after washing, including around the leaves. If the coating is very hot or thin, let it cool for a minute or two before dipping so it clings better.
Can I use chocolate chips instead of white chocolate or candy melts?
You can, but chocolate chips are formulated to hold their shape when baked and can be a bit thicker when melted. If you melt them gently with a teaspoon of neutral oil, they’ll be smoother for dipping. You’ll still need orange food coloring to get the carrot look.
Is there a way to cut the sweetness but keep the same idea?
Yes. Use dark or bittersweet chocolate for the coating, choose a less-sweet pudding or reduce-sugar mix, and serve smaller portions. You can also replace part of the Oreos with plainer chocolate wafer cookies to tone down the filling.
Kitchen note: If you’re serving both kids and adults, consider making a half-batch of slightly less-sweet cups for adults and keeping the classic, sweeter version for kids. Labeling trays clearly avoids confusion.
Can I freeze carrot patch dessert cups with Oreo dirt?
Freezing isn’t ideal for this dessert. The pudding base can become grainy as it thaws, and strawberries change texture significantly. If you want something make-ahead from the freezer, it’s better to look to icebox cakes or ice cream desserts instead.
Conclusion
These carrot patch dessert cups with Oreo dirt bring familiar dirt dessert flavors into a seasonal, playful format that’s manageable even on a busy schedule. The method relies on straightforward steps—whisking pudding, folding in whipped topping, crushing cookies, and dipping strawberries—so older kids can help at nearly every stage.
If you make these, consider noting what worked for you: which cup size you preferred, whether you liked them best freshly assembled or after a longer chill, and any small tweaks to sweetness or toppings. Sharing your variations and results in the comments helps other home cooks adapt the recipe to their own kitchens and occasions.
Carrot Patch Dessert Cups with Oreo Dirt
Equipment
- Medium mixing bowl
- Whisk
- Rubber spatula
- Zip-top bag
- Rolling Pin
- Microwave-safe bowl
- Fork
- Spoon
- Parchment paper
- Small tray or plate
- Clear cups (4–6 oz)
Ingredients
- 24 Oreo cookies about 250 g; for the “dirt” layer
- 2 cups cold whole or 2% milk to mix with the pudding (480 ml)
- 1 package instant chocolate pudding mix 3.9 oz / 110 g box
- 1 cup whipped topping such as Cool Whip, thawed (240 ml)
- 6 oz white baking chocolate or orange candy melts for coating the strawberries (170 g)
- 6 medium strawberries with green tops intact
- orange food coloring gel or liquid; if using white chocolate instead of orange candy melts
- extra Oreo crumbs or chocolate sprinkles optional garnish
Instructions
- Crush the Oreo “dirt.” Place the Oreo cookies in a sturdy zip-top bag, press out most of the air, seal, and crush with a rolling pin into fine-to-medium crumbs. Set aside.
- Mix the chocolate pudding. In a medium bowl, whisk the cold milk with the instant chocolate pudding mix for 1–2 minutes until smooth and starting to thicken. Let sit about 5 minutes to fully set.
- Lighten the pudding. Fold the whipped topping into the thickened pudding with a spatula just until uniform and lighter in color.
- Chill the base briefly (optional). Cover and refrigerate the pudding mixture for 15–20 minutes to firm it slightly for cleaner layers.
- Prepare the strawberry “carrots.” Line a small tray or plate with parchment paper. Wash strawberries and dry them very thoroughly.
- Melt the coating. Microwave the white baking chocolate or candy melts in 20-second bursts, stirring between each, until smooth. If using white chocolate, tint orange with food coloring.
- Dip the strawberries. Hold each strawberry by the green top, dip into the orange coating, let excess drip off, and place on the parchment-lined tray.
- Add carrot ridges. Drizzle thin lines of remaining orange coating across each strawberry with a fork or small spoon. Refrigerate 10–15 minutes until set.
- Layer the pudding and Oreo dirt. Add 1–2 tablespoons crumbs to each cup, then a layer of pudding (about 1/4 cup / 60 ml), then a thin layer of crumbs. Repeat if cups are tall, finishing with an even, generous “dirt” layer on top.
- Adjust for cup size. For 4 oz cups, one pudding layer and one crumb layer is enough; for 6 oz cups, do two pudding layers. Make sure the top Oreo layer fully covers the pudding.
- Plant the strawberry carrots. Just before serving, gently press one coated strawberry into the center of each cup so it stands upright in the crumbs.
- Chill until ready to serve. Refrigerate the assembled cups at least 30 minutes before serving. For best strawberry texture, add the carrots within 2–3 hours of serving.
Leave a Reply