
An espresso cake filling is one of the easiest ways to make a basic layer cake or cupcake taste like it came from a bakery, without changing your favorite cake recipe. This version is rich from cream cheese and butter, with a clear espresso flavor that actually reads as coffee, not just “sweet.” It works as a filling for 2–3 layer cakes or for injecting into cupcakes when you want a surprise center.
If you are staring at cooled cake layers after a busy day, start by softening the cream cheese and butter so they blend smoothly. Rushing? Chill the finished filling for 15–20 minutes before you assemble so it stays where you put it.
This espresso cake filling is especially good with chocolate, vanilla, or caramel-style cakes, and fits well for birthdays, dinner parties, and coffee-themed desserts year-round. Expect a smooth, pipeable consistency that’s sturdy enough for stacking but still soft when you slice.
Ingredients
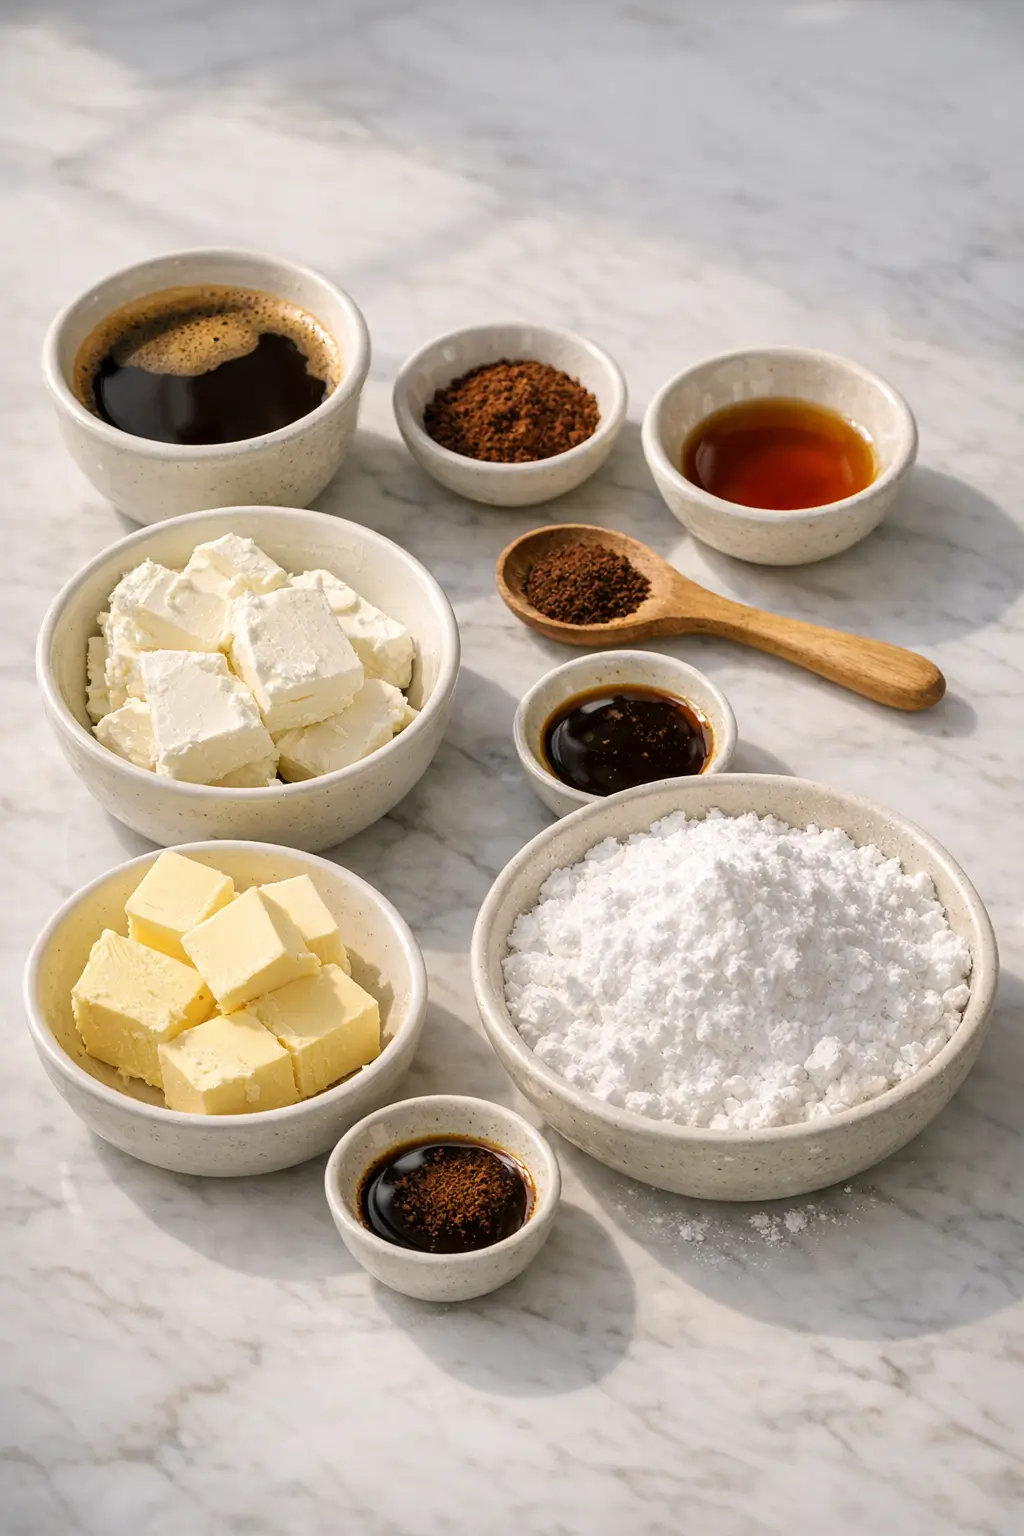
- 225 g / 8 oz cream cheese, full-fat, room temperature – for body, tang, and structure
- 115 g / 1 stick / 1/2 cup unsalted butter, room temperature – adds richness and helps the filling firm in the fridge
- 360 g / 3 cups powdered sugar, sifted – sweetens and thickens to a spreadable consistency
- 30–45 ml / 2–3 tablespoons strong brewed espresso, cooled to room temperature – main flavor; adjust to taste
- 1 teaspoon pure vanilla extract – rounds out the coffee flavor
- 1/4 teaspoon fine sea salt – balances sweetness
Optional, for stronger coffee flavor:
- 1–2 teaspoons instant espresso powder, dissolved into the brewed espresso – boosts intensity without extra liquid
Possible substitutions:
- Use brick-style Neufchâtel instead of cream cheese if you prefer slightly lower fat; texture will be a bit softer.
- If you don’t brew espresso, use 2–3 teaspoons instant espresso dissolved in 2 tablespoons hot water, then cooled.
- Salted butter can replace unsalted; reduce added salt to a small pinch or omit.
Step-by-Step Instructions for Espresso Cake Filling Recipe for Layer Cakes and Cupcakes
-
Make sure your ingredients are at the right temperature.
Take the cream cheese and butter out of the refrigerator 30–45 minutes before you plan to mix. They should feel cool but yield easily when pressed with a fingertip.
Kitchen note: If the cream cheese is still very cold, you’ll see small lumps that never quite disappear. It’s better to wait an extra 10 minutes than to fight the mixer later.
-
Beat cream cheese and butter until completely smooth.
In a large mixing bowl (a stand mixer with the paddle attachment works well, but a handheld mixer is fine), combine the cream cheese and butter.
Beat on medium speed for 2–3 minutes, scraping down the sides and bottom once or twice, until the mixture is creamy, uniform, and free of visible lumps.
-
Add vanilla and salt.
Pour in the vanilla extract and sprinkle in the salt.
Beat briefly, just until combined, about 15–20 seconds.
-
Incorporate the powdered sugar gradually.
Sift the powdered sugar if you haven’t already. With the mixer on low, add the sugar about 1/2 cup (60 g) at a time.
Let each addition mostly disappear before adding the next to prevent clumps and sugar clouds in your kitchen.
Once all the sugar is in, increase speed to medium and beat for 1–2 minutes until thick, lightened, and smooth.
-
Flavor with espresso.
Stir the cooled brewed espresso (and the dissolved espresso powder, if using) to make sure nothing has settled on the bottom.
With the mixer on low, slowly drizzle in 2 tablespoons (30 ml) of the espresso.
Beat just until fully incorporated, then stop and scrape down the bowl.
-
Adjust consistency and coffee strength.
Taste a small spoonful. If you want a stronger coffee note, add up to 1 more tablespoon (15 ml) espresso, beating briefly to combine.
If the filling becomes a little too loose for your liking, add 2–4 tablespoons (15–30 g) additional powdered sugar and mix again until it holds soft peaks on the beater.
Kitchen note: For layer cakes, aim for a consistency slightly thicker than cupcake frosting; when you drag a spatula through the bowl, the line should hold for a few seconds instead of flowing closed immediately.
-
Chill briefly for easier assembly.
Transfer the bowl to the refrigerator for 15–30 minutes.
This short chill firms the butter and cream cheese just enough that the filling won’t squeeze out under the weight of upper layers, but it should still be spreadable.
-
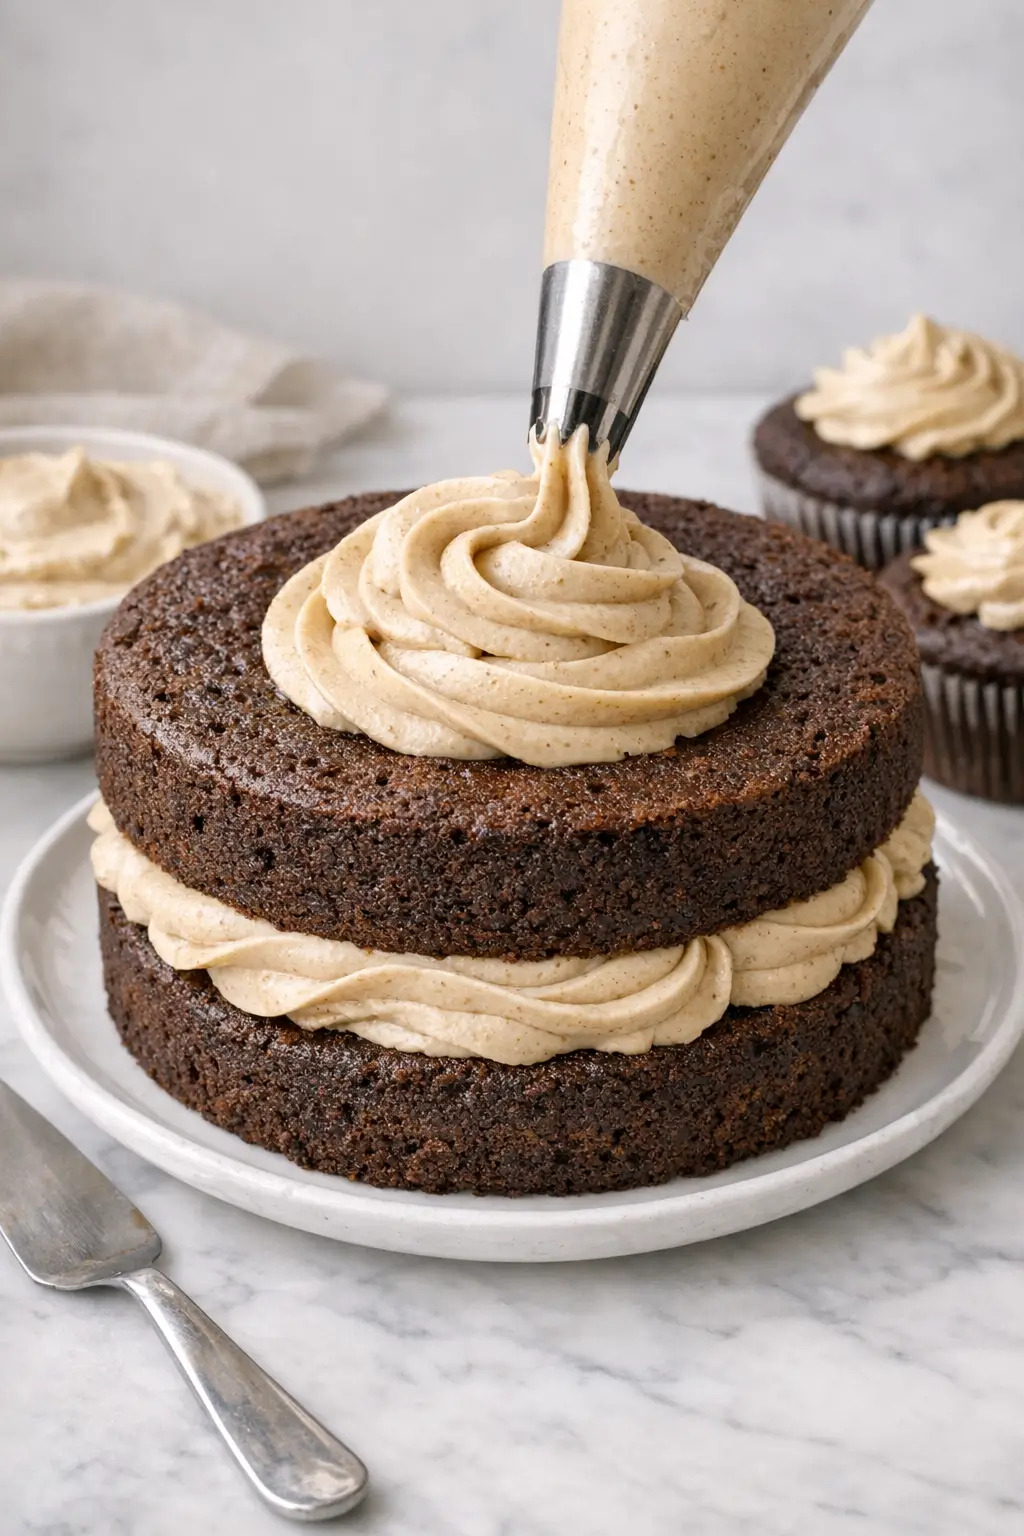
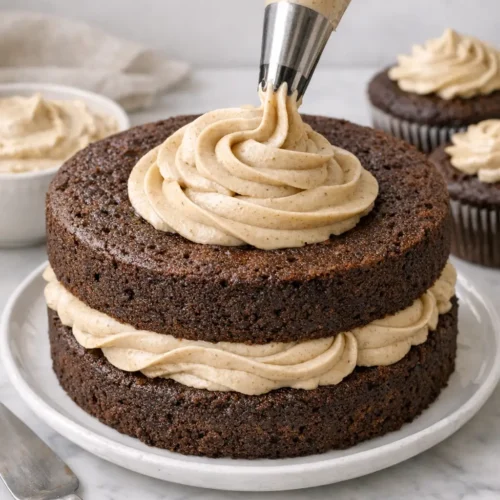
Fill a layer cake.
Place your first cooled cake layer on a serving plate or board.
If your outer frosting is softer (like whipped cream or lighter buttercream), it helps to pipe a ring of that frosting around the edge of the cake as a “dam.”
Spoon about 1/3–1/2 of the espresso filling onto the center of the layer, depending on how many layers you have, and spread it out to meet the frosting dam, keeping it even.
Top with the next cake layer and press gently in the center with your palm to settle the filling.
-
Fill cupcakes.
For cupcakes, fit a piping bag with a round tip (or use a small knife or apple corer).
Insert the tip into the center of a cooled cupcake and gently squeeze in a tablespoon or so of filling, stopping when the top just begins to dome.
Replace any removed cake plug if you cored them, then frost as desired.
-
Final texture check before serving or chilling.
After you’ve filled your cake or cupcakes, refrigerate for at least 30–45 minutes before slicing or transporting.
The filling will set further in the cold, giving clean slices and keeping the layers stable.
Kitchen note: Cream cheese-based fillings should not sit at room temperature for more than about 2 hours. Keep the cake chilled until close to serving, then bring to cool room temperature for 20–30 minutes so the texture softens slightly.
What to Expect
This espresso cake filling tastes like a cross between classic cream cheese frosting and a coffee shop latte.
The cream cheese gives a light tang that prevents the sweetness from becoming cloying, while the butter and powdered sugar create a smooth, almost mousse-like texture when slightly chilled.
Once set, the filling feels firm enough to support 2–3 cake layers without oozing, yet it yields easily to a fork.
In the refrigerator, it becomes more fudge-like; at cool room temperature, it relaxes to a creamy, velvety consistency.
Flavor-wise, expect a clear coffee aroma up front, with vanilla and dairy rounding out any espresso bitterness.
Using instant espresso in addition to brewed coffee will increase intensity, while using only brewed espresso gives a slightly softer, more rounded coffee profile.
Different brands of cream cheese and butter can affect both flavor and stiffness.
Some cream cheeses are softer and slightly looser, which can make the filling feel lighter but less firm; if that happens, a bit of extra powdered sugar and chilling time usually balances it out.
Ways to Change It Up
-
Mocha version (with chocolate).
Whisk 2–3 tablespoons unsweetened cocoa powder into the powdered sugar before adding it to the mixer.
The cocoa softens perceived sweetness and adds a chocolate backbone that pairs especially well with chocolate or marble cakes.
You may need an extra teaspoon or two of espresso or a tablespoon of milk/cream to maintain the same spreadable texture.
-
Lighter, whipped version.
Reduce the butter to 55 g / 4 tablespoons and powdered sugar to 240 g / 2 cups.
Once the base filling is smooth and flavored, fold in 120 ml / 1/2 cup softly whipped heavy cream.
This gives an airier texture closer to espresso whipped cream, ideal for single-layer cakes or cupcakes that will be eaten quickly.
Kitchen note: This lighter version is less stable and should be used for 1–2 thin layers only. Always keep it well chilled and serve the same day if possible.
-
Milder coffee flavor.
For anyone sensitive to coffee or serving kids, cut the espresso down to 1 tablespoon and skip the instant espresso powder.
The result is more like a sweet cream cheese frosting with a gentle coffee note in the background.
-
Bolder, grown-up twist.
Replace 1 tablespoon of the brewed espresso with 1 tablespoon coffee liqueur (like Kahlúa), keeping the total liquid the same.
This deepens the flavor and adds complexity, but keep in mind that it will no longer be suitable for anyone avoiding alcohol.
-
Vegan-friendly adaptation.
Use a firm, block-style vegan cream cheese and a neutral, plant-based butter substitute.
Start with 300 g / 2 1/2 cups powdered sugar and 1–2 tablespoons strong espresso, adding more sugar or a splash of plant milk as needed to find a stable consistency.
The flavor will lean more on the espresso and sweetness because most vegan cream cheeses are less tangy, so a small squeeze of lemon juice can help restore balance.
Serving and Storage
This espresso filling works well with chocolate, vanilla, almond, or caramel-flavored cakes.
It’s especially good in layer cakes served with simple sides like lightly sweetened whipped cream or a scoop of vanilla ice cream.
For cupcakes, a swirl of chocolate or vanilla buttercream on top contrasts nicely with the coffee center.
Plan to keep the filled cake or cupcakes refrigerated because of the cream cheese.
Stored in an airtight container or well-covered cake box, the dessert keeps for about 3–4 days in the fridge.
The flavor often improves on day two as the espresso settles into the filling and cake.
To serve, remove the cake from the refrigerator 20–30 minutes before slicing so the filling softens slightly and tastes more aromatic.
Leftover filling (unused) can be refrigerated in a covered container for up to 4 days.
Stir before using; if it seems too firm, let it sit at room temperature for 10–15 minutes, then beat briefly to restore smoothness.
Freezing is possible: transfer the filling to an airtight container, press plastic wrap directly onto the surface, and freeze for up to 1 month.
Thaw overnight in the refrigerator, then beat to refresh the texture.
Cultural Context
Coffee and espresso-flavored desserts have a long history in European baking, especially in countries where coffeehouse culture developed early.
Layer cakes, buttercreams, and creams with coffee or espresso are often served in cafés and at celebrations as a way to echo the flavors in the cup on the table.
One well-known example is tiramisu, which layers coffee-soaked biscuits with mascarpone cream; it helped popularize coffee-flavored sweets globally in the late 20th century.
For a concise overview of how espresso emerged in Italy and became central to modern coffee culture, see this piece from the Museo Nazionale Scienza e Tecnologia Leonardo da Vinci.
You can also explore how coffee and cafés shaped social life in Europe through this article from Europeana on the history of European coffeehouses, which helps explain why coffee flavors show up so often in cakes and pastries.
Common Questions and Troubleshooting
Why is my espresso filling runny and hard to spread?
Most often, either the espresso was still warm when added or too much liquid was used for the amount of sugar.
Chill the bowl for 20–30 minutes, then beat again to see if it firms up.
If it’s still loose, add 2–4 tablespoons of powdered sugar and beat briefly, repeating as needed until the filling holds gentle peaks.
I see tiny lumps of cream cheese, even after mixing. What went wrong?
Cold cream cheese is difficult to smooth out once sugar and liquid are added.
Next time, make sure the cream cheese is truly at room temperature and beat it thoroughly with the butter before adding anything else.
For the current batch, you can press the filling through a fine mesh sieve, then rebeat briefly to restore the texture.
Kitchen note: Overbeating once the sugar and espresso are in can also introduce excess air and make the filling feel fluffy but unstable. Aim for smooth and creamy, not whipped to stiff peaks.
Can I use this as an outer frosting, not just a filling?
Yes, this recipe will generously fill a 2-layer 8-inch (20 cm) cake and lightly frost the outside, or fill the layers of a 3-layer cake.
Because it’s cream cheese-based, it stays a bit softer than many buttercreams, so keep the finished cake well chilled and avoid leaving it out for long periods, especially in warm kitchens.
Is there a way to make it less sweet?
Cream cheese fillings need a certain amount of powdered sugar for structure.
You can modestly reduce the sugar to about 300 g / 2 1/2 cups and increase the espresso by a teaspoon or two, but the filling will be softer and may need more chilling time.
Balancing with a darker, less sweet outer frosting (like a lightly sweetened whipped cream or dark chocolate ganache) can also keep the overall dessert from tasting too sweet.
Can I make this espresso filling ahead of time?
Yes. You can prepare it up to 2 days ahead, store it covered in the refrigerator, then bring it out 20–30 minutes before using.
Give it a good stir or a brief beat with the mixer to smooth it out before filling your cake or cupcakes.
Is the caffeine level high?
The exact amount depends on your espresso strength and how much filling each slice contains.
In general, the total caffeine in the batch is similar to 1–2 shots of espresso, spread across all the servings.
If you’re concerned, use decaf espresso or instant decaf espresso powder—the flavor stays very similar with significantly less caffeine.
Conclusion
This espresso cake filling is a straightforward way to add a clear coffee note and creamy texture to layer cakes and cupcakes without a lot of extra work.
It relies on common ingredients, comes together in one bowl, and is flexible enough to adjust in sweetness and intensity to match your crowd.
If you try it, consider jotting down how much espresso and sugar balance best for your taste so you can repeat it easily.
Feel free to leave a comment or rating with what kind of cake you paired it with, any flavor twists you tried, and how the filling held up in your kitchen conditions.
Espresso Cake Filling That Elevates Cakes Fast
Equipment
- Large mixing bowl
- Stand mixer with paddle attachment or handheld mixer
- Spatula
- Fine-mesh sieve (for sifting powdered sugar)
- Piping bag with round tip (for cupcakes)
Ingredients
- 225 g cream cheese full-fat, room temperature
- 115 g unsalted butter room temperature
- 360 g powdered sugar sifted
- 30–45 ml strong brewed espresso cooled to room temperature (2–3 tbsp), adjust to taste
- 1 tsp vanilla extract pure
- 1/4 tsp fine sea salt
Optional (for stronger coffee flavor)
- 1–2 tsp instant espresso powder dissolved into the brewed espresso
Instructions
- Make sure your ingredients are at the right temperature: take the cream cheese and butter out of the refrigerator 30–45 minutes before mixing. They should feel cool but yield easily when pressed.
- Beat cream cheese and butter until completely smooth: in a large mixing bowl, beat together on medium speed for 2–3 minutes, scraping down the sides and bottom once or twice, until creamy and lump-free.
- Add vanilla and salt and beat briefly (about 15–20 seconds) just until combined.
- Incorporate the powdered sugar gradually: with the mixer on low, add about 1/2 cup (60 g) at a time. Once all sugar is added, beat on medium for 1–2 minutes until thick, lightened, and smooth.
- Flavor with espresso: stir the cooled espresso (and dissolved instant espresso powder, if using). With the mixer on low, drizzle in 2 tablespoons (30 ml) espresso and mix just until incorporated; scrape down the bowl.
- Adjust consistency and coffee strength: taste and add up to 1 more tablespoon (15 ml) espresso if desired. If the filling becomes too loose, add 2–4 tablespoons (15–30 g) additional powdered sugar and mix until it holds soft peaks.
- Chill briefly for easier assembly: refrigerate the filling for 15–30 minutes so it firms up but remains spreadable.
- To fill a layer cake: place the first cooled cake layer on a plate/board. Optionally pipe a frosting “dam” around the edge. Spread about 1/3–1/2 of the espresso filling evenly, top with the next layer, and press gently to settle.
- To fill cupcakes: fit a piping bag with a round tip (or core with a small knife/apple corer). Insert into the center and pipe about 1 tablespoon filling, stopping when the top begins to dome; replace any cake plug if needed and frost.
- After filling, refrigerate the cake/cupcakes at least 30–45 minutes before slicing or transporting so the filling sets for clean slices and stable layers.
Leave a Reply