
Bright, tangy lemon bars with a buttery shortbread crust are a classic spring dessert for showers, Easter, and potlucks. These lemon bars with shortbread crust lean slightly more tart than sweet, hold their shape, and are designed to slice cleanly so they can travel to parties without collapsing.
If you’re racing around on a busy weeknight before a school event, start by softening or melting the butter and lining your pan with parchment so the crust can go straight into the oven. Hosting with limited counter space? Stack your mixing bowls, measure everything before you begin, and clear a spot near the fridge so the pan can slide in to chill once baked.
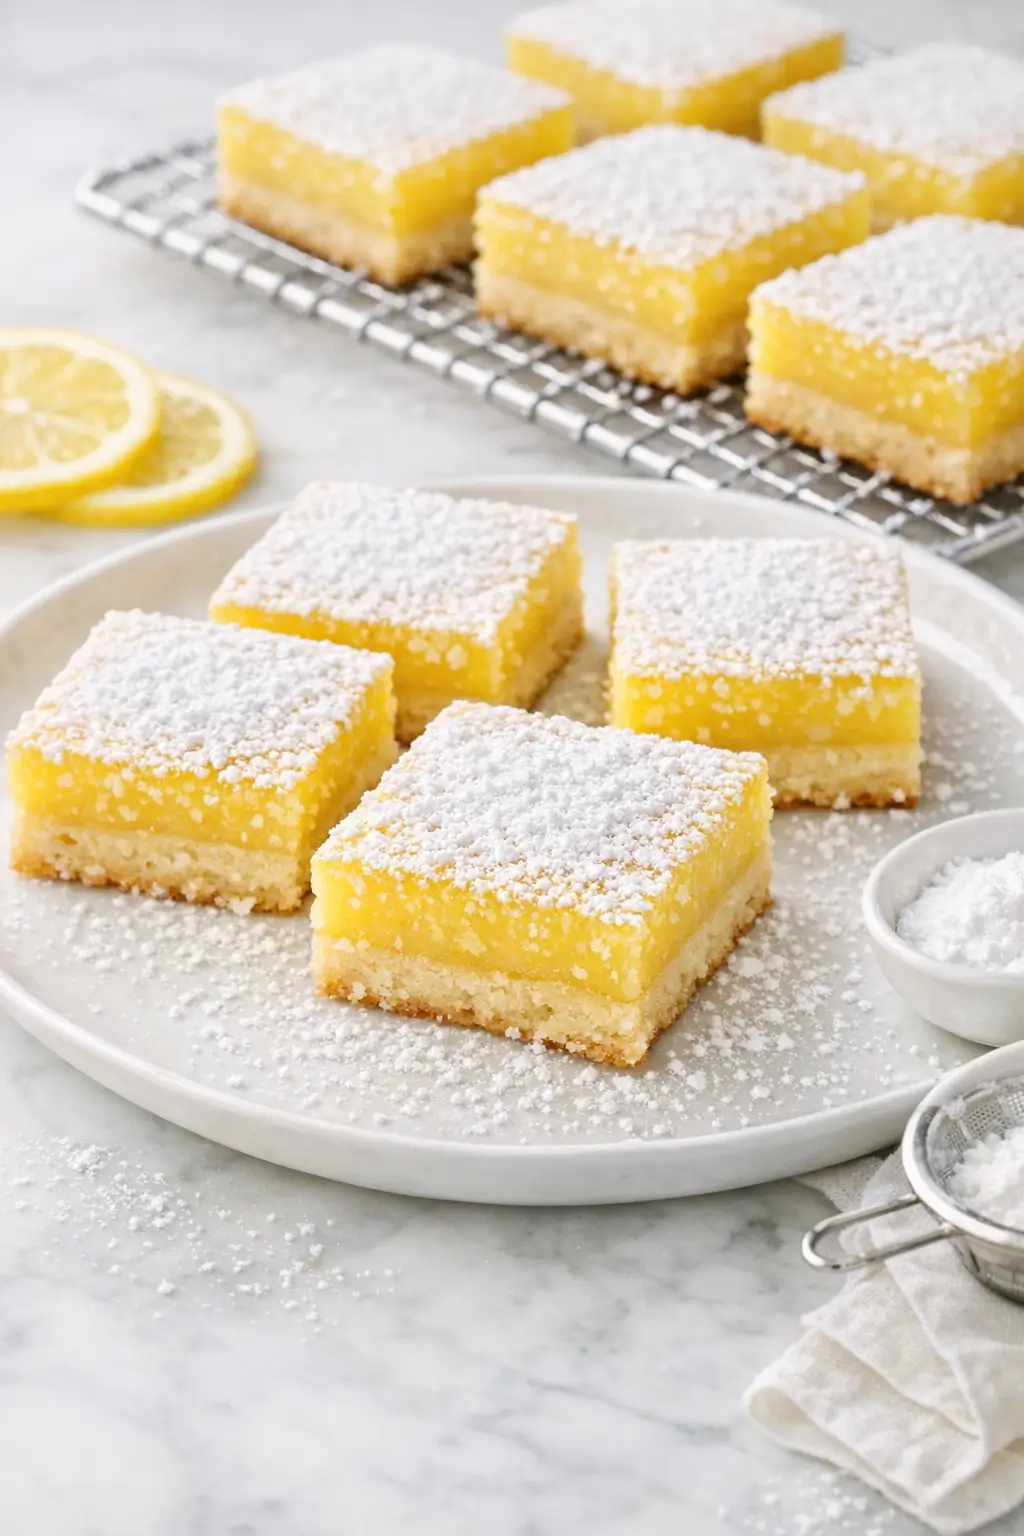
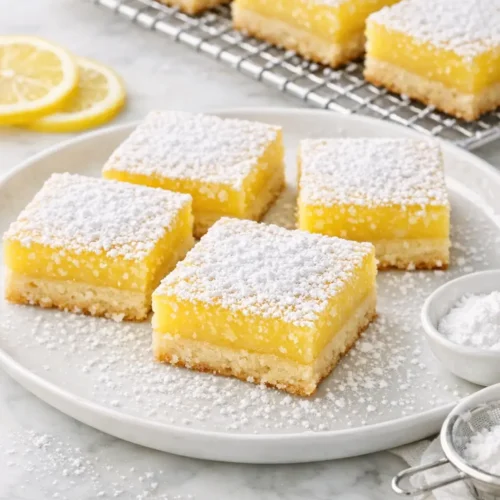
You’ll get a tender but sturdy shortbread base, a smooth lemon custard layer that doesn’t ooze, and delicate powdered sugar on top that you add just before serving.
Ingredients
Makes one 8×8 inch / 20cm square pan (16 small or 9 large bars)
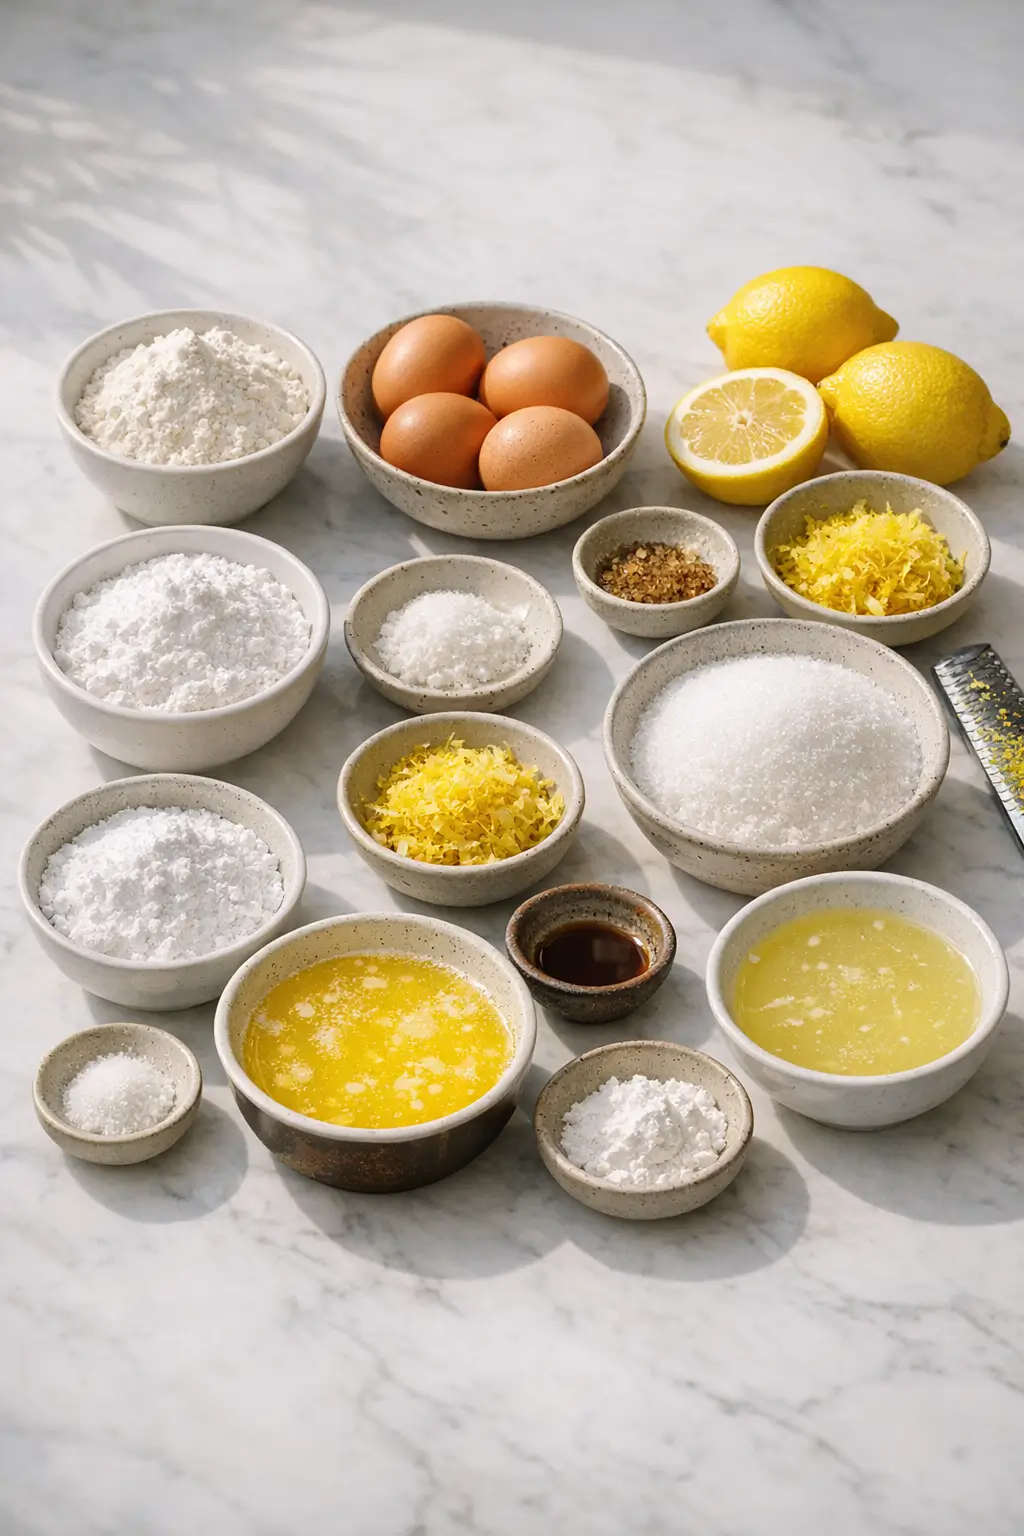
For the shortbread crust
- 125 g / 1 cup all-purpose flour, leveled
- 40 g / 1/3 cup powdered sugar (confectioners’ sugar), sifted if lumpy – for a tender, not grainy, crust
- 1/4 tsp fine salt – balances sweetness and butter
- 115 g / 1/2 cup / 1 stick unsalted butter, melted and slightly cooled
- 1/2 tsp vanilla extract – optional, for a softer cookie flavor
- 1 tsp finely grated lemon zest – optional, echoes the lemon filling
For the lemon filling
- 200 g / 1 cup granulated sugar
- 15 ml / 1 tbsp finely grated lemon zest (from about 2 lemons)
- 30 g / 1/4 cup all-purpose flour, leveled – gently thickens the custard
- 1/8 tsp fine salt
- 4 large eggs, at room temperature
- 120 ml / 1/2 cup freshly squeezed lemon juice, strained (about 3–4 lemons)
For finishing
- 20–30 g / 2–3 tbsp powdered sugar, for dusting just before serving
Kitchen note: Room‑temperature eggs blend more smoothly into the lemon mixture and help the filling bake evenly. If yours are cold, submerge them (in the shell) in warm tap water for 5–7 minutes.
Step-by-Step Instructions for Lemon Bars With Shortbread Crust
-
Preheat and prepare the pan.
Heat the oven to 175°C / 350°F with a rack in the middle. Line an 8×8 inch (20cm) square metal baking pan with parchment, leaving overhang on two sides to create a sling. Lightly grease the parchment and any exposed sides of the pan. -
Mix the shortbread dry ingredients.
In a medium bowl, whisk together the flour, powdered sugar, and salt until no streaks remain. If using lemon zest in the crust, rub it into the dry mixture with your fingertips to release the oils. -
Add butter and bring the dough together.
Pour in the melted, slightly cooled butter and vanilla (if using). Stir with a spatula until you get a soft, sandy dough that holds together when pressed. It should not be runny; if it looks greasy and loose, let it sit a minute to absorb. -
Press the crust into the pan.
Tip the dough into the prepared pan. Use your fingertips or the bottom of a measuring cup to press it into an even layer, pushing firmly into the corners. For bars that travel well, press the dough just slightly up the sides (about 5 mm / 1/4 inch) to create a shallow rim that helps hold the filling. -
Dock (optional) and bake the crust.
If you like, lightly prick the crust a few times with a fork to prevent air pockets. Bake for 18–20 minutes, until the edges are just turning light golden and the top looks dry, not shiny. The center may puff slightly; that’s fine.
Kitchen note: A pale, underbaked crust will taste doughy and can go soggy under the filling. It should look set and just beginning to color at the edges before you add the lemon layer.
-
Start the lemon filling while the crust bakes.
In a medium bowl, combine the granulated sugar and lemon zest. Use your fingertips to rub the zest into the sugar until it feels slightly damp and very fragrant. This step intensifies the lemon flavor. -
Add flour and salt.
Whisk the flour and salt into the lemon sugar until evenly combined and no lumps of flour remain. This disperses the flour so it thickens the filling evenly instead of clumping. -
Whisk in the eggs.
Crack the eggs into a separate small bowl first to avoid shell pieces, then add them to the sugar mixture. Whisk gently but thoroughly until the mixture is smooth and uniform in color. Aim to blend without whipping in lots of air, which can create bubbles and a foamy top. -
Add lemon juice.
Slowly whisk in the freshly squeezed, strained lemon juice. The filling will be loose and pourable. Give it a final stir right before pouring to redistribute any zest that has settled. -
Pour filling over hot crust.
When the crust is ready, remove the pan from the oven but leave the oven on. Immediately pour the lemon filling over the hot crust. Tilt the pan gently or use a spatula to nudge the filling into the corners for an even layer. -
Bake until just set.
Return the pan to the oven and bake for 18–22 minutes, rotating once if your oven has hot spots. The edges will be set and perhaps slightly darker; the center should look set but still have the tiniest jiggle when you nudge the pan. If it sloshes or looks liquid, give it a few more minutes. -
Cool at room temperature.
Place the pan on a cooling rack and let the bars cool completely to room temperature, about 1 hour. The filling will continue to firm up as it cools. -
Chill for clean slices.
For the sharpest, travel‑friendly bars, cover the cooled pan and refrigerate for at least 2 hours, or up to overnight. Chilling sets the custard and makes cutting much neater. -
Dust and slice.
Just before serving or packing for a gathering, use the parchment sling to lift the slab out of the pan onto a cutting board. Dust evenly with powdered sugar using a small sieve. Trim the very edges if you want ultra‑clean sides, then slice into 16 small squares or 9 larger bars, wiping the knife clean between cuts.
Kitchen note: If you need to transport these, skip stacking the bars; instead, place them in a single layer in a lidded container, then dust again lightly with powdered sugar at the party if needed.
What to Expect
These lemon bars set into distinct layers: a pale golden shortbread base that’s tender to bite but sturdy enough to lift, and a smooth lemon custard layer that doesn’t ooze or run once chilled.
The flavor is brightly lemony with a clear tart edge, balanced by enough sugar to keep it from tasting harsh. The powdered sugar on top adds a soft sweetness and looks festive for spring.
Texture can vary slightly depending on pan material and oven temperature. Metal pans usually yield a slightly crisper crust and faster bake time than glass. If your oven runs hot, the edges may brown more quickly; tenting just the edges with a loose strip of foil can help.
Kitchen note: If you prefer a softer, more custardy center, bake just until the middle barely jiggles and chill the minimum amount. For firmer, travel‑tough bars, bake toward the longer end of the range and chill overnight.
Ways to Change It Up
-
Softer, more custardy lemon bars.
Increase the lemon juice to 150 ml / 2/3 cup and reduce the flour in the filling to 20 g / 2 1/2 tbsp. The filling will be silkier and slightly looser, best served from the fridge on plates rather than passed around on napkins. -
Extra‑bright and slightly sweeter bars.
Use a mix of Meyer lemons and standard lemons if they’re available in spring where you live. Meyer lemons are naturally sweeter and less sharp, giving a rounder flavor. You can also bump the sugar to 225 g / 1 1/8 cups for a more dessert‑like sweetness. -
Almond‑kissed crust.
Swap 25 g / 3 tbsp of the crust flour for finely ground almonds or almond meal, and add a drop or two of almond extract with the vanilla. This adds a soft nuttiness that pairs well with lemon but will make the crust slightly more delicate. -
Simplified weeknight version.
If you’re short on time, skip the zest in the crust and only zest the lemons for the filling. You can also cool the bars for 30–40 minutes at room temperature, then chill for just 60 minutes. They’ll be a bit softer but still slice reasonably well if you’re careful. -
Milder lemon flavor.
For kids or lemon‑shy guests, reduce the zest in the filling to 2 tsp and the lemon juice to 90 ml / 3/8 cup, replacing the difference with water. The bars will be sweeter and less tangy, with a more subtle citrus note.
Serving and Storage
Lemon bars are most often served at room temperature or slightly chilled. For spring parties, they’re ideal on dessert tables alongside other small treats. If you’re planning a spread with other bright flavors, you might like them beside Mango Sticky Rice Made Easy: Creamy, Foolproof Dessert or South African Melktert (Milk Tart) Made Simply Tonight for a mix of citrusy and creamy options.
For neat presentation at gatherings, arrange the bars in a single layer on a platter, leaving a bit of space between each piece so the powdered sugar stays visible. A few thin lemon slices or curls of zest scattered around the platter underline the lemon theme.
Store leftover bars covered in the refrigerator for up to 4 days. The crust is crispest on day one and two but stays pleasant afterward. For best texture, return the bars to room temperature for 10–15 minutes before serving.
If you’d like to make them ahead for a big event, bake, cool, and chill completely, then freeze the un‑dusted slab well wrapped for up to 2 months. Thaw overnight in the fridge, dust with powdered sugar, and slice shortly before serving.
Kitchen note: Powdered sugar slowly dissolves on moist surfaces in the fridge. For a clean, white finish, always dust just before serving, even if the bars are fully chilled.
Cultural Context
Lemon bars in their current form—shortbread crust plus a tangy lemon custard layer—are widely associated with North American baking, particularly mid‑20th‑century home and community cookbooks. They fit into a broader category of bar cookies and traybakes that were popular for bake sales and church socials because they slice easily and feed a crowd.
The idea of pairing citrus with rich pastry goes back much further. Lemon custards and tarts appear in European cookbooks from at least the 18th and 19th centuries, such as those documented in culinary history collections at institutions like the Library of Congress Cookbook and Home Economics Collection. Citrus itself traveled through trade routes around the Mediterranean, and today lemon desserts feature in many cuisines, from British lemon curd tarts to American lemon meringue pie, as outlined by the historical overview of lemons and their global spread.
Because these bars are easy to portion and carry, they remain a staple at potlucks, school events, and casual spring gatherings.
Common Questions and Troubleshooting
My lemon bars are runny or don’t set. What went wrong?
Usually the filling was underbaked or the oven temperature was a bit low. The bars need enough time for the eggs and flour to fully set; keep baking until only the very center has a slight jiggle. Skipping the chill time can also make them feel looser than they actually are.
The crust turned out soggy. How can I fix that next time?
A soggy crust often means it was underbaked before the filling went on, or the bars sat at room temperature too long in a humid kitchen. Make sure the crust is lightly golden and fully set before you pour on the filling, and store finished bars in the fridge once they’re cool.
I only have bottled lemon juice. Can I use it?
You can, but the flavor will be a bit flatter and sometimes slightly bitter compared to fresh juice. If possible, combine bottled juice with at least a little fresh zest to brighten the flavor. Fresh lemons are strongly recommended for the best result.
Can I double the recipe for a larger pan?
Yes. For a 9×13 inch pan, double all the ingredients and bake the crust for about 22–25 minutes, then the filling for 22–26 minutes, watching for the same visual cues. The bars will be slightly thicker but still set nicely once chilled.
My bars puffed a lot and collapsed with a wrinkled top. Are they ruined?
Not at all. Vigorous whisking can add extra air, which makes the filling rise and fall more dramatically. The texture will still be good; the top may just look a little more rustic. Next time, whisk just until smooth and avoid using an electric mixer.
How should I pack these for travel to a party?
Chill the sliced bars thoroughly, then place them in a single layer in a shallow, lidded container. If you must stack, separate layers with parchment and know that the powdered sugar may smudge. Dust again lightly right before serving if you can.
Conclusion
These lemon bars with shortbread crust are designed with real gatherings in mind: they slice cleanly, hold up on a buffet table, and bring a bright citrus note to spring parties.
Once you’ve made them once or twice, you can adjust the tartness, sweetness, or crust thickness to suit your crowd. If you try them, feel free to leave a rating, share how they turned out in your kitchen, and note any tweaks you made for your own spring celebrations.
Lemon Bars With Shortbread Crust for Spring Parties
Equipment
- 8×8-inch (20 cm) square metal baking pan
- Parchment paper
- Medium mixing bowls
- Whisk
- Rubber spatula
- Measuring cups and spoons
- Cooling rack
- Fine-mesh sieve (for dusting powdered sugar)
- Knife
- Cutting board
Ingredients
For the shortbread crust
- 125 g all-purpose flour 1 cup, leveled
- 40 g powdered sugar (confectioners’ sugar) 1/3 cup; sifted if lumpy
- 1/4 tsp fine salt
- 115 g unsalted butter melted and slightly cooled (1/2 cup / 1 stick)
- 1/2 tsp vanilla extract optional
- 1 tsp lemon zest finely grated; optional
For the lemon filling
- 200 g granulated sugar 1 cup
- 15 ml lemon zest finely grated (from about 2 lemons)
- 30 g all-purpose flour 1/4 cup, leveled
- 1/8 tsp fine salt
- 4 large eggs room temperature
- 120 ml freshly squeezed lemon juice strained (about 3–4 lemons)
For finishing
- 20–30 g powdered sugar for dusting just before serving (2–3 tbsp)
Instructions
- Heat the oven to 175°C / 350°F with a rack in the middle. Line an 8×8 inch (20cm) square metal baking pan with parchment, leaving overhang on two sides to create a sling. Lightly grease the parchment and any exposed sides of the pan.
- In a medium bowl, whisk together the flour, powdered sugar, and salt until no streaks remain. If using lemon zest in the crust, rub it into the dry mixture with your fingertips to release the oils.
- Pour in the melted, slightly cooled butter and vanilla (if using). Stir with a spatula until you get a soft, sandy dough that holds together when pressed. If it looks greasy and loose, let it sit a minute to absorb.
- Tip the dough into the prepared pan. Use your fingertips or the bottom of a measuring cup to press it into an even layer, pushing firmly into the corners. Press the dough just slightly up the sides (about 5 mm / 1/4 inch) to create a shallow rim.
- Optional: lightly prick the crust a few times with a fork to prevent air pockets. Bake for 18–20 minutes, until the edges are just turning light golden and the top looks dry, not shiny.
- While the crust bakes, combine the granulated sugar and lemon zest in a medium bowl. Rub the zest into the sugar with your fingertips until slightly damp and very fragrant.
- Whisk the flour and salt into the lemon sugar until evenly combined and no lumps remain.
- Crack the eggs into a separate small bowl first, then add them to the sugar mixture. Whisk gently but thoroughly until smooth and uniform in color, avoiding whipping in lots of air.
- Slowly whisk in the freshly squeezed, strained lemon juice. Stir once more right before pouring to redistribute any settled zest.
- When the crust is ready, remove the pan from the oven (leave the oven on) and immediately pour the lemon filling over the hot crust. Tilt the pan gently or nudge the filling into the corners for an even layer.
- Return the pan to the oven and bake for 18–22 minutes, rotating once if needed. The edges should be set; the center should look set but still have the tiniest jiggle.
- Cool on a rack until completely room temperature, about 1 hour.
- Cover and refrigerate for at least 2 hours (or up to overnight) for the cleanest slices.
- Lift out using the parchment sling and set on a cutting board. Dust with powdered sugar using a small sieve. Trim edges if desired, then slice into 16 small squares or 9 larger bars, wiping the knife between cuts.
Leave a Reply