
Homemade granola bars with chocolate chips are one of those snacks that actually earn their space in your fridge. They’re chewy, sturdy enough for lunch boxes, and you control the sweetness instead of guessing what’s in the wrapper. This version bakes in one pan, uses basic pantry ingredients, and comes out like a cross between a soft cookie bar and a classic oat bar. If you’re juggling homework, sports, and a 20-minute window before meltdown o’clock, mix the base during dinner, bake while you eat, then chill and slice after bedtime. I started making these when my kid kept asking for the blue-box bars, and they’ve been in rotation ever since.
Ingredients
Makes 12–16 bars (8-inch square pan)
- 160 g (2 cups) old-fashioned rolled oats (not instant)
- 30 g (1 cup) crisp rice cereal (gives that classic light crunch; can skip and replace with another 30 g (1/3 cup) oats, bars will be denser)
- 50 g (1/2 cup) chopped nuts – almonds, walnuts, or pecans (or use unsweetened shredded coconut or pumpkin seeds if nut-free is needed)
- 1/4 tsp fine sea salt
- 1/4 tsp ground cinnamon (optional, but nice warmth)
- 80 g (1/3 cup, packed) light brown sugar
- 120 g (1/3 cup) honey (this is the main binder and sweetness)
- 56 g (4 Tbsp) unsalted butter
- 60 g (1/4 cup) creamy peanut butter or almond butter (for nut-free, use sunflower seed butter; flavor changes slightly but texture is similar)
- 2 tsp vanilla extract
- 80–90 g (1/2 cup) semi-sweet chocolate chips, plus a spoonful extra for sprinkling on top
Step-by-Step Homemade Granola Bars with Chocolate Chips
- Prep the pan and oven.
- Heat your oven to 325°F (165°C).
- Line an 8-inch (20 cm) square pan with parchment, leaving overhang on two sides so you can lift the slab out later.
- Lightly grease the parchment with a bit of butter or neutral oil so the bars release cleanly.
- Toast the oats and nuts (optional but worth it).
- On a rimmed baking sheet, spread the oats and chopped nuts in an even layer.
- Toast in the preheated oven for 8–10 minutes, stirring once, until the oats smell nutty and a few edges are just turning golden.
- This step deepens flavor and helps the bars taste less “raw.”
- Combine the dry mix.
- In a large bowl, add the toasted oats and nuts, crisp rice cereal, salt, and cinnamon.
- Stir to combine and set aside.
- Make the binding syrup.
- In a small saucepan, combine brown sugar, honey, and butter.
- Bring to a gentle simmer over medium-low heat, stirring often, until the mixture is smooth and just starting to bubble around the edges, about 2–3 minutes.
- Take off the heat and immediately whisk in the peanut butter and vanilla until the mixture is glossy and uniform.
- One thing — if you walk away and boil this hard for several minutes, you’ll end up with crunchy, hard bars. Gentle heat only.
- Coat the dry ingredients thoroughly.
- Pour the hot syrup over the oat mixture.
- Using a sturdy spatula, fold and scrape from the bottom of the bowl until every bit of oat and cereal is evenly coated.
- If you see dry pockets, keep mixing; any dry clumps are where your bars will crumble later.
- Cool slightly, then add chocolate chips.
- Let the mixture sit 5–7 minutes to cool down a bit; it should still be warm but not scorching.
- Sprinkle in the chocolate chips and fold quickly.
- If a few chips melt into streaks, that’s fine. If the chips all melt completely, the bars turn more like a chocolate-oat slab—not a disaster, just a different look.
- Pack the mixture firmly into the pan.
- Transfer the mixture to your prepared pan.
- Spread it out with a spatula, then lay a second piece of parchment (or lightly oiled hands) over the top.
- Press down very firmly, especially into the corners and edges, until the surface feels compact and level.
- Heads up: this pressing step is what keeps the bars from falling apart. Really lean on it.
- Top with a few extra chips (optional).
- While the surface is still warm, scatter a small handful of chocolate chips on top.
- Gently press them in with the back of a spoon or your palm so they stick.
- Bake until lightly set.
- Bake at 325°F (165°C) for 18–22 minutes, until the edges look just a shade deeper golden and the center looks slightly puffed.
- The bars will still feel a bit soft when hot; they firm up as they cool.
- Cool, chill, and slice.
- Let the pan cool on a rack until it reaches room temperature, at least 45–60 minutes.
- For the cleanest slices, transfer the pan to the fridge for another 30–60 minutes.
- Lift the slab out using the parchment, place on a cutting board, and cut into 12 large or 16 smaller bars with a sharp knife.
What to Expect
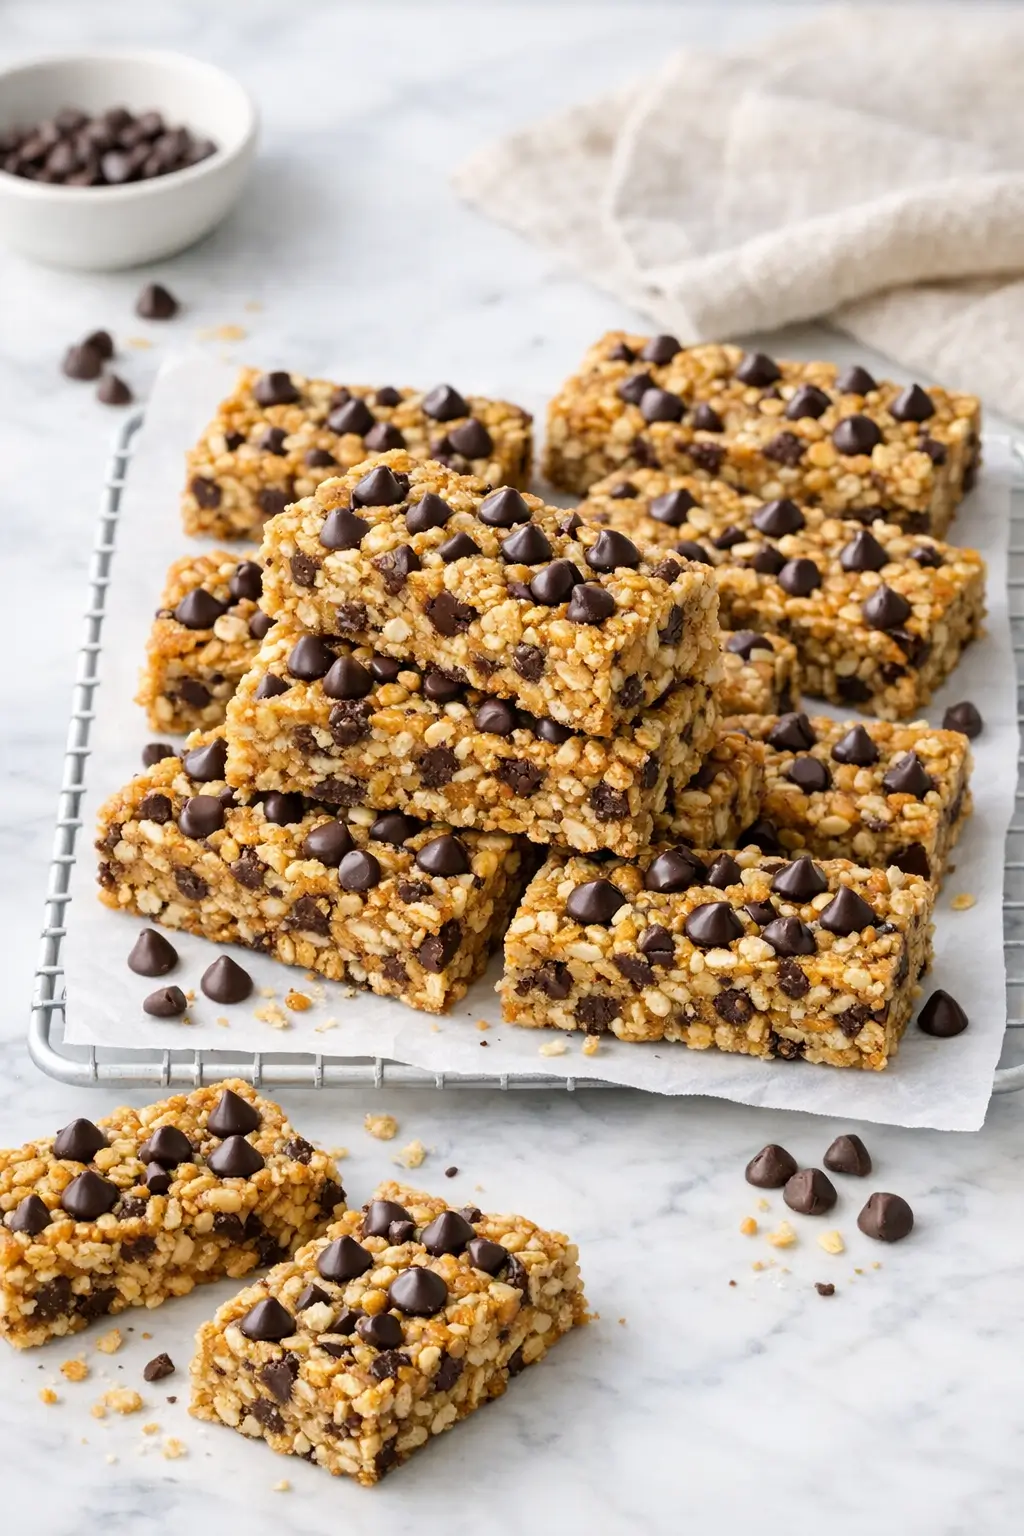
These homemade bars come out chewy in the center with slightly firmer, caramelized edges, more like a soft cookie bar than a brittle granola brick. You’ll taste toasted oats first, then the honey and brown sugar sweetness, with little pops of chocolate and crunch from the rice cereal and nuts. If you press the mixture very firmly and don’t overbake, they slice cleanly and hold together in lunch boxes without turning into a bag of crumbs.
Ways to Change It Up
You don’t have to mess with the base much, but a few tweaks are genuinely useful:
-
For a nut-free version, swap the nuts for pumpkin or sunflower seeds, and use sunflower seed butter in place of peanut butter. The flavor leans more “seedy” than nutty, but the bars still hold together really well.
-
If you want more of a fruit-and-chocolate vibe, fold in 2–3 Tbsp finely chopped dried fruit (cranberries, cherries, or apricots) and reduce the chocolate chips slightly so the bars don’t get too crowded and crumble.
-
I’ve also baked these in a 9×13-inch pan when I needed a lot of small bites for a kids’ event. The bars are thinner and bake faster (check around 14–16 minutes), and they’re more like snack-sized fingers than big bars.
Serving and Storage
Granola bars are snack food, but they behave better when you treat them a little like a cookie bar.
At home, I usually cut them into larger squares for after-school snacks and smaller rectangles for lunch boxes so they don’t come home half-eaten. They’re great tucked next to a yogurt cup, some sliced fruit, or a hard-boiled egg if you’re building a simple snacky lunch.
For storage, keep the sliced bars in an airtight container at room temperature for 3–4 days, separating layers with parchment if your kitchen runs warm. For longer storage, wrap bars individually or stack with parchment and refrigerate for up to 10 days.
They also freeze beautifully: lay on a tray to freeze solid, then move to a zip-top bag and freeze for up to 2 months. You can pack them in lunch boxes straight from the freezer; they’ll thaw by the time anyone’s ready to eat.
Common Questions
Why are my granola bars falling apart?
Most of the time it’s one of three things: not pressing the mixture firmly enough into the pan, not coating the oats fully with the syrup, or cutting before they’re completely cool. Next round, really lean on the mixture when you press it in (use the bottom of a measuring cup if that’s easier), and don’t rush the chilling step before slicing.
Can I cut back on the sugar or honey?
You can shave the brown sugar down to 60 g (1/4 cup, packed) without a problem. If you reduce the honey a lot, you lose both sweetness and the glue that keeps the bars together. I wouldn’t go below 90 g (1/4 cup + 2 Tbsp) honey unless you’re ready for more crumbly, loose bars.
Can I use quick oats instead of rolled oats?
Use them only for part of the mix. Swapping up to half the rolled oats for quick oats is fine, but using 100% quick oats makes the texture pasty and dense. If you want more specifics on working with oats in baking, this short piece on oat types from Harvard’s nutrition site is actually helpful.
Do these work with maple syrup instead of honey?
Maple syrup is thinner and less sticky than honey, so the bars are more fragile. If you really want maple flavor, use half honey and half maple; you’ll still get that maple note without sacrificing structure.
Are homemade granola bars actually better than store-bought?
“Better” depends on what you’re after. If you like reading about the history and evolution of granola and snack bars, this article on granola’s health-food origins and how it became a mainstream snack is a fun rabbit hole. From a home-cook angle, I like that you can keep the ingredient list short and adjust the sweetness for your own crew.
I’d start with the recipe as written once so you know what “normal” looks and tastes like in your own oven. After that, play with different nuts, a handful of seeds, or a mix of milk and dark chocolate chips to keep things interesting. And if you try a version with dried cherries or a nut-free school-safe combo that your kids love, tell me what worked — I’m always tinkering with these.

Homemade Granola Bars with Chocolate Chips Kids Love
Equipment
- 8-inch (20 cm) square baking pan
- Parchment paper
- Rimmed baking sheet
- Large mixing bowl
- Small saucepan
- Whisk
- Sturdy spatula
- Wire rack
- Cutting board
- Sharp knife
Ingredients
- 160 g old-fashioned rolled oats 2 cups; not instant
- 30 g crisp rice cereal 1 cup; optional (can replace with another 30 g / 1/3 cup oats for denser bars)
- 50 g chopped nuts (almonds, walnuts, or pecans) 1/2 cup; or use unsweetened shredded coconut or pumpkin seeds if nut-free is needed
- 1/4 tsp fine sea salt
- 1/4 tsp ground cinnamon optional
- 80 g light brown sugar 1/3 cup, packed
- 120 g honey 1/3 cup
- 56 g unsalted butter 4 Tbsp
- 60 g creamy peanut butter or almond butter 1/4 cup; for nut-free use sunflower seed butter
- 2 tsp vanilla extract
- 80–90 g semi-sweet chocolate chips 1/2 cup, plus a spoonful extra for sprinkling on top
Instructions
- Heat oven to 325°F (165°C). Line an 8-inch (20 cm) square pan with parchment, leaving overhang on two sides. Lightly grease the parchment with a bit of butter or neutral oil.
- Optional: Toast oats and nuts. Spread oats and chopped nuts on a rimmed baking sheet and toast 8–10 minutes, stirring once, until fragrant and lightly golden at the edges.
- In a large bowl, combine the (toasted) oats and nuts with crisp rice cereal, salt, and cinnamon; stir and set aside.
- Make the binding syrup: In a small saucepan over medium-low heat, combine brown sugar, honey, and butter. Bring to a gentle simmer, stirring often, until smooth and just bubbling around the edges, about 2–3 minutes. Remove from heat and whisk in peanut butter and vanilla until glossy and uniform (avoid hard boiling or the bars can turn crunchy).
- Pour the hot syrup over the dry mixture. Using a sturdy spatula, fold and scrape until everything is evenly coated with no dry pockets.
- Let mixture cool 5–7 minutes (warm but not scorching), then quickly fold in the chocolate chips.
- Transfer to the prepared pan. Spread evenly, then press down very firmly (use a second piece of parchment or lightly oiled hands) to compact the mixture, especially in corners and edges.
- Optional: Sprinkle a few extra chocolate chips on top while warm and gently press them in so they stick.
- Bake 18–22 minutes at 325°F (165°C), until edges are slightly deeper golden and center looks lightly puffed (will still be soft when hot).
- Cool in the pan on a rack to room temperature, 45–60 minutes. For clean slices, refrigerate 30–60 minutes more. Lift out using parchment, transfer to a cutting board, and slice into 12 large or 16 smaller bars.
Leave a Reply