
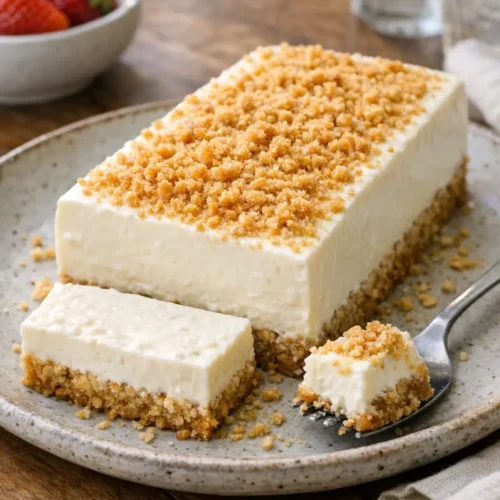
Japanese cheesecake, in this quick no-bake form, gives you a softly set, tangy-sweet dessert with almost no effort. Thick yogurt and crushed cookies are pressed into a small mold, then the fridge does the work. Expect a creamy spoonable center that slices once fully chilled, closer to a mousse than a dense bakery cheesecake.
Short on time tonight? Strain the yogurt now so it thickens while you prep the pan. Working in a tiny kitchen? Use a loaf pan lined with parchment so unmolding isn’t a wrestling match later.
Ingredients
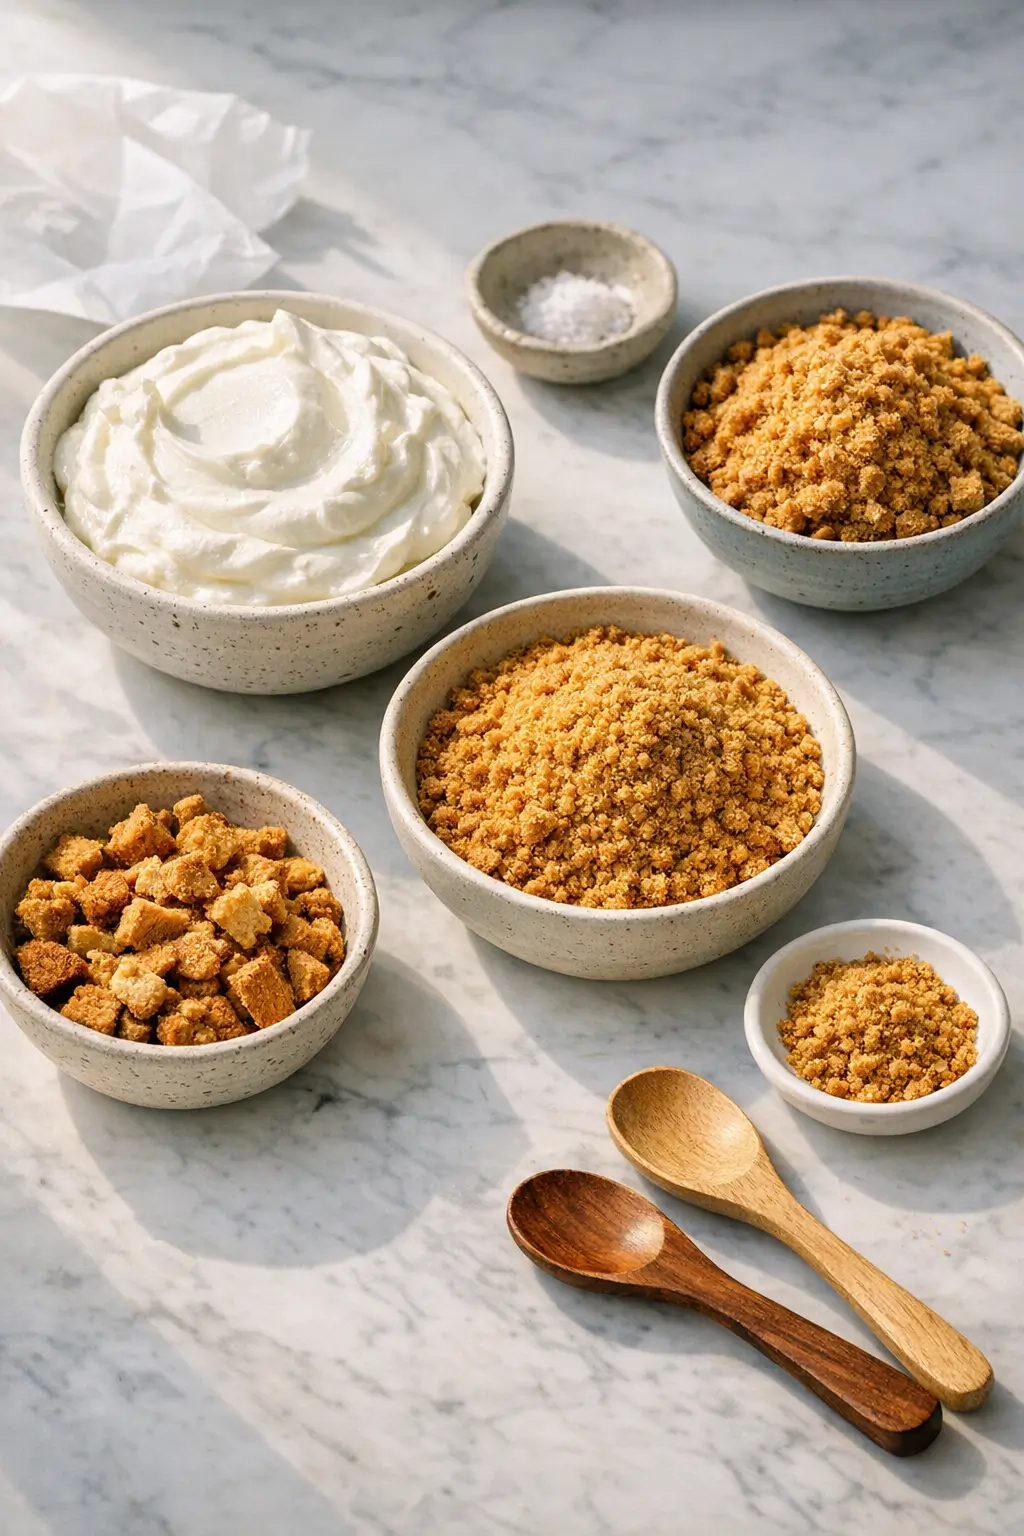
- 500 g (about 2 cups) thick Greek yogurt or skyr — full-fat or 2% gives the creamiest set; nonfat will be a touch looser. Skyr or labneh both work; avoid drinkable yogurts.
- 160 g (about 1 1/2 cups) very dry cookies, finely crushed — Biscoff/speculoos, graham crackers, or plain digestive biscuits. Shortbread or vanilla wafers also work; sandwich cookies can be used if you scrape out the filling for a cleaner set.
- 20 g (about 2 tbsp) cookie crumbs, reserved — for finishing the top after chilling.
- Pinch of fine salt (optional) — boosts flavor without making it “salty.”
Ingredient notes:
- Cookie dryness matters. The drier the cookie, the better it absorbs whey from the yogurt and firms the slice.
- If your yogurt lists gums/pectin, it may weep more during chilling. Strain it through a mesh sieve lined with a coffee filter or paper towel for 30–60 minutes to thicken.
- For a gluten-free version, use a very dry gluten-free cookie; crumbs that are too sandy or oily won’t hydrate well.
Step-by-Step Instructions for Japanese cheesecake
1) Prepare the pan and yogurt.
- Line a small 6-inch (15 cm) springform pan or a 8.5×4.5-inch (22×11 cm) loaf pan with a parchment sling that overhangs on two sides. This gives you “handles” to lift the cake out.
- Whisk the yogurt (and the optional pinch of salt) until completely smooth. If it looks loose, set it over a sieve and strain 30–60 minutes while you crush the cookies.
2) Crush the cookies two ways.
- Pulse most of the cookies to fine crumbs. Stop before they turn pasty.
- Leave a small handful slightly coarser (oatmeal-sized bits). This mix of fine and coarse crumbs helps the layers lock together without turning stodgy.
3) Build the base layer (no butter needed).
- Add about 2/3 of the fine crumbs to the lined pan and spread into an even layer.
- Mist lightly with water using clean fingertips or a spray bottle, then press gently with the back of a spoon. You’re not aiming for a hard crust; just enough cohesion so the first yogurt layer doesn’t sink straight through.
4) First yogurt layer.
- Spoon roughly half the yogurt over the crumbs and spread edge to edge. Tap the pan firmly on the counter to help the yogurt settle and drive out air pockets.
5) Mid-layer crumbs.
- Scatter the remaining fine crumbs plus the coarser bits evenly over the yogurt. Don’t press hard; light contact lets the crumbs hydrate and knit to the yogurt.
6) Final yogurt layer and neat edges.
- Spread the remaining yogurt on top, then use an offset spatula to smooth the surface. Wipe the sides of the pan clean with a damp paper towel for tidy unmolding later.
Kitchen note: If your yogurt isn’t especially thick, plan on a longer chill (10–12 hours). You should see the edges pull slightly from the parchment and the center wobble like soft set yogurt, not flow.
7) Chill until set.
- Cover and refrigerate at least 6 hours; overnight (8–12 hours) gives the firmest slices. Fridge temps vary: colder fridges set faster, warmer ones need more time.
8) Unmold and finish.
- Loosen the edges with a thin knife, lift using the parchment, and slide onto a cutting board. Sprinkle the reserved 2 tbsp crumbs over the top for texture.
- For clean slices, dip a knife in hot water, wipe dry, and cut with gentle sawing motions.
9) Serve.
- The texture should be creamy and sliceable, not bouncy or rubbery. If it slumps, chill longer or serve as soft-set spoonfuls in bowls.
Beginner safeguards:
- If using sandwich cookies, scrape out the filling first. The extra fat can make the crumb layer greasy and slow hydration.
- Avoid overpacking the crumb base. A hard-pressed base won’t absorb whey and can detach from the yogurt when sliced.
Technique cross‑reference: If you prefer a classic no-bake cheesecake with a firmer, gelled structure, consult a meringue-and-gelatin approach like Serious Eats’ yogurt cheesecake principles. This style whips yogurt with cream and sets with gelatin for a lofty slice, though it’s more involved than the two‑ingredient method referenced here.
What to Expect
- Texture: Think softly set yogurt‑mousse. The edges firm up more than the center, and crumbs hydrate into a tender, cake-like layer without the crunch of a butter crust.
- Flavor: Tangy from the yogurt, sweet-spiced or buttery from your cookie choice. It’s less sweet than a bakery cheesecake; a drizzle of honey or a few berries balance that if you want more dessert energy.
- Variability: Greek yogurt, skyr, and labneh all behave slightly differently. Higher fat and heavier straining lead to a cleaner slice. Some brands add stabilizers, which can increase whey separation; blot any surface moisture with a paper towel before serving.
Kitchen note: If you see a little liquid pooling along the edges after an overnight chill, that’s whey. Tilt the pan gently over the sink and blot with paper towel—don’t stir it back in or the surface turns streaky.
Ways to Change It Up
- Plant-based: Use a thick, unsweetened coconut or almond‑based yogurt and dry vegan cookies. Expect a softer slice; plant yogurts without stabilizers may weep more. Straining for 1–2 hours helps.
- Cookie profile: For “spicier,” reach for gingersnaps or speculoos. For milder, choose grahams or digestives. Chocolate sandwich cookies (filling removed) make it cocoa‑forward.
- Faster, single‑serve: Layer yogurt and crushed cookies into 4 small jars or ramekins and chill 3–4 hours. They set faster in individual portions and don’t need unmolding. If you want a different no‑bake take that still chills firm, our No-Bake Japanese Cheesecake That Chills Overnight includes additional small-format pointers.
- Cheesecake-ier: Stir in 2–3 tablespoons (30–45 g) softened cream cheese per 500 g yogurt for a richer profile. It stays no‑bake and sliceable, just a touch denser. Prefer a baked version altogether? Try our Basque Cheesecake Made Easy: Burnt Top, Creamy Center.
Serving and Storage
- Serve chilled, straight from the fridge. A small wedge with macerated berries, sliced mango, or a spoon of quick jam works nicely. For drinks, green tea, matcha latte, or black coffee cut through the dairy.
- Portion guide: A 6‑inch round or loaf pan yields 4 modest slices. For parties, make two pans or switch to the single‑serve jars noted above.
- Storage: Cover and refrigerate up to 3 days. Expect light whey separation on day 2–3; blot before serving and re-smooth the top if you like.
- Freezing isn’t ideal. The yogurt curdles slightly after thawing and the crumb layer gets pasty.

Kitchen note: If you need to transport it, keep it in the lined pan. Finish with the crumb topping and slice at the destination for the cleanest look.
Cultural Context
In Japan, “Japanese cheesecake” often refers to a soufflé‑light baked cake made by folding cream cheese into meringue and baking it gently. Another local style, “rare cheesecake,” sets without baking and commonly includes cream cheese and gelatin. The quick yogurt‑and‑cookie chill method borrows the spirit of that no‑bake category but strips it to the essentials for everyday kitchens. For background on the baked style, see this concise overview of the dessert’s history and texture in the background on soufflé‑style Japanese cheesecake, and for how “rare” fits into global cheesecake families, this encyclopedic overview of baked vs. no‑bake cheesecakes is useful.
Common Questions and Troubleshooting
- My cake won’t slice; it slumps. What now? Chill longer—aim for a full overnight set. If you used nonfat yogurt or a brand with added gums, strain next time for 1–2 hours. In a pinch, serve it as soft‑set parfaits in bowls; it will still taste great.
- Can I use low‑fat or nonfat yogurt? Yes, but expect a looser set. Strain longer to compensate. Skyr tends to set a bit firmer because it’s naturally thicker.
- Which cookies work best? Dry, low‑fat cookies like Biscoff/speculoos, gingersnaps, digestives, or grahams hydrate cleanly. Oily cookies or those with cream fillings can make the crumb layer greasy and slow to soften. If using sandwich cookies, remove the filling for better results.
- Do I need gelatin? Not for this two‑ingredient approach. The set comes from the yogurt’s thickness and the crumbs absorbing whey. If you want a taller, slice‑perfect result for entertaining, a classic no‑bake cheesecake that uses gelatin and whipped components is a better route.
- There’s liquid on top after chilling. Is it safe? That’s whey separating from the yogurt. Blot gently with a paper towel and serve. Next time, strain your yogurt or choose a brand with fewer stabilizers.
- Can I sweeten it more? Absolutely. Drizzle honey or maple syrup on slices just before serving, or fold 1–2 teaspoons into the top yogurt layer before assembly. Adding too much sugar directly to the yogurt can thin it; drizzle is safer.
- Can I make it ahead? Yes—make it 24 hours ahead and keep covered in the pan. The texture actually improves by day two, though it continues to release small amounts of whey.
- How do I scale it? For 2 people, build in two small ramekins (about 150 g yogurt + 40 g crumbs each). For 4+, use the 6‑inch pan quantities here or double into an 8‑inch pan and extend the chill by 2–4 hours.
Conclusion
This no‑bake yogurt‑and‑cookie method offers a fast path to a creamy, cheesecake‑like dessert with minimal gear and dishes. If you try it, leave a note with your cookie choice, how long you chilled it, and any tweaks that helped your set or flavor—you’ll help the next home cook nail it, too. And if you branched out to a baked style or a firmer gelatin‑set version, share your results so others can choose the path that fits their kitchen and schedule.
No-Bake Japanese Cheesecake with Yogurt and Cookies
Equipment
- 6-inch (15 cm) springform pan or 8.5×4.5-inch (22×11 cm) loaf pan
- Parchment paper
- Mixing bowl
- Whisk
- Food processor (optional, for crushing cookies)
- Offset spatula (optional)
- Spoon
- Fine-mesh sieve + coffee filter or paper towel (optional, for straining yogurt)
- Thin knife
Ingredients
- 500 g thick Greek yogurt or skyr full-fat or 2% preferred
- 160 g very dry cookies finely crushed (Biscoff/speculoos, graham crackers, or digestive biscuits)
- 20 g cookie crumbs reserved, for finishing the top after chilling
- fine salt pinch, optional
Instructions
- Prepare the pan and yogurt: Line a small 6-inch (15 cm) springform pan or an 8.5×4.5-inch (22×11 cm) loaf pan with a parchment sling that overhangs on two sides. Whisk the yogurt (and optional pinch of salt) until completely smooth. If it looks loose, set it over a sieve and strain 30–60 minutes while you crush the cookies.
- Crush the cookies two ways: Pulse most of the cookies to fine crumbs (stop before they turn pasty). Leave a small handful slightly coarser (oatmeal-sized bits) to help the layers lock together.
- Build the base layer (no butter needed): Add about 2/3 of the fine crumbs to the lined pan and spread into an even layer. Mist lightly with water using clean fingertips or a spray bottle, then press gently with the back of a spoon—just enough cohesion so the first yogurt layer doesn’t sink through.
- First yogurt layer: Spoon roughly half the yogurt over the crumbs and spread edge to edge. Tap the pan firmly on the counter to help the yogurt settle and remove air pockets.
- Mid-layer crumbs: Scatter the remaining fine crumbs plus the coarser bits evenly over the yogurt. Don’t press hard; light contact lets the crumbs hydrate and knit to the yogurt.
- Final yogurt layer and neat edges: Spread the remaining yogurt on top and smooth the surface (an offset spatula helps). Wipe the sides of the pan clean with a damp paper towel for tidy unmolding later.
- Chill until set: Cover and refrigerate at least 6 hours; overnight (8–12 hours) gives the firmest slices. If your yogurt isn’t especially thick, plan on a longer chill (10–12 hours).
- Unmold and finish: Loosen the edges with a thin knife, lift using the parchment, and slide onto a cutting board. Sprinkle the reserved cookie crumbs over the top for texture. For clean slices, dip a knife in hot water, wipe dry, and cut with gentle sawing motions.
- Serve: Serve chilled. The texture should be creamy and sliceable, not bouncy or rubbery. If it slumps, chill longer or serve as soft-set spoonfuls in bowls.
Leave a Reply