
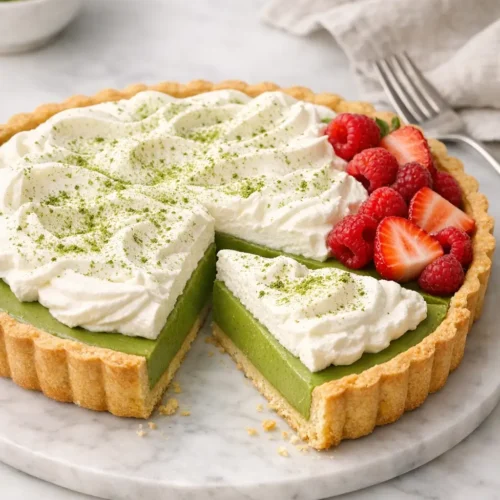
A matcha crème tart looks impressive, but at its core it’s a simple combination of crisp pastry, silky matcha custard, and softly whipped cream. The flavor leans gently earthy and just sweet enough, which makes it a good option when you want dessert that doesn’t feel heavy.
If it’s a busy weeknight, start by chilling your butter and measuring flour and sugar so your tart dough comes together fast. If you’re juggling kids or roommates in a small kitchen, prioritize getting the crust baked and cooling first, since the custard and cream can be made while it chills.
You’ll see versions of this tart in modern Japanese- and French-inspired bakeries, and it works nicely for spring dinners, afternoon tea, or any time you want a make-ahead dessert. The recipe suits cautious bakers as well as more confident cooks, as long as you stay attentive to visual cues in the custard.
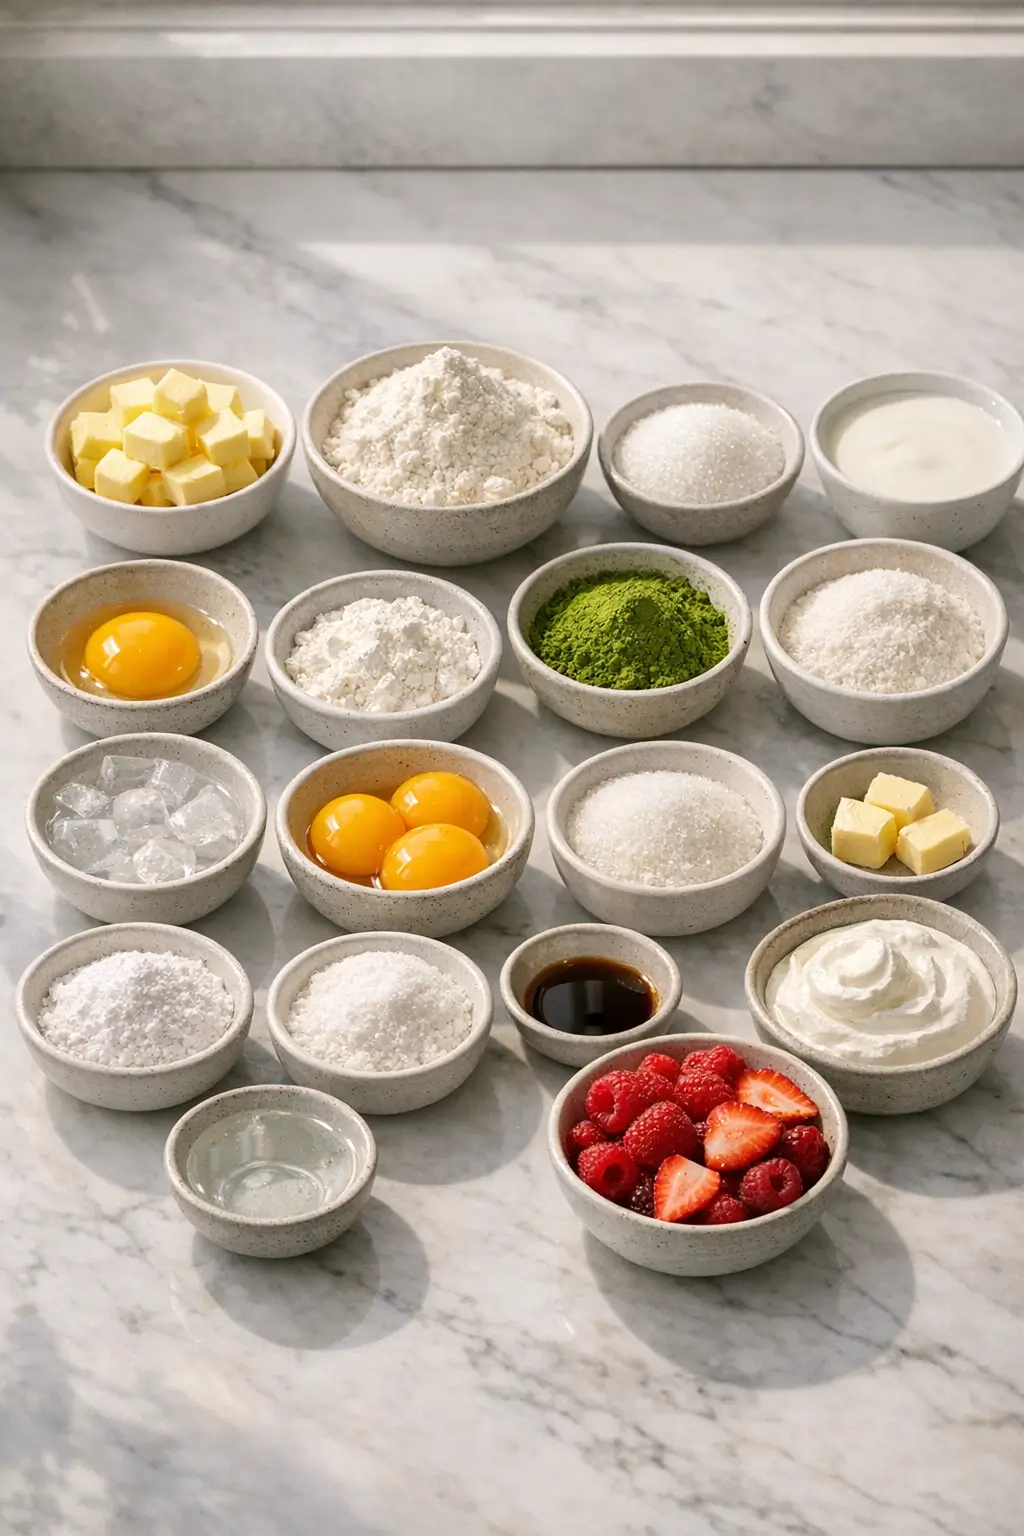
Ingredients
Makes one 9-inch / 23 cm tart (8 slices)
For the tart crust
- 150 g (1 1/4 cups) all-purpose flour
- 30 g (1/4 cup) powdered sugar
- 1/4 tsp fine sea salt
- 90 g (6 1/3 Tbsp) cold unsalted butter, cut into small cubes
- 1 large egg yolk, cold
- 15–30 ml (1–2 Tbsp) ice-cold water, as needed
Purpose: A classic sweet tart crust (similar to pâte sucrée) gives a crisp, cookie-like base that stands up to the soft matcha crème.
Kitchen note: If your kitchen is warm, chill the bowl and flour for 10 minutes first. Keeping everything cold helps prevent the crust from shrinking and toughening in the oven.
For the matcha crème (custard) filling
- 360 ml (1 1/2 cups) whole milk
- 240 ml (1 cup) heavy cream (36–40% fat)
- 100 g (1/2 cup) granulated sugar
- 20 g (about 3 Tbsp) cornstarch
- 3 large egg yolks
- 10–12 g (2–3 tsp) culinary-grade matcha powder, sifted
- 1 tsp pure vanilla extract
- 1/4 tsp fine sea salt
- 28 g (2 Tbsp) unsalted butter, cut into small pieces
Purpose: This is a matcha pastry cream style filling—sturdy enough to slice cleanly, but still soft and creamy once chilled.
For topping
- 240 ml (1 cup) cold heavy cream
- 15–25 g (1–2 Tbsp) powdered sugar, to taste
- 1/2 tsp vanilla extract
- Small pinch of matcha, for dusting (optional)
- Fresh berries, sliced stone fruit, or thinly sliced strawberries (optional garnish)
Step-by-Step Instructions for matcha crème tart
1. Make and chill the tart dough
- In a medium bowl, whisk together the flour, powdered sugar, and salt until no lumps remain.
- Add the cold butter cubes and use your fingertips or a pastry cutter to rub/cut the butter into the flour until you have mostly pea-sized pieces with some floury crumbs. You’re aiming for a sandy mixture with visible small bits of butter.
- Whisk the egg yolk with 1 tablespoon of ice water, then drizzle it over the flour mixture. Use a fork to gently toss and press the mixture together. If it looks dry and doesn’t hold when squeezed, add more ice water 1 teaspoon at a time, just until the dough comes together in clumps.
- Tip the dough onto a clean work surface and gently press it into a disk. Avoid kneading; you want to bring it together with as few movements as possible so it stays tender.
- Wrap tightly in plastic or place in a covered container, and chill for at least 30 minutes (up to 2 days). Chilling relaxes the gluten and firms the butter so the crust holds its shape.
2. Line the tart pan and blind-bake the crust
- When you’re ready to bake, preheat your oven to 180°C / 350°F with a rack in the middle.
- Lightly flour your work surface and roll the chilled dough into a circle about 28–30 cm (11–12 inches) wide and roughly 3 mm (1/8 inch) thick.
- Carefully roll the dough up around the rolling pin, then unroll it over a 9-inch / 23 cm tart pan with a removable bottom. Ease the dough into the corners without stretching it, pressing it gently against the sides.
- Trim the overhang so it’s flush with the rim or slightly taller, then use any scraps to patch thin spots. Prick the base lightly with a fork to help prevent puffing.
- Chill the lined tart pan in the fridge or freezer for 15–20 minutes, until firm to the touch.
- Line the chilled crust with parchment paper or foil, making sure it covers the edges, and fill with pie weights, dried beans, or rice.
- Bake for 15 minutes, then carefully lift out the parchment and weights. Continue baking 10–15 minutes more, until the crust is dry and light golden.
Kitchen note: If the base puffs slightly after removing the weights, gently press it down with the back of a spoon while still hot. Work quickly so you don’t crack the crust.
- Let the baked crust cool completely on a wire rack. The crust should be cool before you add the custard, or the filling can separate at the edges.
3. Prepare the matcha crème
- In a medium bowl, whisk together the sugar, cornstarch, and sifted matcha until the powder looks evenly distributed and there are no green clumps.
- Add the egg yolks and whisk until you have a thick, smooth paste. This step helps prevent lumps later.
- In a saucepan, combine the milk, 1 cup cream, salt, and vanilla. Heat over medium-low heat until the mixture is steaming and small bubbles form around the edges, but do not let it boil.
- Slowly pour about one-third of the hot milk mixture into the egg mixture while whisking constantly. This gently warms (tempers) the yolks so they don’t scramble.
- Pour the tempered egg mixture back into the saucepan with the remaining hot milk, whisking as you go.
- Cook over medium heat, whisking constantly and reaching into the corners of the pan, until the custard thickens and large bubbles start to surface. This usually takes 3–5 minutes, but it can vary by stove.
- Once it’s thick and just starting to bubble, reduce the heat to low and cook for 30–60 seconds more, whisking, to cook out the starchy taste.
- Remove from heat and immediately whisk in the butter pieces until fully melted and glossy.
- For the smoothest texture, strain the hot custard through a fine-mesh sieve into a clean bowl. Press gently with a spatula to encourage it through.
Kitchen note: Properly cooked matcha custard should be thick enough to mound on itself but still smooth and shiny. If you see scrambled egg bits or it turns grainy, it likely boiled too hard—straining can rescue the texture, but next time lower the heat a little earlier.
- Press plastic wrap directly onto the surface of the custard to prevent a skin from forming. Let it cool to room temperature, then chill in the fridge until cold and set, at least 2 hours. You can make the custard up to 2 days ahead.
4. Fill and chill the tart
- Once the crust and custard are both cool, briefly whisk the chilled custard to loosen it. It should be thick but spreadable.
- Spoon the matcha crème into the cooled tart shell and smooth the top with an offset spatula or the back of a spoon.
- Transfer the filled tart to the fridge and chill until the custard is fully set and slices cleanly, at least 2 hours (4 hours or overnight gives the neatest slices).
5. Whip and add the cream topping
- Just before serving—or up to 2 hours in advance—add the cold heavy cream, powdered sugar, and vanilla to a medium, chilled bowl.
- Whip with a hand mixer or whisk until soft to medium peaks form. The cream should hold its shape but still look smooth and billowy.
- Spread or pipe the whipped cream over the chilled matcha tart, leaving a bit of green border visible if you like.
- Lightly dust with a pinch of matcha through a fine sieve and garnish with fresh berries or thinly sliced fruit, if using.
Kitchen note: Overwhipped cream turns grainy and can separate as it sits. If you go too far, gently fold in a tablespoon or two of fresh cream to loosen it back to soft peaks.
- Slice with a sharp, thin knife. Wipe the blade between cuts for the cleanest slices.
What to Expect
This matcha crème tart sets into neat slices but feels soft and custardy when you eat it, a bit like a firm pastry cream. The crust stays crisp for a day or so, especially if you keep the tart well chilled and avoid piling on wet fruit too early.
Flavor-wise, you can expect balanced sweetness with a noticeable but not overpowering matcha note. The heavy cream and vanilla round out the edges of the tea’s light bitterness, and the whipped cream adds extra richness without making the dessert feel dense.
Texture will vary slightly depending on your cornstarch brand and how vigorously you cooked the custard. A slightly looser custard still tastes excellent; you’ll just get softer slices that may lean gently on the plate rather than standing perfectly straight.
Ways to Change It Up
Lighter, more tea-forward tart: Reduce the sugar in the custard to 80 g (about 1/3 cup + 1 Tbsp) and increase the matcha to 14 g (about 1 1/2 Tbsp) for a more intense green tea flavor. The filling will taste less sweet and a bit more bitter, which some matcha fans prefer.
Vegan-leaning variation: Swap the crust for a press-in cookie or nut crust using crushed vegan cookies and melted plant-based butter. For the filling, you can adapt ideas from vegan matcha tarts that rely on coconut milk and starch instead of eggs, similar to versions from bakers like Oh Sweet Day and King Arthur. Use full-fat coconut milk and an extra tablespoon of cornstarch to help it set, and top with coconut whipped cream instead of dairy.
Faster weeknight version: Use a good-quality store-bought sweet tart shell or even a graham cracker crust. You’ll skip making and blind-baking pastry, which saves roughly 45 minutes. The trade-off is a softer, more crumbly base and a flavor that leans more “cookie” than classic tart.
Fruit-forward finish: Top the whipped cream with sliced strawberries, raspberries, or peeled citrus segments. This adds freshness and a bit of acidity, which plays nicely against the earthy matcha and rich custard. For more ideas on pairing bright sides with richer mains or desserts, you might like the Pineapple Salsa in 15 Minutes: Bright, Zesty, Fresh as a separate, fruit-forward dish for the table.
Serving and Storage
Serve the tart well chilled. I like to pull it from the fridge about 10–15 minutes before slicing so the custard softens slightly but still holds its shape.
Matcha crème tart works well as the main dessert after a lighter meal, or as part of a dessert spread with fresh fruit and a simple cookie or bar. It fits comfortably alongside other make-ahead desserts like Mango Sticky Rice Made Easy: Creamy, Foolproof Dessert if you want a small dessert “buffet.”
For storage, keep the tart covered in the fridge. Without whipped cream, the filled tart holds well for up to 2 days, and the crust stays reasonably crisp. Once topped with whipped cream, aim to serve within 24 hours for the best texture.
Avoid freezing this tart. Egg-thickened custards can turn grainy and weep liquid when thawed, and the matcha color may dull slightly over time.

Cultural Context
Matcha, a finely ground green tea powder, has deep roots in Japanese tea culture, especially in the tea ceremony (chanoyu), where it is prepared with carefully structured, ritualized movements. For a concise overview of its history and cultural role, the Urasenke school offers background on the tea ceremony and utensils through resources like the Urasenke Center and associated materials.
Modern desserts such as matcha crème tart are part of a broader trend of incorporating matcha into Western-style pastries—custard tarts, cheesecakes, and entremets—where its earthy bitterness helps balance sweet, creamy components. You can read more about the evolution of matcha in contemporary sweets and beverages in educational articles from institutions like the Japan Society’s food and drink programming and from cultural overviews at the Metropolitan Museum of Art, which discuss tea’s place in Japanese visual and material culture.
Common Questions and Troubleshooting
Why is my custard lumpy or grainy?
Lumps usually mean the eggs cooked too quickly or the cornstarch clumped. Next time, temper the yolks slowly with the hot milk, keep the heat at medium or medium-low, and whisk constantly, especially in the corners. Straining the hot custard through a fine-mesh sieve can rescue a slightly curdled batch.
My tart didn’t set firmly—what happened?
If the slices slump a lot, the custard may not have cooked quite long enough, or the tart may not have chilled fully. Make sure the custard comes to a gentle boil for 30–60 seconds to activate the starch, and allow at least 4 hours of chilling for the filled tart if you want very neat slices.
Can I use low-fat milk or skip the cream?
You can replace some of the whole milk with low-fat milk, but keep at least half of the liquid as whole milk or cream. Reducing fat too much makes the custard feel thin and can emphasize matcha’s bitterness. If you prefer a lighter dessert overall, keep the filling as written and serve smaller slices with extra fruit.
What matcha should I use?
Look for culinary-grade matcha from a reputable brand, stored in an opaque, airtight container. Higher-quality culinary matcha will give a brighter green color and cleaner taste. Very inexpensive powders can taste dull or overly bitter once baked or cooked.
Can I make the crust or filling ahead?
Yes. You can bake the crust a day in advance, cool it completely, and store it at room temperature, wrapped well. The custard can be made up to 2 days ahead and kept chilled with plastic wrap pressed directly on the surface. Assemble the tart the day you plan to serve, ideally a few hours ahead so it has time to set.
Kitchen note: If the crust feels slightly soft on day two, you can place the empty baked shell back into a 160°C / 325°F oven for 5–8 minutes to refresh it before filling. Let it cool completely again before adding the custard.
How should I store leftovers?
Cover leftover slices tightly and refrigerate. They’re best within 24–36 hours, while the crust is still reasonably crisp and the matcha color remains bright. Store slices in a single layer so the cream topping isn’t squashed.
Conclusion
Matcha crème tart rewards a bit of patient stirring with a dessert that feels polished but not fussy. Once you’ve made the crust and custard once, the timing becomes predictable and you can easily fit each step around the rest of your day.
If you try this version, I’d be interested to hear how strong you like the matcha flavor and what toppings you choose. Feel free to leave a rating, share your adjustments, or note any troubleshooting you encountered so other home cooks can benefit from your experience too.
Matcha Crème Tart with Silky Custard Filling
Equipment
- Medium mixing bowl
- Pastry cutter
- Rolling Pin
- 9-inch / 23 cm tart pan with removable bottom
- Parchment paper or foil
- Pie weights (or dried beans/rice)
- Wire rack
- Saucepan
- Whisk
- Fine-mesh sieve
- Spatula
- Offset spatula
- Hand mixer (optional)
Ingredients
For the tart crust
- 150 g all-purpose flour (1 1/4 cups)
- 30 g powdered sugar (1/4 cup)
- 1/4 tsp fine sea salt
- 90 g unsalted butter cold, cut into small cubes (6 1/3 Tbsp)
- 1 large egg yolk cold
- 15–30 ml ice-cold water as needed (1–2 Tbsp)
For the matcha crème (custard) filling
- 360 ml whole milk (1 1/2 cups)
- 240 ml heavy cream 36–40% fat (1 cup)
- 100 g granulated sugar (1/2 cup)
- 20 g cornstarch (about 3 Tbsp)
- 3 large egg yolks
- 10–12 g culinary-grade matcha powder sifted (2–3 tsp)
- 1 tsp pure vanilla extract
- 1/4 tsp fine sea salt
- 28 g unsalted butter cut into small pieces (2 Tbsp)
For topping
- 240 ml heavy cream cold (1 cup)
- 15–25 g powdered sugar to taste (1–2 Tbsp)
- 1/2 tsp vanilla extract
- matcha small pinch, for dusting (optional)
- fresh berries, sliced stone fruit, or thinly sliced strawberries optional garnish
Instructions
- In a medium bowl, whisk together the flour, powdered sugar, and salt until no lumps remain.
- Add the cold butter cubes and use your fingertips or a pastry cutter to rub/cut the butter into the flour until you have mostly pea-sized pieces with some floury crumbs (a sandy mixture with visible small bits of butter).
- Whisk the egg yolk with 1 tablespoon of ice water, then drizzle it over the flour mixture. Use a fork to gently toss and press the mixture together. If it looks dry and doesn’t hold when squeezed, add more ice water 1 teaspoon at a time, just until the dough comes together in clumps.
- Tip the dough onto a clean work surface and gently press it into a disk. Avoid kneading.
- Wrap tightly (or cover) and chill for at least 30 minutes (up to 2 days).
- Preheat the oven to 180°C / 350°F with a rack in the middle.
- Lightly flour your work surface and roll the chilled dough into a circle about 28–30 cm (11–12 inches) wide and about 3 mm (1/8 inch) thick.
- Transfer dough to a 9-inch / 23 cm tart pan with removable bottom. Ease it into the corners without stretching and press gently against the sides.
- Trim the overhang; patch thin spots with scraps. Prick the base lightly with a fork.
- Chill the lined tart pan for 15–20 minutes until firm.
- Line the crust with parchment paper or foil and fill with pie weights, dried beans, or rice.
- Bake for 15 minutes. Remove parchment and weights, then bake 10–15 minutes more, until dry and light golden.
- Cool the baked crust completely on a wire rack.
- In a medium bowl, whisk together the sugar, cornstarch, and sifted matcha until evenly distributed and no green clumps remain.
- Add the egg yolks and whisk until you have a thick, smooth paste.
- In a saucepan, combine the milk, 1 cup cream, salt, and vanilla. Heat over medium-low until steaming with small bubbles around the edges (do not boil).
- Temper the yolks: slowly pour about one-third of the hot milk mixture into the egg mixture while whisking constantly.
- Pour the tempered egg mixture back into the saucepan with the remaining hot milk, whisking as you go.
- Cook over medium heat, whisking constantly, until the custard thickens and large bubbles start to surface, about 3–5 minutes.
- Reduce heat to low and cook 30–60 seconds more, whisking, to cook out the starchy taste.
- Remove from heat and whisk in the butter until fully melted and glossy.
- For the smoothest texture, strain the hot custard through a fine-mesh sieve into a clean bowl, pressing gently with a spatula.
- Press plastic wrap directly onto the surface. Cool to room temperature, then chill until cold and set, at least 2 hours (up to 2 days ahead).
- When crust and custard are both cool, whisk the custard briefly to loosen. Spoon into the tart shell and smooth the top.
- Chill the filled tart until fully set and slices cleanly, at least 2 hours (4 hours or overnight for the neatest slices).
- For the topping, whip cold heavy cream with powdered sugar and vanilla to soft to medium peaks.
- Spread or pipe whipped cream over the tart. Dust with a pinch of matcha and add fresh fruit if desired.
- Slice with a sharp thin knife, wiping the blade between cuts.
Leave a Reply