
On busy school mornings, no bake peanut butter oat balls are exactly the kind of grab-and-go snack that keeps everyone sane. They’re soft but not sticky, sweet enough to feel like a treat, and sturdy enough to survive a lunchbox. I first made a version of these when my son came home with a “no bake energy bites” handout from school, and I’ve been tweaking the ratios ever since.
If you’re juggling homework, missing socks, and a ticking clock, here’s the move: make a double batch on Sunday, chill or freeze, and just toss a couple into each lunchbox. They’ll thaw by snack time and save you from the vending machine.
Ingredients
Makes about 18–20 balls (2–4 lunchboxes for the week)
- 160 g (2 cups) old-fashioned rolled oats – the base; use certified gluten-free oats if needed
- 180 g (3/4 cup) creamy peanut butter (natural or regular)
- 90 g (1/4 cup) honey – for sweetness and binding; maple syrup works but makes a slightly looser mix
- 30 g (1/4 cup) ground flaxseed – gentle nutty flavor, helps firm the balls
- 30 g (3 Tbsp) mini chocolate chips – optional but kid-magnet territory
- 1 tsp vanilla extract
- 1/4 tsp fine sea salt – bump up to 1/2 tsp if your peanut butter is unsalted
- 1–3 Tbsp milk (dairy or unsweetened non-dairy), only if needed to help the mixture come together
Why the flax? It soaks up some of the stickiness from the honey and peanut butter and gives you a dough that holds its shape instead of slumping in the lunchbox.
Step-by-Step No Bake Peanut Butter Oat Balls for Lunchboxes
-
Stir the wet ingredients.
In a medium bowl, add the peanut butter, honey, vanilla, and salt. Stir with a sturdy spoon or spatula until smooth. If your peanut butter is very stiff, microwave it for 10–15 seconds first to loosen it. -
Add the dry mix.
Tip in the oats and ground flaxseed. Stir, pressing the back of the spoon into the mixture to really work the peanut butter into the oats. It’ll look dry at first; keep going until most of the oats look glossy and coated. -
Check the texture before adding liquid.
Grab a tablespoon of the mixture and squeeze it in your palm. If it holds together in a ball with just a few cracks, you’re good. If it’s crumbly and falls apart, drizzle in 1 Tbsp milk and mix again. Repeat, a tablespoon at a time, only until the mixture packs easily. -
Fold in chocolate chips.
Once the base feels cohesive, fold in the mini chocolate chips. If your kitchen is hot and the chips start to melt into streaks, pop the bowl into the fridge for 10–15 minutes, then stir again. -
Chill briefly for easier rolling (optional but helpful).
One thing — if the mixture’s still sticky and clinging to your spoon, chill it for 15–20 minutes. The oats will hydrate, the flax will swell a bit, and rolling becomes much less messy. -
Roll into balls.
Line a tray or plate with parchment. Scoop the mixture into roughly 1 Tbsp portions (a small cookie scoop is handy) and roll between your palms into balls. Aim for walnut-sized; if they’re much bigger, they won’t chill as firmly and are more likely to squish in a lunchbox. -
Set and store.
Arrange the balls on the lined tray and chill for at least 30 minutes to firm up. After that, transfer them to an airtight container. For easy packing, I like to layer them with a sheet of parchment so they don’t weld together.
Heads up: Honey-based balls will always be a bit softer at warm room temp. For kids’ lunchboxes that sit out for hours, freezing the balls overnight gives you the best texture by snack time.
What to Expect
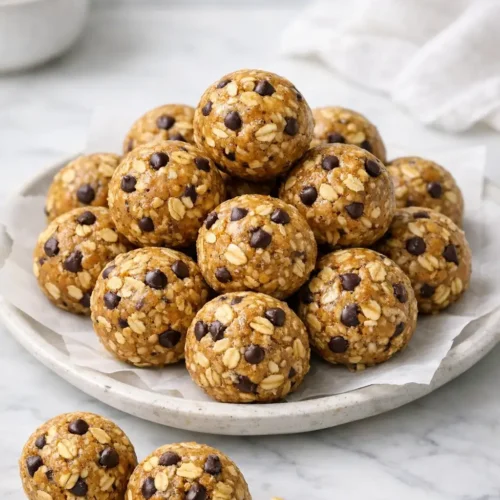
These no bake peanut butter oat balls set up into a soft, chewy texture — think firm cookie dough rather than a crunchy granola bar. The flavor leans peanut buttery first, with oat and honey in the background and tiny pops of chocolate if you add chips.
Use natural peanut butter and they’ll taste a little more roasty and less sweet; use a sweeter commercial brand and they eat more like dessert. In a warm classroom or backpack, they’ll soften slightly but shouldn’t collapse if you kept them on the smaller side.
Ways to Change It Up
If your house has a peanut-free policy (or your kid’s classroom does), swap the nut butter, but don’t just grab the first jar you see.
- Sunflower seed butter: works well and keeps the recipe nut-free. It’s looser than some peanut butters, so you might need an extra spoonful of oats or flax if the mixture feels too sticky.
- Almond butter: nice if you want a milder flavor. Choose a thicker, not drippy, brand or again, add a tablespoon of oats.
For a more “trail mix” bite, stir in 2–3 Tbsp finely chopped dried fruit (raisins, cranberries, apricots) and a spoonful of seeds. Just keep total mix-ins to about 1/3 cup so the dough still holds together.
If you want them less sweet for everyday snacking, cut the honey back to 60 g (3 Tbsp) and add 1–2 Tbsp extra peanut butter. You’ll get a more savory, breakfast-friendly ball that still sticks together.
Serving and Storage
For lunchboxes, I usually pack 2–3 balls per kid alongside sliced fruit and something crunchy like snap peas or pretzels. They also work well as a quick breakfast bite next to a hard-boiled egg or a small yogurt.
In the fridge: store in an airtight container for up to 1 week. They’ll firm as they chill; if they seem too hard straight from the fridge, let them sit 5–10 minutes before eating.
In the freezer: freeze in a single layer on a tray, then move to a freezer bag or container. They keep well for about 2 months. For lunchboxes, I toss them in frozen; by midday they’re soft and ready, and they help keep the rest of the lunch cool.
Reheating isn’t a thing here, but if your balls pick up a bit of fridge dryness after a week, a tiny drizzle of honey rubbed on your hands before rolling them again brings back some moisture.

Common Questions
Can I use quick oats instead of rolled oats?
Yes. Quick oats give a slightly softer, smoother bite that some kids prefer. Because they absorb liquid faster, start with 1–2 Tbsp less milk (or skip it entirely) and only add if the mixture is dry and crumbly.
Are these safe for very young kids?
Texture-wise, they’re soft enough, but peanut butter is a common allergen and oats plus honey can be rich for tiny stomachs. For toddlers, make the balls smaller, skip the chocolate chips, and talk with your pediatrician if there’s any peanut allergy history.
Can I swap the honey for maple syrup or agave?
Maple syrup works well and gives a slightly looser, less sticky ball and a lovely flavor. Agave is thinner and sweeter; if you use it, cut back to 3 Tbsp and be ready to add an extra spoonful of oats or flax so the balls set.
What if my mixture is too sticky to roll even after chilling?
Don’t panic. Sprinkle in another 2–3 Tbsp oats or 1 Tbsp flax, stir well, and let it sit 5 minutes so the dry ingredients can absorb some moisture. Worst case, press the mixture into a lined pan, chill, and cut into bites instead of balls.
Can I make these without added sugar?
If you want to avoid honey and syrup completely, use an unsweetened peanut butter and add finely chopped soft dates instead (about 80–100 g, 1/2 cup packed). The texture leans more toward classic energy bites, but it holds together and feels less like dessert.
There’s not much that can go wrong with these, which is why I lean on them for back-to-school weeks. Once you’ve made them once, you’ll know exactly how the dough should feel in your hands, and from there it’s easy to riff.
If you try a classroom-friendly version with sunflower seed butter or sneak in chia seeds or hemp hearts, tell me what combo actually passed the lunchbox test at your house.
No Bake Peanut Butter Oat Balls for Lunchboxes
Equipment
- Medium Bowl
- Sturdy spoon or spatula
- Measuring spoons
- Tray or plate
- Parchment paper
- Airtight container
- Small cookie scoop (optional)
Ingredients
- 160 g old-fashioned rolled oats about 2 cups; use certified gluten-free oats if needed
- 180 g creamy peanut butter about 3/4 cup; natural or regular
- 90 g honey about 1/4 cup (maple syrup works but makes a looser mix)
- 30 g ground flaxseed about 1/4 cup
- 30 g mini chocolate chips optional; about 3 Tbsp
- 1 tsp vanilla extract
- 1/4 tsp fine sea salt use up to 1/2 tsp if peanut butter is unsalted
- 1–3 Tbsp milk dairy or unsweetened non-dairy; only if needed to help mixture come together
Instructions
- Stir the wet ingredients. In a medium bowl, add the peanut butter, honey, vanilla, and salt. Stir with a sturdy spoon or spatula until smooth. If your peanut butter is very stiff, microwave it for 10–15 seconds first to loosen it.
- Add the dry mix. Tip in the oats and ground flaxseed. Stir, pressing the back of the spoon into the mixture to really work the peanut butter into the oats. It’ll look dry at first; keep going until most of the oats look glossy and coated.
- Check the texture before adding liquid. Grab a tablespoon of the mixture and squeeze it in your palm. If it holds together in a ball with just a few cracks, you’re good. If it’s crumbly and falls apart, drizzle in 1 Tbsp milk and mix again. Repeat, a tablespoon at a time, only until the mixture packs easily.
- Fold in chocolate chips. Once the base feels cohesive, fold in the mini chocolate chips. If your kitchen is hot and the chips start to melt into streaks, pop the bowl into the fridge for 10–15 minutes, then stir again.
- Chill briefly for easier rolling (optional). If the mixture’s still sticky and clinging to your spoon, chill it for 15–20 minutes so the oats hydrate and the flax swells a bit.
- Roll into balls. Line a tray or plate with parchment. Scoop the mixture into roughly 1 Tbsp portions (a small cookie scoop is handy) and roll between your palms into walnut-sized balls.
- Set and store. Arrange the balls on the lined tray and chill for at least 30 minutes to firm up. Transfer to an airtight container (layer with parchment if needed) and refrigerate up to 1 week or freeze up to about 2 months.
Leave a Reply