
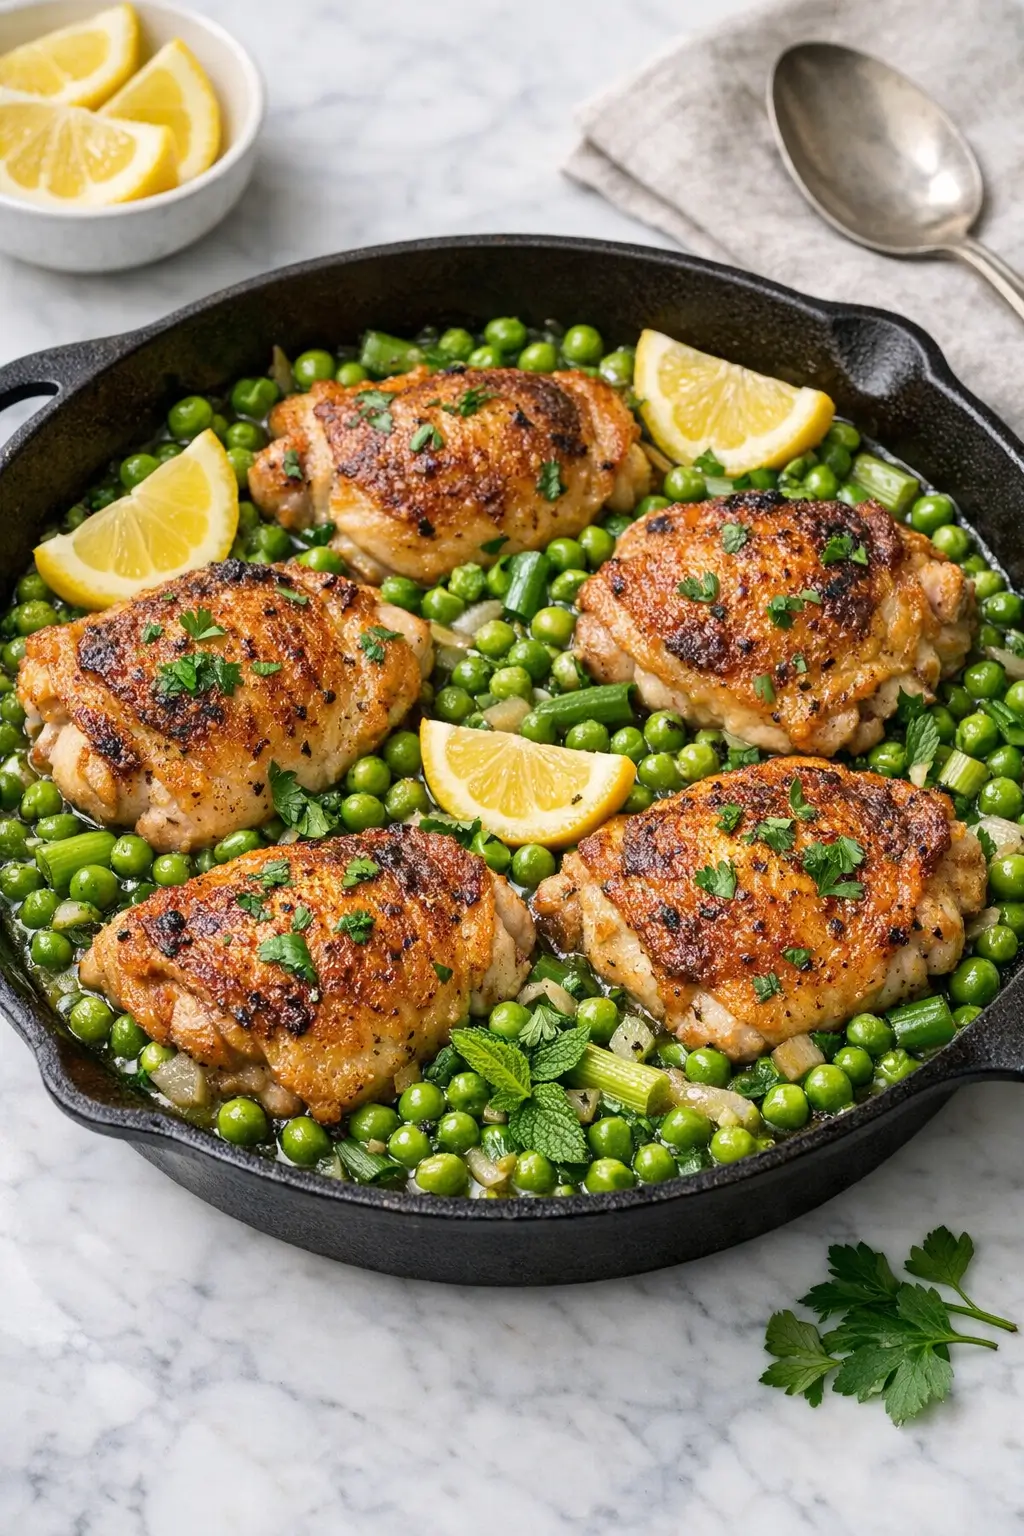
A one pan spring chicken thighs with peas dinner is the kind of meal that feels like you put in more effort than you actually did. Crispy chicken, sweet peas, lemon, and herbs all share one pan, so the flavors mingle and the cleanup is quick.
If you’re walking in the door on a busy weeknight, start by getting the oven heating and seasoning the chicken thighs right away; everything else can happen while the pan warms. Cooking in a smaller kitchen? Clear one stretch of counter for your board and keep a bowl nearby for scraps so you’re not juggling clutter as you go.
This dish is inspired by the way spring vegetables show up alongside simple roast chicken in many European and North American kitchens, often as a Sunday lunch or light early-spring dinner. Expect savory, lemony pan juices, tender peas, and chicken with properly rendered skin rather than restaurant-style perfection. It suits anyone comfortable with basic stovetop and oven cooking who wants a reliable, fresh-tasting weeknight main.
Ingredients
- 4 bone-in, skin-on chicken thighs (about 700 g / 1½ lb total)
- 1 tsp fine sea salt (plus more to taste)
- ½ tsp freshly ground black pepper
- 1½ Tbsp / 20 ml olive oil
- 2 Tbsp / 30 g unsalted butter
- 3 garlic cloves, thinly sliced
- 1 medium shallot, finely chopped (or use ¼ small yellow onion)
- 120 ml / ½ cup dry white wine (or use chicken broth)
- 240 ml / 1 cup low-sodium chicken broth
- 1 lemon, zested and then cut into wedges (you’ll use both zest and juice)
- 200 g / 1½ cups fresh or frozen green peas (no need to thaw if frozen)
- 4 thin scallions (spring onions), cut into 2.5 cm / 1-inch pieces
- 2 Tbsp / 8 g chopped fresh parsley
- 1 Tbsp / 4 g chopped fresh mint (or use more parsley if you prefer)
- Optional: ¼ tsp red pepper flakes for gentle heat

Kitchen note: Aim for chicken thighs that are similar in size so they cook evenly. If some pieces are much smaller, start checking those a few minutes earlier.
Step-by-Step Instructions for One Pan Spring Chicken Thighs With Peas
-
Prep the chicken and aromatics.
Pat the chicken thighs dry thoroughly with paper towels, especially the skin, which helps it crisp instead of steam. Season all over with the salt and pepper. Let the chicken sit at room temperature for about 15 minutes while you mince the shallot, slice the garlic, chop the herbs, and zest the lemon. -
Preheat the oven and choose your pan.
Heat the oven to 200°C / 400°F with a rack in the middle. Use a heavy, oven-safe skillet (cast iron works well) that’s about 28 cm / 11 inches wide so the chicken can sit in a single layer without crowding. -
Render and brown the chicken skin.
Add the olive oil to the cold skillet, then place the chicken thighs skin-side down in a single layer. Set the pan over medium heat and let the chicken cook undisturbed for 10–12 minutes.
You want steady, gentle sizzling; adjust the heat down slightly if the skin is browning too fast. -
Check for color and adjust.
After about 10 minutes, peek under one thigh. You’re looking for deep golden, well-rendered skin with some crisp edges. If the skin is still pale, keep cooking another 3–5 minutes. If it’s already very dark, lower the heat.
Kitchen note: If the pan starts to smoke heavily, the heat is too high. Slide the skillet off the burner for a minute, lower the heat, then return it so the fat can keep rendering slowly.
-
Flip the chicken and briefly sear the other side.
Once the skin is a deep golden brown, flip each thigh so the skin faces up. Cook the second side for 3–4 minutes to get a little color, then transfer the chicken to a plate. Leave the rendered fat in the pan—that’s your flavor base. -
Soften the shallot and garlic.
Reduce the heat to medium-low. Add the butter to the pan and let it melt into the chicken fat. Stir in the chopped shallot with a pinch of salt and cook for 2–3 minutes, scraping up any browned bits from the bottom.
Add the sliced garlic and cook just until fragrant, about 30 seconds; it should smell nutty but not browned. -
Deglaze with wine and add broth.
Pour in the white wine and use a wooden spoon to scrape up any remaining browned bits stuck to the pan. Let the wine bubble for 1–2 minutes until it reduces slightly.
Stir in the chicken broth and lemon zest, and bring the mixture back to a gentle simmer. -
Nestle in the chicken for the oven phase.
Return the chicken thighs to the skillet, skin-side up, along with any juices on the plate. The liquid should come about halfway up the sides of the meat; add a splash more broth or water if needed.
Spoon a little of the pan liquid over the exposed meat (not the skin) so it doesn’t dry out. -
Roast until nearly done.
Transfer the skillet to the oven and roast for 15 minutes. At this point, the chicken should be almost cooked through, but not quite. An instant-read thermometer plunged into the thickest part (without touching bone) should read around 68–70°C / 155–160°F. -
Add peas and scallions.
Carefully pull the hot skillet from the oven and scatter the peas and scallions around the chicken into the pan liquid. If using red pepper flakes, sprinkle them over the peas.
Stir the vegetables gently into the juices, leaving the chicken skin exposed on top so it can continue to crisp. -
Finish roasting.
Return the skillet to the oven and roast for another 8–10 minutes, until the peas are tender and bright green and the chicken reaches 74°C / 165°F.
If your peas are very small and tender, start checking at 6–7 minutes so they don’t overcook and wrinkle. -
Adjust seasoning and add lemon and herbs.
Remove the pan from the oven and let the chicken rest in the skillet for 5 minutes. Squeeze 1–2 lemon wedges over the pan, then taste the juices.
Add more lemon juice or a pinch of salt as needed for a bright, savory flavor. Scatter the chopped parsley and mint over the top. -
Serve straight from the pan.
Bring the skillet to the table on a trivet and let everyone scoop a thigh, plenty of peas, and a spoonful of pan juices. Offer extra lemon wedges on the side.
Kitchen note: If the skin has softened slightly by the time you’re ready to serve, you can slide the pan under a hot broiler for 1–2 minutes. Watch closely; it can go from crisp to scorched quickly.
What to Expect
This dish gives you chicken thighs with well-rendered, crisp skin sitting in shallow, lemony pan juices. The meat underneath should be moist and easy to pull from the bone without falling apart.
The peas turn tender but not mushy, with a fresh sweetness that plays against the savoriness of the chicken fat, garlic, and broth. Scallions and herbs bring a gentle sharpness rather than intense onion flavor.
Depending on your pan and oven, you might get more or fewer browned bits sticking to the sides. A dark, heavy skillet usually browns more aggressively, which can deepen flavor but may require an extra splash of broth to keep the juices from reducing too far.
Kitchen note: If your oven runs hot, the juices may reduce more quickly and taste saltier. In that case, thin them with a little hot water or unsalted broth before serving and hold back on any extra salt.
Ways to Change It Up
-
Creamy version.
For a richer, sauce-forward meal, stir 60 ml / ¼ cup heavy cream into the pan juices when you add the peas and scallions. Let it simmer in the oven for those last 8–10 minutes.
Expect a slightly thicker, more indulgent sauce that clings to the peas and chicken. -
Herby spring vegetables mix.
Add 100 g / 1 cup thin asparagus pieces or small halved radishes along with the peas if you want more varied spring vegetables. Both will soften in roughly the same time as the peas.
Just make sure the vegetables are cut to a similar size so they cook evenly. -
Lighter, dairy-free take.
Omit the butter and use all olive oil instead. Increase the fresh herbs and add a handful of chopped soft herbs like dill or extra mint at the end to keep the flavors bright.
The result is a lighter, more broth-driven dish with a cleaner finish. -
Spicier skillet.
Swap the red pepper flakes for 1 finely sliced mild fresh chile pepper, added with the scallions and peas. You’ll get a gentle warmth without overwhelming the spring flavors.
Serving and Storage
Serve these chicken thighs and peas as a complete one-pan meal, or stretch the juices by spooning everything over couscous, buttered rice, or small roasted potatoes. Crusty bread is especially useful for soaking up the lemony broth.
For a slightly more composed plate, pair it with a simple side salad dressed with lemon and olive oil so the brightness mirrors the flavors in the pan. A plain yogurt or yogurt-garlic sauce also works well if you want something cooling.
Leftovers keep in an airtight container in the refrigerator for up to 3 days. To reheat, place the chicken and peas in a small skillet with a splash of water or broth, cover, and warm over low heat until the chicken is hot all the way through.
Kitchen note: Reheating under a lid on the stovetop will soften the skin again; if you care about crispness, reheat uncovered in a 190°C / 375°F oven for about 15 minutes, then briefly broil the top.
Cultural Context
Cooking chicken in one pan with seasonal vegetables is common in many culinary traditions, especially where spring peas mark a change from winter storage crops. Green peas have a long history in European cooking, shifting from dried field peas for stews to tender garden peas prized by wealthier households in the early modern period, as discussed in this National Geographic piece on the history of peas.
Modern one-pan chicken and pea dishes echo that history while leaning on convenience and home kitchen practicality. They often sit alongside related spring preparations like mixed vegetable sautés and light stews, which showcase early-season produce in relatively simple formats.
Common Questions and Troubleshooting
My chicken skin didn’t get crisp. What went wrong?
Usually the chicken wasn’t dry enough before it hit the pan, or the heat was too low to render the fat properly. Pat the thighs dry, avoid crowding the pan, and give the skin a full 10–15 minutes undisturbed before flipping.
Can I use boneless, skinless thighs?
Yes, but expect a different result. Brown them in a little oil for 3–4 minutes per side, then reduce the oven time to about 12–15 minutes once they go in the pan with the broth. You’ll miss the crisp skin, but the meat will still be juicy.
Will frozen peas work?
Frozen peas are perfectly fine. Add them straight from the freezer when the recipe calls for peas; they’ll thaw and heat through in the final 8–10 minutes. If your peas are very small, start checking them a couple of minutes early so they don’t lose their bright color.
My pan juices reduced too much and taste salty. How do I fix it?
Stir in 60–120 ml / ¼–½ cup hot water or unsalted broth and let it simmer briefly on the stovetop. Taste again and adjust with a squeeze of lemon rather than more salt.
Can I make this ahead?
You can season the chicken up to 24 hours in advance and keep it uncovered in the refrigerator so the skin dries slightly, which actually helps it crisp. Cook the dish close to serving time; reheated peas lose some of their snap.
Conclusion
This one pan spring chicken thighs with peas recipe is designed to be dependable and adaptable, giving you crisp-skinned chicken, bright vegetables, and enough sauce to spoon over whatever starch you like. Use it as a base and adjust the herbs, citrus, and vegetables to match what looks good at the market.
If you try it, consider leaving a rating and sharing how it worked in your kitchen—especially any tweaks you made for timing, spice, or extra vegetables. Those details help other home cooks make the recipe fit their own weeknight routine.

One Pan Spring Chicken Thighs With Peas
Equipment
- Oven-safe heavy skillet (about 28 cm / 11-inch; cast iron recommended)
- Paper towels
- Cutting board
- Knife
- Wooden spoon
- Instant-read thermometer
Ingredients
- 4 bone-in, skin-on chicken thighs about 700 g / 1½ lb total
- 1 tsp fine sea salt plus more to taste
- 1/2 tsp freshly ground black pepper
- 1 1/2 Tbsp olive oil about 20 ml
- 2 Tbsp unsalted butter about 30 g
- 3 garlic cloves thinly sliced
- 1 medium shallot finely chopped (or use 1/4 small yellow onion)
- 120 ml dry white wine or use chicken broth
- 240 ml low-sodium chicken broth
- 1 lemon zested and then cut into wedges (use both zest and juice)
- 200 g green peas fresh or frozen (no need to thaw if frozen)
- 4 scallions (spring onions) thin; cut into 2.5 cm / 1-inch pieces
- 2 Tbsp fresh parsley chopped (about 8 g)
- 1 Tbsp fresh mint chopped (about 4 g) (or use more parsley if you prefer)
- 1/4 tsp red pepper flakes optional
Instructions
- Prep the chicken and aromatics. Pat the chicken thighs dry thoroughly with paper towels, especially the skin, which helps it crisp instead of steam. Season all over with the salt and pepper. Let the chicken sit at room temperature for about 15 minutes while you mince the shallot, slice the garlic, chop the herbs, and zest the lemon.
- Preheat the oven and choose your pan. Heat the oven to 200°C / 400°F with a rack in the middle. Use a heavy, oven-safe skillet (cast iron works well) that’s about 28 cm / 11 inches wide so the chicken can sit in a single layer without crowding.
- Render and brown the chicken skin. Add the olive oil to the cold skillet, then place the chicken thighs skin-side down in a single layer. Set the pan over medium heat and let the chicken cook undisturbed for 10–12 minutes. You want steady, gentle sizzling; adjust the heat down slightly if the skin is browning too fast.
- Check for color and adjust. After about 10 minutes, peek under one thigh. You’re looking for deep golden, well-rendered skin with some crisp edges. If the skin is still pale, keep cooking another 3–5 minutes. If it’s already very dark, lower the heat.
- Flip the chicken and briefly sear the other side. Once the skin is a deep golden brown, flip each thigh so the skin faces up. Cook the second side for 3–4 minutes to get a little color, then transfer the chicken to a plate. Leave the rendered fat in the pan—that’s your flavor base.
- Soften the shallot and garlic. Reduce the heat to medium-low. Add the butter to the pan and let it melt into the chicken fat. Stir in the chopped shallot with a pinch of salt and cook for 2–3 minutes, scraping up any browned bits from the bottom. Add the sliced garlic and cook just until fragrant, about 30 seconds; it should smell nutty but not browned.
- Deglaze with wine and add broth. Pour in the white wine and use a wooden spoon to scrape up any remaining browned bits stuck to the pan. Let the wine bubble for 1–2 minutes until it reduces slightly. Stir in the chicken broth and lemon zest, and bring the mixture back to a gentle simmer.
- Nestle in the chicken for the oven phase. Return the chicken thighs to the skillet, skin-side up, along with any juices on the plate. The liquid should come about halfway up the sides of the meat; add a splash more broth or water if needed. Spoon a little of the pan liquid over the exposed meat (not the skin) so it doesn’t dry out.
- Roast until nearly done. Transfer the skillet to the oven and roast for 15 minutes. At this point, the chicken should be almost cooked through, but not quite. An instant-read thermometer plunged into the thickest part (without touching bone) should read around 68–70°C / 155–160°F.
- Add peas and scallions. Carefully pull the hot skillet from the oven and scatter the peas and scallions around the chicken into the pan liquid. If using red pepper flakes, sprinkle them over the peas. Stir the vegetables gently into the juices, leaving the chicken skin exposed on top so it can continue to crisp.
- Finish roasting. Return the skillet to the oven and roast for another 8–10 minutes, until the peas are tender and bright green and the chicken reaches 74°C / 165°F. If your peas are very small and tender, start checking at 6–7 minutes so they don’t overcook and wrinkle.
- Adjust seasoning and add lemon and herbs. Remove the pan from the oven and let the chicken rest in the skillet for 5 minutes. Squeeze 1–2 lemon wedges over the pan, then taste the juices. Add more lemon juice or a pinch of salt as needed for a bright, savory flavor. Scatter the chopped parsley and mint over the top.
- Serve straight from the pan. Bring the skillet to the table on a trivet and let everyone scoop a thigh, plenty of peas, and a spoonful of pan juices. Offer extra lemon wedges on the side.
Leave a Reply