
Green bean casserole from scratch isn’t much harder than the canned-soup version, and you can taste the difference right away. You skip the can and make a quick mushroom sauce from butter, garlic, broth, and half-and-half, and the beans stay bright green instead of going olive-drab.
I started making it this way after a Thanksgiving where the canned version sat untouched next to the turkey. Nobody’s ignored it since.
If you’re cooking on a weeknight or fighting for holiday oven space, blanch the beans and make the sauce the day before. Putting it together the next day takes five minutes.
Ingredients
Serves 4 as a side. You’ll need a 10-inch (25 cm) oven-safe skillet. Cast iron is ideal because you build the sauce and bake in the same pan.
The original 1955 “Green Bean Bake” was built entirely on pantry staples, so a homemade sauce is a fun change from where the dish started. Smithsonian has a short piece on Dorcas Reilly, the Campbell’s test-kitchen cook who created it.
For the beans
- 1 tablespoon fine salt, for the blanching water
- 1 lb (450 g) fresh green beans, trimmed and halved. Thin French green beans (haricots verts) work too. They blanch a minute faster.
For the mushroom sauce
- 2 tablespoons (28 g) unsalted butter
- 12 oz (340 g) mushrooms, cut into 1/2-inch (1 cm) pieces. A mix of white, cremini, and shiitake has the most flavor. All cremini is fine. All white button mushrooms work but taste milder.
- 1/2 teaspoon fine salt
- 1/2 teaspoon freshly ground black pepper
- 2 garlic cloves, minced or finely grated
- 2 tablespoons (16 g) all-purpose flour, which thickens the sauce
- 1 cup (240 ml) low-sodium chicken broth. Vegetable broth makes it vegetarian with almost no flavor loss.
- 1 cup (240 ml) half-and-half. Equal parts whole milk and heavy cream gets you the same result. All whole milk works, but the sauce comes out thinner and less rich.
For the topping
- About 1 1/3 cups store-bought crispy fried onions, divided
Step-by-Step Green Bean Casserole From Scratch
-
Prep. Heat the oven to 400°F (200°C). Bring a large pot of water to a boil with the 1 tablespoon of salt. Set a big bowl of ice water next to the stove.
-
Blanch the beans. Drop the beans into the boiling water and cook for 4 to 5 minutes, until they’re bright green and just tender but still have a little snap. Drain, then plunge them into the ice water to stop the cooking. Drain again.
-
Dry them properly. Spread the beans on a clean towel and pat them dry. The first time I tested this I skipped that step and found a pale puddle in the bottom of the skillet. Wet beans water down the sauce.
-
Brown the mushrooms. Melt the butter in the skillet over medium-high heat. Add the mushrooms, 1/2 teaspoon salt, and the pepper. Cook for 6 to 8 minutes, stirring only now and then. They’ll release liquid first. Keep going until that liquid has mostly cooked off and the edges are browned.
Don’t rush the mushrooms. Pale, steamed mushrooms make a flat-tasting sauce. The browning is where most of the flavor comes from.
-
Add garlic and flour. Stir in the garlic and cook for about 1 minute, until fragrant. Sprinkle in the flour and stir for another minute so it coats the mushrooms and loses its raw taste.
-
Build the sauce. Pour in the broth and scrape up any browned bits from the bottom of the pan. Let it bubble for a minute, then stir in the half-and-half. Lower the heat to medium-low and simmer, stirring often, for 5 to 8 minutes, until the sauce coats the back of a spoon. It’ll look slightly loose. That’s fine, because it tightens in the oven.
-
Combine. Taste and add more salt if it needs it. Take the pan off the heat and stir in the beans plus about a third of the fried onions. The onions soften into the sauce and thicken it a little.
-
Bake. Bake for about 15 minutes, until the sauce is bubbling around the edges. Scatter the rest of the onions over the top and bake another 5 to 10 minutes, until they’re deep golden.
Heads up: store-bought fried onions go from golden to burnt quickly, and ovens vary. Start checking at the 5-minute mark.
- Rest. Let it sit for 5 minutes before serving so the sauce settles.
Don’t have an oven-safe skillet? Move everything into an 8×8-inch (20 cm) baking dish after step 7. Bake times stay about the same.
What to Expect
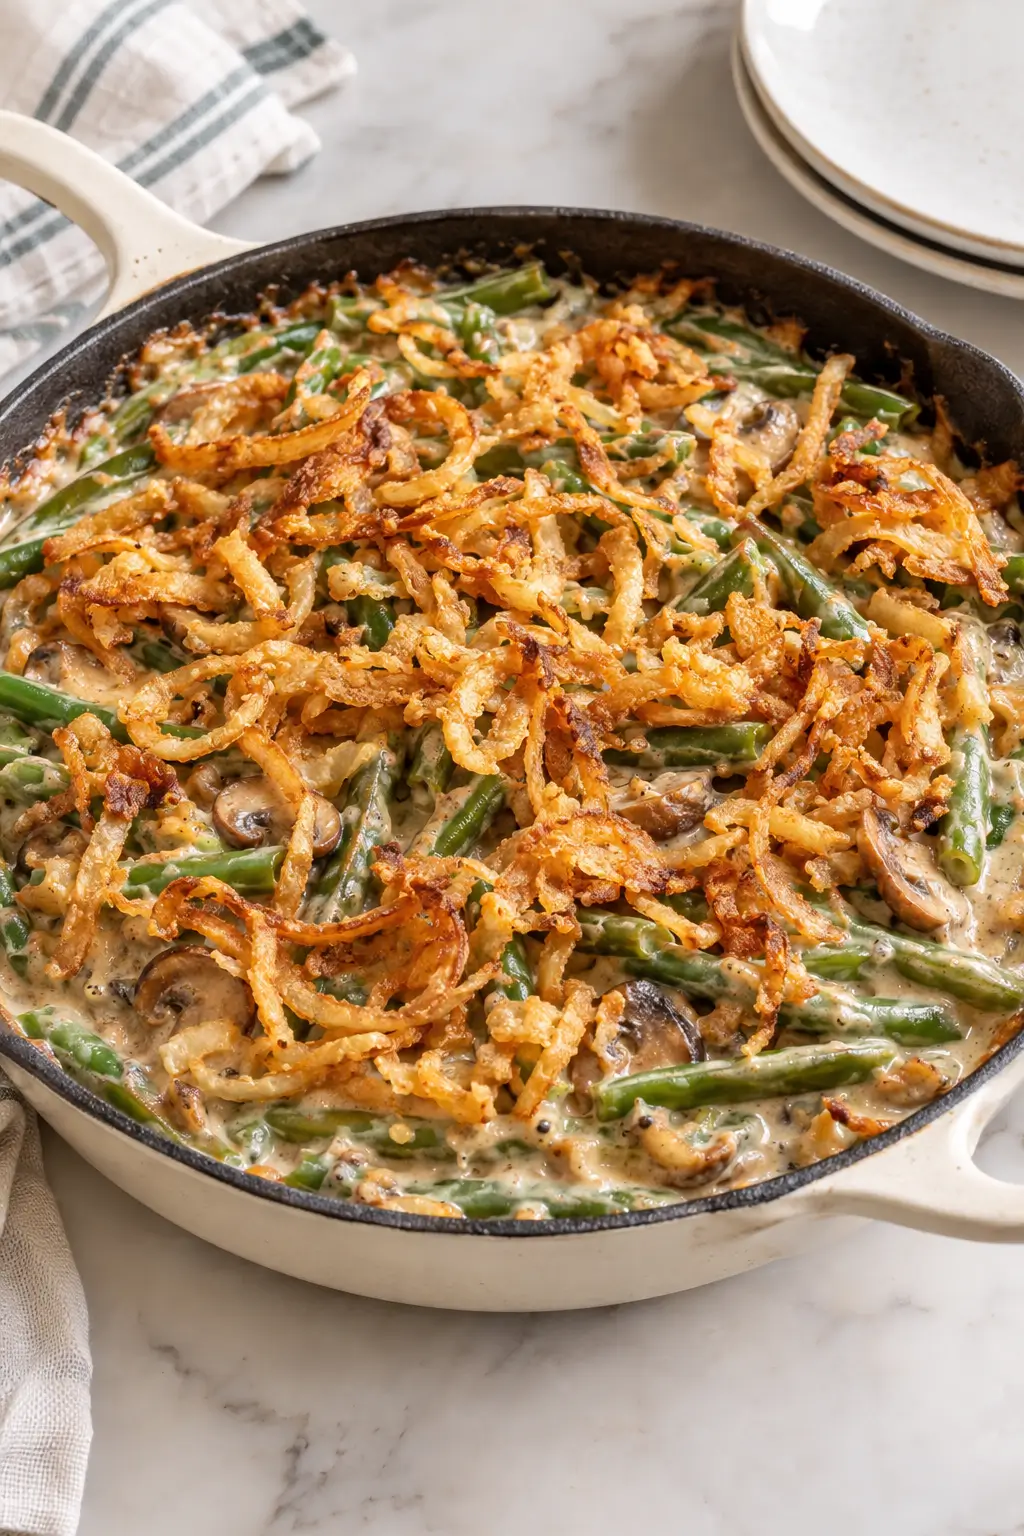
This won’t look like the canned version. The sauce is light tan, flecked with browned mushroom, and the beans keep their green color and some bite. It’s creamy without being gluey, and it tastes mostly of mushroom and garlic, with the crunchy onions adding salt.
Using mostly white mushrooms makes it milder. Shiitakes make it earthier. If you like that mushroom-and-cream combination, my Hungarian mushroom soup with dill and paprika is built on a similar base.
Ways to Change It Up
To make it vegetarian, use vegetable broth. That’s the only change, and you’d have trouble telling the two apart.
Adding a splash of dry white wine gives the sauce a brighter flavor. Some from-scratch versions deglaze the pan with about 1/4 cup (60 ml) right after the mushrooms brown. Let it cook off almost completely before you add the flour.
For a less salty, more homemade topping, fry thinly sliced shallots in a little oil until crisp and golden, drain them on paper towels, and use them instead of the canned onions. It’s more work, and honestly the canned onions are part of why people love this dish. I only make the shallots when I have time to spare.
Serving and Storage
It’s a natural fit next to roast turkey or chicken, and it holds its own beside a weeknight main like spiced apple butter pork tenderloin. For a holiday spread, serve it with classic cranberry sauce with orange zest, maple glazed sweet potato wedges, and a bowl of colcannon mashed potatoes with cabbage. Save room for a make-ahead pumpkin bread pudding with caramel sauce after.
Leftovers keep covered in the fridge for 3 to 4 days. Reheat covered at 350°F (175°C) for 15 to 20 minutes, or microwave single portions. Either way the onions go soft, so add a fresh handful on top before serving.
I don’t recommend freezing it. Cream sauces can turn grainy after thawing, and the beans go mushy.
Common Questions
Can I use frozen green beans?
Yes. Skip the blanching, thaw them fully, and pat them very dry. They’ll end up softer than fresh, but on a busy night that’s a fair trade.
Why did my casserole turn out watery?
Usually it’s one of two things. Either the beans went in damp, or the mushrooms didn’t cook long enough to get rid of their liquid. Undercooking the sauce in step 6 can do it too. Make sure it coats a spoon before you add the beans.
How far ahead can I make it?
Blanch and dry the beans, make the sauce, and refrigerate them separately for up to a day. When it’s time, warm the sauce gently on the stove, stir in the beans and some onions, and bake. It may need about 5 extra minutes because everything starts cold. Keep the topping onions in the bag until the end, or they’ll go limp.
Is this the original recipe, just without the can?
Not quite. The 1955 version was built around condensed soup because the brief called for ingredients most households already had. You can read more about that in the encyclopedia entry on green bean casserole. This version keeps the same idea and swaps in a homemade sauce.
If you only change one thing next time, give the mushrooms more time to brown than feels necessary. That’s what keeps this from tasting like soup from a can. And if you try the shallot topping, tell me whether it was worth the extra pan.
Green Bean Casserole From Scratch, No Canned Soup Needed

Equipment
- 10-inch oven-safe skillet
- Large pot
- Big bowl
- Clean towel
- 8×8-inch baking dish
Ingredients
For the beans
- 1 tablespoon fine salt for the blanching water
- 1 lb fresh green beans trimmed and halved
For the mushroom sauce
- 2 tablespoons unsalted butter
- 12 oz mushrooms cut into 1/2-inch (1 cm) pieces
- 1/2 teaspoon fine salt
- 1/2 teaspoon freshly ground black pepper
- 2 cloves garlic minced or finely grated
- 2 tablespoons all-purpose flour for thickening the sauce
- 1 cup low-sodium chicken broth vegetable broth works for a vegetarian version
- 1 cup half-and-half
For the topping
- 1 1/3 cups store-bought crispy fried onions divided
Instructions
- Heat the oven to 400°F (200°C). Bring a large pot of water to a boil with the 1 tablespoon of salt. Set a big bowl of ice water next to the stove.
- Drop the beans into the boiling water and cook for 4 to 5 minutes, until bright green and just tender but still have a little snap. Drain, plunge them into the ice water to stop the cooking, then drain again.
- Spread the beans on a clean towel and pat them completely dry. Wet beans water down the sauce and leave a pale puddle in the skillet.
- Melt the butter in the skillet over medium-high heat. Add the mushrooms, 1/2 teaspoon salt, and the pepper. Cook for 6 to 8 minutes, stirring only now and then, until the released liquid has mostly cooked off and the edges are browned. Don’t rush this step, because pale, steamed mushrooms make a flat-tasting sauce and the browning is where most of the flavor comes from.
- Stir in the garlic and cook for about 1 minute, until fragrant. Sprinkle in the flour and stir for another minute so it coats the mushrooms and loses its raw taste.
- Pour in the broth and scrape up any browned bits from the bottom of the pan. Let it bubble for a minute, then stir in the half-and-half. Lower the heat to medium-low and simmer, stirring often, for 5 to 8 minutes, until the sauce coats the back of a spoon. It will look slightly loose, which is fine because it tightens in the oven.
- Taste and add more salt if needed. Take the pan off the heat and stir in the beans plus about a third of the fried onions. The onions soften into the sauce and thicken it a little.
- Bake for about 15 minutes, until the sauce is bubbling around the edges. Scatter the rest of the onions over the top and bake another 5 to 10 minutes, until deep golden. Store-bought fried onions burn quickly and ovens vary, so start checking at the 5-minute mark.
- Let it sit for 5 minutes before serving so the sauce settles. No oven-safe skillet? Move everything into an 8×8-inch (20 cm) baking dish after step 7, and bake for about the same time.



Leave a Reply